
Melt Buttery Spread & Apple Bread

A while ago, I was contacted about trying out and reviewing a new butter alternative spread called Melt Buttery Spread. I don’t usually do reviews, but this new spread caught my interest. It was free of the nasty stuff you usually see in fake butter spreads, and was made from a gluten free blend of non-hydrogenated healthy fats:
- organic virgin coconut oil
- organic flaxseed oil
- organic palm fruit oil
- organic canola oil
- organic high-oleic sunflower oil
The company describes their spread as: “Rich & Creamy Melt® Organic, a butter alternative that is truly delicious. Melt® Organic is the perfect organic blend of the healthiest fats that supports healthy weight when replacing other fats in your daily diet. Each serving of Melt® Organic delivers an ideal combination of healthful saturated, polyunsaturated, and monounsaturated fats for optimal nutrient content and absorption, weight management, thyroid function, heart health, and digestive health. Melt® Organic is certified organic and kosher, and is soy free, Trans fat free, and gluten free. Our products do not contain coloring agents or artificial ingredients of any kind and they never will. Our ingredients are Eco-social, fair trade, and non-GMO.”
I quickly received my sample and couldn’t wait to try it out. Upon opening the container, I was pleasantly surprised at the smooth, creamy consistency, and the mild coconut aroma. My first concern was it’s taste, I knew if it was too coconutty (is that word?) it wouldn’t fly in our house. But the taste was great. It did have a mild coconut flavor, but nothing that was over powering.

Since first trying the spread, I’ve buttered my toast with it, melted it in mac & cheese, sautéed vegetables with it, and the final test – I baked with it. I decided to use it melted, as a substitute for vegetable oil in an apple bread recipe. The result was fantastic. I couldn’t tell any difference, and I felt good knowing that the fat was all healthy.
Now I just wish I could say the fat on my body was all healthy.
Disclaimer: I was not compensated in any way for doing this review, other than the product I received from sampling purposes.
Apple Bread
Printable Recipe
- 3/4 cup brown sugar
- 1/4 cup melted Melt buttery spread (or vegetable oil)
- zest of one lemon
- 1 cup whole what pastry flour (or all-purpose flour)
- 1/2 tsp baking soda
- Pinch of salt
- 3/4 cup buttermilk
- 1-1/2 cups chopped apples
- 1 tsp pure vanilla extract
- 1/4 cup chopped pecans (or walnuts)
- 1/4 cup flour
- 2 tbsp butter (or Melt spread)
- 1/4 tsp ground cinnamon
- 2 tbsp brown sugar

Three Cheese Balsamic Pancetta Mac & Cheese

There are certain simple pleasures in life that make me feel good. Like walking hand in hand with my son, the feel of his trusting grip against my fingers, and the methodical thud, thud, thud of his 4 year old gait, as his too-big rain boots scrape against the pavement.
This was a moment that captured me today, as we made a quick trip to the store to get the ingredients for this dish. Dark skies and rainy weather are the perfect combination to enjoy another simple pleasure – comfort food. Macaroni and cheese to be exact.
The Wisconsin Milk Marketing Board hosts a Macaroni & Cheese Blog called 30 Days 30 Ways with Macaroni & Cheese, and this year I contributed a recipe for their new project. Every three weeks, they post a new mac & cheese recipe from a featured food blogger on their site. There were several themes to choose from, and I decided to go with the Decadent Holiday Recipe.
My mind came up with way too many possibilities, and I had a hard time narrowing it down to one concept. I also tried to keep it simple, yet still delicious. I decided on a three cheese recipe that incorporates Gouda and Fontina cheese, with a crispy balsamic glazed pancetta topping – and a sprinkling of smoked Gouda for good measure.
While this may not be the fanciest mac and cheese you’ve tried, it definitely qualifies as a delicious decadent holiday dish for me! To see my featured recipe, head on over to 30 Days 30 Ways with Macaroni & Cheese, and you'll see many more delicious recipes too.

Three Cheese Balsamic Pancetta Mac & Cheese
Serves 6-8 Printable Recipe
Ingredients:
2 packages of thinly sliced pancetta ( 3 ounces each)
2 tablespoons balsamic vinegar, separated
4 tablespoons butter
4 tablespoons flour
2 teaspoons fresh rosemary, minced
2 1/2 cups whole milk, warmed
1/2 cup half and half, warmed
6 ounces gouda cheese, shredded
4 ounces fontina cheese, shredded
2 ounces smoked gouda cheese, shredded
10 ounces cavatappi (corkscrew) pasta
salt and fresh cracked pepper, to taste
Directions:
Preheat oven to 400 degrees Fahrenheit. Place a large pot of water over high heat and cover. Roll up the pancetta slices and slice into strips with a sharp knife. In a large pan over medium heat, cook the pancetta strips until just starting to crisp, about 3-4 minutes, drizzle 1 tablespoon of the balsamic vinegar over the pancetta and stir. Allow the cooked pancetta to drain on a paper towel and set aside.


In a medium sized saucepan over medium heat, melt the butter. When the butter has melted, whisk in the 4 tablespoons of flour. Continue to cook and whisk the flour for about 30 seconds. Add the rosemary and continue to cook for another 30 seconds. Slowly pour in the warmed milk and half and half, continue to whisk continuously so that there are no lumps. Allow the sauce to come to a simmer, stirring constantly.
While waiting for the sauce to simmer, liberally salt the pot of boiling water. Add the pasta to the water and cook for about a minute less than package directions.
When the sauce has come to a simmer, stir in the 6 ounces of gouda, and the fontina cheese until melted and the sauce is smooth. Remove from heat and stir in about 1 tablespoon of balsamic vinegar, or more if you want a more pronounced flavor. Season with salt and pepper to taste. Drain the cooked pasta and stir into the cheese sauce until combined.
Pour the macaroni mixture into a baking dish, and sprinkle with half of the smoked gouda. Top with the cooked pancetta and then the remaining smoked gouda.


Bake for 15 to 20 minutes, or until the topping is crisp and the cheese is bubbly. If the pancetta starts to get too dark, cover with a piece of aluminum foil. Serve hot.

Enjoy!
Amber
Ozark Apple Pudding– Tasty Kitchen Blog Post

I’m so excited to be able to contribute another recipe post to the Tasty Kitchen Blog. I’m sure most of you are already familiar with Tasty Kitchen, a great place to find delicious recipes within a wonderful community.
You can browse and submit recipes on their main website, and on their blog they feature different recipes each week.
When I came across a recipe for Ozark Apple Pudding, it immediately caught my eye – since I live in the Ozarks! I’ve never heard of this dessert (shame on me), but it is so good I will be making this again. It is a rustic, hearty cake that is similar to an apple bread pudding – but better!
You can find the recipe and my complete Tasty Kitchen guest post here.
Enjoy!
Amber

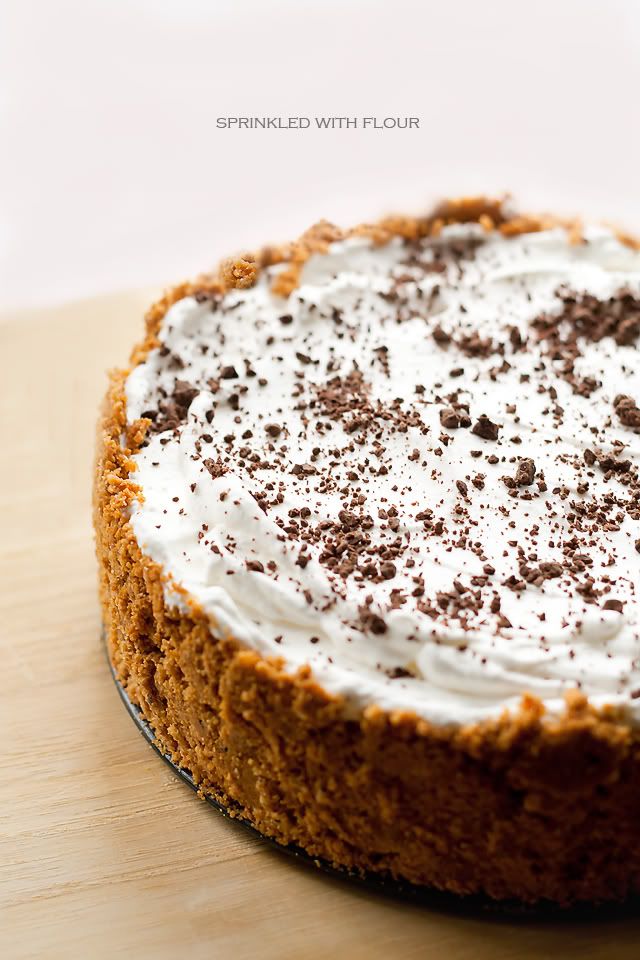
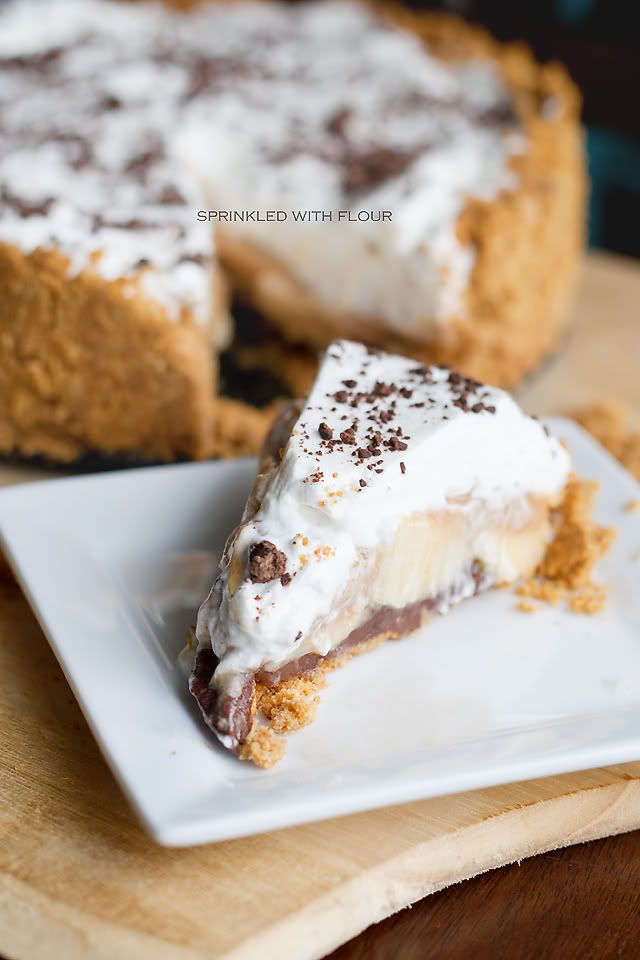
Banoffee Surprise Pie
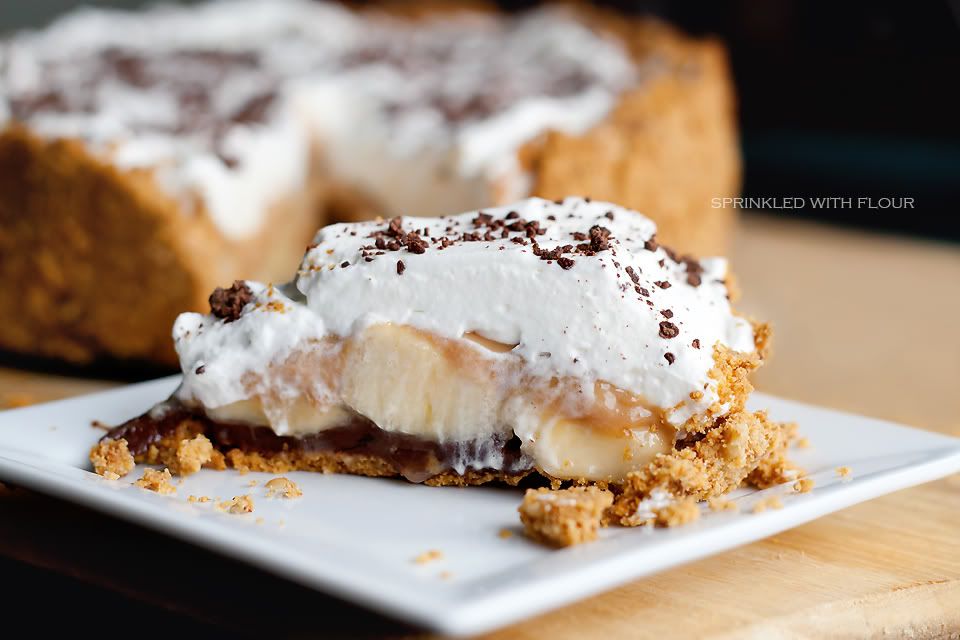
I’m sorry it’s been so long since my last post! I’ve been putting a lot of time into developing my photography skills, and as a results I’ve been focusing more on portrait photography lately. But never fear, I won’t be leaving my foodie friends in the dust. Here is a peace offering to get those saliva glands working, this is a truly delicious dessert that is currently sitting in my fridge, making it impossibly hard for me to stick to my diet.
I love Banoffee pie (banana + toffee for those wondering at the strange word), and when I had some bananas reaching the point of no return, I decided to make this dessert that I haven’t had since I left Wales. I wanted to switch it up a bit, so I added a layer of peanut butter chocolate over a toasted walnut-graham crust. Layered with the typical sliced bananas, gooey toffee flavor filling and fresh whipped cream, this really made my day!
Banoffee Surprise Pie
Printable Recipe
Filling:
- 2 (14oz) cans sweetened condensed milk
- 4 ripe bananas
- juice of 1/2 lemon
- 1 tsp vanilla extract
- 1 cup heavy cream, whipped
- 6oz semi sweet chocolate chips
- 2 tbsp butter
- 1/4 cup peanut butter
- 4-5 tablespoons butter, melted
- 6oz graham crackers, crushed into crumbs
- 2/3 cup toasted walnuts, ground
Place the unopened cans of milk in a large pan and add enough water to cover them. Bring to a boil, then reduce heat and let simmer for 2 hours, topping the water level to keep the cans covered. Carefully lift the hot cans from the pan and let cool.
Preheat oven to 350F. Grease a 9-inch tart pan or spring-form pan with butter. Place the remaining butter in a bowl and add the crushed graham crackers and ground nuts. Mix together well, then press the mixture evenly into the base and up the sides of the pan. Bake for 10-12 minutes, then remove from oven and let cool.
Peel and slice the bananas and place in a bowl. Squeeze the lemon juice over the bananas, add the vanilla extract and mix together. Place the chocolate chips, 2 tablespoons butter, and the peanut butter in a microwaveable bowl. Microwave on low until the mixture is melted, stirring frequently.
Gently spread the chocolate mixture over the base of the cooled crust (you won’t need all of it), and place in the freezer for a few minutes until the chocolate has hardened. Now spread the banana mixture over the chocolate layer in the pan, then spoon the contents of the cooled cans of condensed milk over the bananas. You may not need to use all of the condensed milk. Top with a layer of whipped cream. You can garnish the top with grated chocolate, chopped nuts, or whatever your heart desires! Eat and enjoy.
Amber
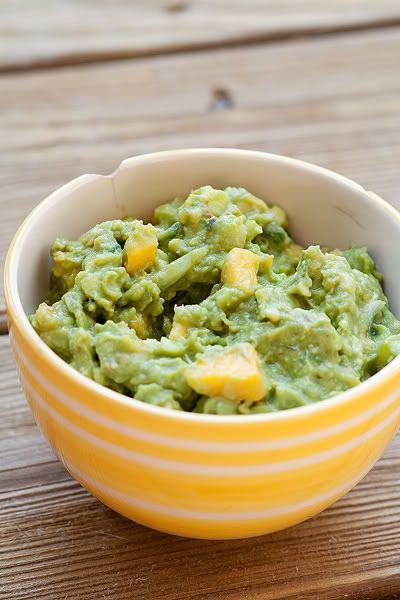
Fruity Guacamole
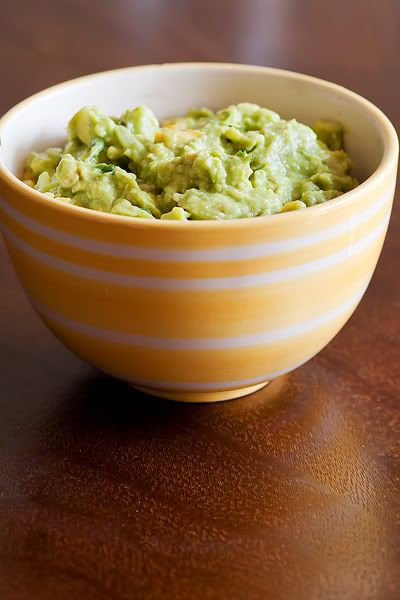
I love Guacamole, and yet, it’s something that I rarely make at home. I don’t know why. It’s full of heart healthy fat and tastes so good, that I always wonder why I don’t make it more often.
This guacamole isn’t your typical run-of-the-mill guac. It’s packed with vitamin rich fruit!
Yep. You heard me. Fruit.
Now hold on there a minute, before you start screeching the brakes, it really is worth a try.
Sweet mangos, juicy peaches, tart granny smith apples, and fresh basil turn this guacamole into something truly special.
I added a little cilantro too, for the traditional zippiness (is that a word?).
Serve with tortillas chips, or if you’re trying to be a little more conscious of your waistline, scoop it up with fresh celery spears or sweet pepper strips.
Fruity Guacamole
- 2 avocados
- juice of one lime
- 1/4 yellow onion, diced
- 1 mango, peeled and diced
- 1/2 yellow peach, peeled and diced
- 1/2 Granny Smith apple, peeled and diced
- 1/4 habanero pepper, seeds removed, minced (optional)
- 1 tablespoon fresh chopped basil
- 2 tablespoons fresh chopped cilantro
- salt & pepper to taste
1. Cut each avocado in half, remove the pit, and slice the flesh into small cubes. Scoop the cubes into a medium bowl, and mash with a fork until chunky.
2. Stir in the lime juice, diced onion, mango, peaches, apple, habanero pepper (if using), basil, and cilantro. Season with salt and pepper to taste. Enjoy!
(adapted from Shape, September 2011)
Lemon Basil Chicken Salad

I’ve been on a sugar cleanse lately, trying to cut back on the baked goodies for a while. So the recipe today is a savory dish that will be sure to please anybody. I’ve had some fresh herbs growing on my windowsill for a while now, and I’ve been so proud of myself for not killing them – yet.
If you don’t know by now, I was not blessed with a green thumb, and most of my potted endeavors end in failure.
However, my dainty green herbs are still going strong, so I wanted to incorporate them into something. I had a bright idea – or what I thought was one – until I discovered it had already been done. Lemon Basil Chicken salad. A quick Google search led me to numerous recipes, and I decided to try one from Paula Deen. I adapted the original recipe a tad to suit my tastes, by adding chopped apple and substituting walnuts for the almonds. The key here is definitely using fresh basil, which adds a lot of flavor. You could even use plain yogurt in place of the sour cream and mayo if you wanted to.
Lemon Basil Chicken Salad

(adapted from Paula Deen)
Ingredients
- 4 cups diced cooked chicken
- 1 rib minced celery
- 1 cup chopped apple (I used gala)
- 1/4 cup chopped fresh basil leaves
- 1/4 cup slivered almonds (or walnuts)
- 1/2 cup sour cream (I used light sc)
- 1/2 cup mayonnaise (I used olive oil mayo)
- 1 1/2 teaspoons fresh lemon juice
- 1/2 teaspoon salt
- 1/4 teaspoon ground black pepper
Directions
In a medium bowl, combine the chicken, celery, apple, basil and nuts. In a small bowl, combine sour cream, mayonnaise, lemon juice, salt, and pepper. Add to chicken mixture, tossing gently to coat. Cover and chill. Serve on a bed of baby spinach for a light salad, or spread on some delicious homemade bread for a yummy sandwich.Enjoy!
Amber
Featured Foodie Interview with Foodsherpa

I've found a great new website for you all to enjoy. Foodsherpa. What is Foodsherpa you say? Well, let me have them tell you, "Experience an exciting new tasty food item every day through Foodsherpa. We scour food markets, artisan shops, local farms and more across the country and feature one amazing food item daily. You can check it out on our website or receive a daily email and even buy it to enjoy at amongst friends or on your own."
They have such a unique selection of fresh, artisan made foods, it makes my mouth water just thinking about it. How does Cinnamon Pear Maple Syrup sound, or Strawberry Lavendar Jam?
Sounds like pure heaven to me :)
They also have a featured foodie section, and I was so honored when they asked to feature my blog.
You can check out my interview, and browse through some incredible foods on foodsherpa.com
Enjoy!
Amber
Cherry Limeade Streusel Cake

I love cherries, especially fresh ones. Last year I bought some beautiful rainier cherries because they were so pretty with their pale yellow skin with a hint of blush. The dessert I use them for was a brainstorm that turned out so well, I decided to make it again this year. Since it’s the season for these yummy cherries, I picked some up at the store to remake the treat I used them for last time. Cherry Limeade Streusel Cake.
I love making this cake in a skillet, with lime soaked cherries and topped with a buttery streusel and zesty lime glaze…it’s sooo good. I had a few kinks to work out from the last time I made it. The cherries sunk to the bottom, so this time I coated them with a little flour and that seemed to do the trick. The cake is cooling as I’m writing this, and I’m pretty sure it’s time to glaze it….so I’m off to indulge in some deliciousness!

Cherry-Limeade Streusel Cake

Cake:
4 Tbsp butter, unsalted and room temperature, plus more for skillet
1 cup all-purpose flour, plus more for skillet
1/2 tsp baking powder
1/4 tsp baking soda
1/4 tsp salt
3/4 cup sugar
1 large egg
1/2 cup buttermilk
1 pound fresh cherries, halved and pitted
2 limes, zested and juiced
Streusel Topping:
1/2 cup all-purpose flour
1/4 cup butter, chilled and cut into pieces
1/4 cup sugar
1/4 tsp salt
Lime Glaze:
6-7 Tbsp powdered sugar
reserved lime juice from cake + 1 tsp lime zest
3 drops of almond extract
For the streusel topping: Place the flour in a small bowl and add the butter. Using a fork, cut the butter into the flour until the mixture resembles coarse crumbs. Add the sugar and salt, mixing it in with a fork. Set aside.
For the cake: Preheat oven to 375F. Cut the cherries in half and remove the pits, then quarter the halves. Place the cherries in a small bowl, and pour the juice of two limes over them, tossing lightly to coat. Set aside. Butter an 8-inch ovenproof skillet (or an 8-inch cake pan), and dust with flour, tapping out the excess. In a medium bowl, combine the flour, baking powder, baking soda, and salt. Using a mixer on medium speed, beat the butter and sugar until pale and fluffy. Beat in the egg. Gradually add the flour mixture, alternating with the buttermilk. Remove the cherries from the lime juice, and pour about 2 tablespoons of lime juice into the batter (save the rest for the glaze). Add the zest from the limes you juiced for the cherries. Stir just until combined. Sprinkle 1-2 tablespoons of flour over the cherries, and lightly toss. It’s o.k if the cherries get a little gummy, they will sill have some residual lime juice on them.
Pour the batter into the prepared skillet, and smooth the top with a spatula. Scatter the cherry halves on top of the batter, the sprinkle the streusel topping over the cherries. Bake for 35 minutes, or until cake is golden brown and a toothpick inserted into the center comes out clean. Remove pan from the oven and let cool for at least 30 minutes, up to an hour. In the meantime, combine the powdered sugar, lime juice, zest, and about 3 drops of almond extract. Set aside.
Once the cake has cooled, place a plate upside down, over the top of the skillet. Holding the bottom of the plate, quickly turn the skillet over so that the cake is streusel side down on the plate. Place your serving platter upside down over the cake, and flip again, so the cake is now streusel side up. Drizzle the lime glaze over the top of the cake. If desired, garnish with fresh cherries and a lime slice.

Enjoy!
Amber
7 Layer Chocolate Fudge Cake

Here’s another recipe that I tried out for the Clickin Moms scavenger hunt I participated in. The hunt is now over, and while I had a ton of fun with it…I’m exhausted! I loved how it made me push myself and step outside of my comfort zone.
During this scavenger hunt I:
Found a Delorean, met with a magician, visited a cave, took my son to his first fair, talked a complete stranger into letting me take her picture during her pedicure, cajoled an unknown tattooed man into sitting on a pink bike for me, and walked into a gym and asked a random man to bench press 200lbs for me! This is just naming a few of the bizarre things I’ve done this month
This cake was not as difficult as I thought it would be, and was quite good. I think I would bake the cake layers for a little less time next time though, and double the icing recipe. More icing = more deliciousness…right?
Seven Layer Chocolate Fudge Cake

(adapted from 100 Café Street)
Cake Layers:
3 eggs, beaten
1 tsp. Baking soda
¼ c. apple sauce
2 c. self-rising flour
1 ½ c. granulated sugar
1 tsp. Pure vanilla extract
1 c. buttermilk
Directions:
1. Combine flour and baking soda.
2 Add eggs, apple sauce, sugar, vanilla and buttermilk.
3. Mix until well blended, but do not over mix.
4. Pour ¾ c. batter into 6 or 7, 9” round cake pans (depending on how much batter you have and how well you scrape the bowl) and use anodized aluminum, so as not to burn the edges.
5. Bake at 350 degrees for 15-18 minutes.
6. Cool on wire racks while making fudge frosting.
Fudge Frosting:
2 cups granulated sugar
1/3 c. cocoa
1 tsp. Pure vanilla extract
½ c. margarine
7 oz. Evaporated milk
Directions:
1. Melt butter in sauce pan over medium heat without boiling.
2. Add sugar, cocoa, vanilla and evaporated milk.
3. Stir well and bring to a boil.
4. As soon as it comes to a boil, time for five minutes (ONLY five minutes) and then immediately remove from heat.
5. Ice your cake layers immediately or the frosting will harden into fudge, rendering it impossible to spread. 6. Serve warm, if possible, and you have the most decadent, Southern tradition that will melt in your mouth and be remembered for generations to come!
Note: The recipe shows the original amounts, I would suggest double the icing to be able to have enough to frost the layers and the outside. I used disposable cake pans, which made removing the cake from the pans easier. I very gently turned the pans inside out, and slide a knife under the cake to lift the cake off of the pan. I tried greasing and flouring one pan, but that method still let the cake stick.
Enjoy!
Amber
Raspberry White Chocolate Kolache

When I first heard of Kolache I thought, “Say whatey?” A few weeks ago I had never even heard of this yummy treat, but since joining the fun of the Clickin Moms 3rd Annual Scavenger Hunt, I’ve been introduced to a new favorite. Also spelled Kolacky, this Czech treat is a type of pastry that holds a dollop of fruit rimmed by a puffy pillow of supple dough.
I’ve been slowly but surely making my way through the scavenger hunt list, and I thought that this item was a perfect way to kill two birds with one stone. My poor blog has been a bit neglected of late, I’ve been entrenched in the scavenger hunt you know – and my family is starting to think I’m a tad crazy with the lengths I will go to cross something off my list .
So while making these pastries did cross an item off my list, it also allowed me to share this deliciousness with you too. These were definitely VERY tasty. I filled mine with raspberry jam and white chocolate chips, but there are so many other possibilities too. PB&J and lemon curd are two that come to mind…hmmm…I may have to try that next. Well, I’m off – I’ve got a list to get through before the 31st. Wish me luck!
Raspberry White Chocolate Kolache
(adapted from Allrecipes)
- 3 ounces cream cheese
- 1/2 cup butter, softened
- 1 cup all-purpose flour
- 1/2 cup any flavor fruit jam
- 1/3 cup confectioners' sugar for decoration
- Mix cream cheese and butter until smooth. Add flour slowly until well blended. Shape into a ball and chill overnight or for several hours.
- Preheat oven to 350 degrees F (180 degrees C). Roll dough out 1/8 inch thick on a floured pastry board. Cut into 2 1/2 inch squares and place 1/2 tsp (approx) of jam or preserves. Overlap opposite corners and pinch together. Place on ungreased cookie sheets.
- Bake for 10 to 12 minutes in the preheated oven. Cool. Sprinkle lightly with confectioner's sugar.


Enjoy!
Amber
Top 10 & A Bloggiversary

Today is officially my 1 year Bloggiversary. One year ago today, and I wouldn’t have known what that term even meant. I have learned so much and gained so many new friends since starting this adventure, and I am truly grateful for all of the wonderful people I have come in contact with through my blog.
When I originally started Sprinkled With Flour, it was more of my own way to journal family recipes, new recipes, and improve on my culinary skills. In the midst of that journey, I came across a new passion – photography.
I started out knowing next to nothing about the photography world, and using a little point and shoot for my photos. When my husband bought me my first DSLR last fall, I didn’t know my aperture from my shutter speed, let alone ISO, WB, and the myriad of other photog terms. I started out just shooting the food for my blog, but recently I’ve delved into other areas (namely people) and have found “What I want to be when I grow up.”:) I have come a long way from where I started, but I still have a long way to go. If you’re interested, you can catch up on my photography exploits on my second blog – Sprinkled With Flour Photography.
For my bloggiverasy post, I am ending the month long series I started in June – Celebrate 30. For those that missed it, I turned 30 this month, and my one year bloggiversary fell on the 30th, so it only seemed natural that I should highlight 30 of my most popular recipes from the last year. The grand finale is my Top 10 list; these recipes are the 10 most visited and searched for posts on my blog. So, without further ado…I give you the Top 10. Enjoy!
Amber
Here’s the first 4 from the above collage:5. Cinnamon Rolls
6. New York Style Coffee Cake
7. Cinnamon Bark Cookies
8. Peanut Butter Cup Ice Cream Pie

And finally the last two:
9. Smore’s Cookies
10. Banana Split Cake Cups

Desserts & More: Celebrate 30

Well, as of yesterday I am officially 30. No nervous break down yet. I’m still in possession of all my teeth and original hair color, and so far I’ve been mercifully avoided by the Wrinkle Fairy. Now the Saddlebag Witch and the Belly Pooch Pirate showed up long ago, and I’ve been battling them at the gym for the past month. We’ll see who wins :)
When I undertook my plan to post 30 recipes this month, I didn’t realize how the time would creep along - kind of like the last 30 years. So this post had to be packed with a few extra recipes to keep me on schedule for my final top 10. Hope you enjoy!
Amber
________________________________________________

A Little Savory–Celebrate 30 Series
Whew! It’s been busy around here, and my Celebrate 30 posts have been neglected. Never fear…I’ve compiled another selection of a few of my favorite dishes from the past year. You may notice an absence of sugar…which is a little out of the norm for me!
I thought it would be a nice change to showcase some of my favorite savory dishes, just to prove that I don’t ALWAYS make sweets.
This post will be short and sweet (no pun intended), as my to-do list today is off the charts. The countdown to my 30th birthday is getting shorter – as are my nerves – and I’m working on a Top 10 finale.
Roasted Butternut Squash with Apples – This is the perfect side dish during those cooler months. I love the sweetness of the apple paired with the buttery squash.
Plum Pizza with Caramelized Onions & Crispy Bacon – This was an experiment in pizza toppings that I totally loved. This has made a repeat appearance many times at my house.
Just Peachy Glazed Pork Chops – I was skeptical about this dish, but the peach glaze is perfect to brush on grilled meat.
Homemade Flour Tortillas – The BEST tortillas ever. Nuff said.

I thought it would be a nice change to showcase some of my favorite savory dishes, just to prove that I don’t ALWAYS make sweets.
This post will be short and sweet (no pun intended), as my to-do list today is off the charts. The countdown to my 30th birthday is getting shorter – as are my nerves – and I’m working on a Top 10 finale.
Enjoy!
Amber
Plum Pizza with Caramelized Onions & Crispy Bacon – This was an experiment in pizza toppings that I totally loved. This has made a repeat appearance many times at my house.
Just Peachy Glazed Pork Chops – I was skeptical about this dish, but the peach glaze is perfect to brush on grilled meat.
Homemade Flour Tortillas – The BEST tortillas ever. Nuff said.

Sugar Cream Pie: A Tasty Kitchen Guest Post

I’m super excited about my post today. I was so honored to be asked to contribute a guest post on Pioneer Woman’s Tasty Kitchen. I have to say, this really made my day, and I’ve been so excited to share with you all the wonderful recipe I chose to make for the post.
If you are not familiar with Tasty Kitchen (but I’m sure you are), you really need to head over and browse the collection of delicious recipes and wonderful posts. I stumbled across this delicious looking recipe for Sugar Cream Pie, and since it is the Indiana State Pie – and my family is from Indiana – it seemed like the perfect match. So head on over to the Tasty Kitchen Blog today, and check out this great recipe and my guest post.

Enjoy!
Amber
Fruity Desserts: Celebrate 30 Part 3
I hope you’re enjoying your weekend, and that these next three recipes will help bring on the drool factor. I present Part 3 of my month-long Celebrate 30 theme. If you missed the first two posts, I encourage you to check them out.
The next three recipes were creations of my own, and turned out super tasty.
Raspberry White Chocolate Truffle Tart – A tart filled with a layer of white chocolate truffle and spiced raspberry curd.
Cherry Crunch Coffee Cake – My first attempt at a homemade pastry, the braiding effect was so much fun.
Caramel Chocolate Dipped Sugar Pears – Yummy and perfect for a fall treat.
Enjoy!
Amber


Cookies And Pie - Oh My: A Recipe Recap Part 2
In case you missed my last post, the end of this month marks my 30th birthday, and my 1 year Bloggiversary which is on the 30th. To celebrate, I am featuring 30 of my most popular/favorite recipes from the last year, along with a few new ones. To save time, I’ll be grouping a few together in one post, with a Top 10 featured on my actual Bloggiversary. 
These next three recipes are dear to my heart and are a few of my earliest posts. The Cinnamon Chai Cream Pie was a Looks Delicious featured recipe on the Tasty Kitchen Blog. Malted Milk Ball Chewies was my first recipe that was featured in the Foodbuzz Top 9, at number 1 too! And Turtle Cookie Bars was my first photo accepted by Foodgawker. Stay tuned for the next installment for this month-long celebration!


These next three recipes are dear to my heart and are a few of my earliest posts. The Cinnamon Chai Cream Pie was a Looks Delicious featured recipe on the Tasty Kitchen Blog. Malted Milk Ball Chewies was my first recipe that was featured in the Foodbuzz Top 9, at number 1 too! And Turtle Cookie Bars was my first photo accepted by Foodgawker. Stay tuned for the next installment for this month-long celebration!
Enjoy!
Amber


Subscribe to:
Posts (Atom)


