Showing posts with label Blogging Tips. Show all posts
Showing posts with label Blogging Tips. Show all posts
Browned Butter Pecan Shortbead: Before & After

I love makeovers don't you? I bet you never thought a photograph could get a makeover, but that's exactly what I'm going to show you today. Back when I first started this blog, it was purely as a way to chronicle recipes that I wanted to try, and to have something that showed my progress along the way.
I never imagined it would re-spark a love for photography that I'd always had but never did anything about. As I look back on my first few recipes, I cringe at those photos but I know that every journey had to start somewhere.
I just wish at the beginning of that journey I knew what the heck white balance was. Seriously, food is not supposed to be blue my friends...unless you happen to be eating a blueberry, or these Blue Velvet Cupcakes, or blue cotton candy...you get the idea.
I purposely kept those ugly images up because I wanted a reminder of where I started at. I've decided to go ahead and update my old photos with new ones, but instead of the old picture being dumped (rightly so) into the recycle bin, I'm going to turn it into a Before & After post. If you're just starting out in the food blogging world, and get discouraged looking at other bloggers food photos, maybe these posts will help you see that everyone started somewhere.
Even if somewhere was ugly blue food. :)
Here's the before shot of my Browned Butter Pecan Shortbread.

O.K. here's where I'm going to completely trash my own photo. Don't worry - I'm a pro - I've gotten enough rejection emails from Foodgawker over the years that I can handle it.
1. THIS COOKIE IS BLUE
Obviously. Food is not supposed to be blue. Unless it's the aforementioned blueberries...or cotton candy. If you don't already know about white balance, find your camera's user manual and learn how to set a proper white balance in camera. This does not mean Auto White Balance. To get the most accurate white balance, you should set a custom white balance using a grey card, or if your camera has the option you can set the Kelvin number to somewhere between 5500K and 6500K. This range should cover most daylight lighting situations. Here's a great Kelvin Chart to help you out. If you don't want to mess with setting your white balance in camera, you can also adjust it in your editing program. Most editing software has the option to adjust the WB to a more natural color.
Obviously. Food is not supposed to be blue. Unless it's the aforementioned blueberries...or cotton candy. If you don't already know about white balance, find your camera's user manual and learn how to set a proper white balance in camera. This does not mean Auto White Balance. To get the most accurate white balance, you should set a custom white balance using a grey card, or if your camera has the option you can set the Kelvin number to somewhere between 5500K and 6500K. This range should cover most daylight lighting situations. Here's a great Kelvin Chart to help you out. If you don't want to mess with setting your white balance in camera, you can also adjust it in your editing program. Most editing software has the option to adjust the WB to a more natural color.
2. CAN YOU SAY "BACK UP?"
Seriously, getting in close for a detail shot is alright but when you start to loose the ability to tell what's in the picture, you're too close. The same goes for cropping your pictures, leave a little room to breahe...trust me...your food will thank you. :)
Seriously, getting in close for a detail shot is alright but when you start to loose the ability to tell what's in the picture, you're too close. The same goes for cropping your pictures, leave a little room to breahe...trust me...your food will thank you. :)
3. TOO DARK
This image is underexposed AND overexposed, making the left side of the image too dark and the right side too bright. This easily happens when shooting a side lit image (when you're light source is coming from the side of your subject.) To fix this, you need use something to reflect some light back onto the shadowed side of the image. I like to use a white foam board or reflector to open up shadows. To prevent overexposed areas, you can either move the plate further away from the light - so it's less harsh, or use something to diffuse the light (make the light softer and not so harsh). I have sheer white curtains hanging from my kitchen patio door. These work great for diffusing the light when it's too harsh.
This image is underexposed AND overexposed, making the left side of the image too dark and the right side too bright. This easily happens when shooting a side lit image (when you're light source is coming from the side of your subject.) To fix this, you need use something to reflect some light back onto the shadowed side of the image. I like to use a white foam board or reflector to open up shadows. To prevent overexposed areas, you can either move the plate further away from the light - so it's less harsh, or use something to diffuse the light (make the light softer and not so harsh). I have sheer white curtains hanging from my kitchen patio door. These work great for diffusing the light when it's too harsh.
4. BAD COMPOSITION
The crop is part of the bad composition, but a little planning and food styling/arrangement does wonders. This subject is too broad to cover now, but when you're looking through your viewfinder really look at the image before you snap the shutter. Is your picture crooked? Is there enough room to crop if needed? I'm still guilty of not paying close enough attention to the composition before I snap the shot.
The crop is part of the bad composition, but a little planning and food styling/arrangement does wonders. This subject is too broad to cover now, but when you're looking through your viewfinder really look at the image before you snap the shutter. Is your picture crooked? Is there enough room to crop if needed? I'm still guilty of not paying close enough attention to the composition before I snap the shot.
Now for the AFTER shots:

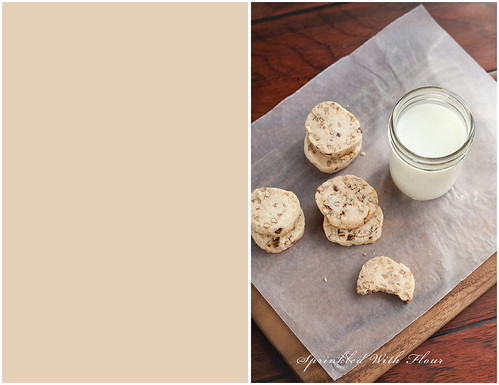 |
There you have it. How I went from glowing blue cookies to something a little more edible looking. If you'd like a more in depth explanation of anything I mentioned, let me know! If there is enough interest I'll do more food photography posts, diving into more detail on photography tips and tricks I've learned, and showing you how I like to get the shots for my posts. What do you think? Let me know in the comments below. :)
Note: I don't claim to be an expert, but I have learned a thing or two over the years and will gladly share those things with people. I'm also a family photographer in the St. Louis area, so if you're interested in seeing my work outside of food photography, visit Amber Potter Photography. Update: If you're just starting out in the photography world and need some help understanding all that photo jibber-jabber, my pal Karly at Buns In My Oven has started a great series called So You Want To Be A Better Photographer? Her tutorials are sure to help you "see the light". Hehe...bad pun? Anyway, her tips combined with my before and after critiques are a good way to see the photography principals put into practice, and learn to recognize what's wrong with an image. When you can tell what's wrong with a photo and why it doesn't work, then you can better improve your own skill!
You can find the recipe for these cookies in my original post for Browned Butter Pecan Shortbread.
|
Have a great day!
Amber
Easy and Customized Blog Posts

Does the process of posting on your blog make you want to pull out your hair? How about trying to upload your photos and get everything spaced and lined up right? I’ve spent countless hours trying to fix layout problems, and lamenting on my lost picture quality, when using Blogger to write posts and upload photos.
I’ve recently started using Windows Live Writer (thanks to the fabulous suggestion of Jenni from The Story of My Life), and let me tell you, blogging is no longer a hassle! What used to take me a couple of hours to get just right, now takes me about 30 minutes.
For those of you on Wordpress, don’t worry, Windows Live Writer is compatible with your platform too.
Lucky for me, this program came already downloaded on my computer. You may already have it too, but if not you can download it for free here. I don’t believe that WLW is compatible with a Mac, but for those of you using a Mac, I would suggest using Photobucket or Flickr to upload pictures to your blog.
For those on Blogger, if you don’t want to use Windows Live Writer, I would also suggest you to use Photobucket or Flickr to upload your blog pictures. Both of these hosting sites will give you better picture quality than Blogger. Here is a tutorial for using Photobucket to upload photos to your blog.
Using Windows Live Writer
You have two options to upload photos to WLW:
1. Upload photos directly from your computer (using the insert button under the Picture icon, or the Insert tab).
2. Upload photos from the web, e.g Photobucket or Flickr (using the insert button the Picture icon, or the Insert tab).
Note: If you want to upload pictures from Flickr, you will need to download the Flickr4Writer plug in.
Uploading photos directly to WLW from your computer, allows you a wide range of customizable options– like adding borders, shadows, tilt, or even your own watermark. You can also add picture effects or make a few edits (sharpen, contrast, etc.) Be careful, if you’ve already edited your photo in another editing software, you don’t want to overdo it.) The best part, you can make the picture any size you want. Just select the photo, and either drag the picture to the size you want, or you can set specific dimensions.
I’ve added a watermark here

Or tilt your pictures and add a shadow border like this


Play around with the font, which gives you the option to use any font downloaded on your computer - like some of these free custom fonts I downloaded from Kevin & Amanda.
I love these fonts!
Pea Cathi
milktop girl
A little pot
Note: Just a word of advice, at tempting as it may be, try to avoid making your entire post in one of these custom fonts. You want your post to be easily readable, and if a reader has trouble making out what you’ve written, you’ve lost them.
These are just some of the creative things you can do with WLW, so does that have you curious to try it out? Go on, once you get the hang of it, you’ll never go back to the old way again 
Enjoy!
Amber
Subscribe to:
Posts (Atom)






 Posts
Posts