
Chocolate Revel Bars
Chocolate Revel Bars: A chewy oatmeal bar with creamy chocolate filling - yum!

Today I'm sharing a tasty cover recipe that I reviewed for Culinary Covers - Chocolate Revel Bars. These bars are so easy to make, with an oatmeal crust and topping and a creamy chocolate filling that's very close to a satiny frosting.
Yes, I said it. Frosting. Who wouldn't want to eat a cookie bar with frosting in middle?
I'm about 34 weeks pregnant now and I am definitely READY to be done. It never ceases to amaze me how a full grown baby manages to fit inside me. I feel like a stuffed turkey - pretty fitting for the upcoming holiday, right?
Well, if you'd like to grab this recipe then head on over to Culinary Covers to read my full post and get the printable recipe too!
Enjoy!
Amber
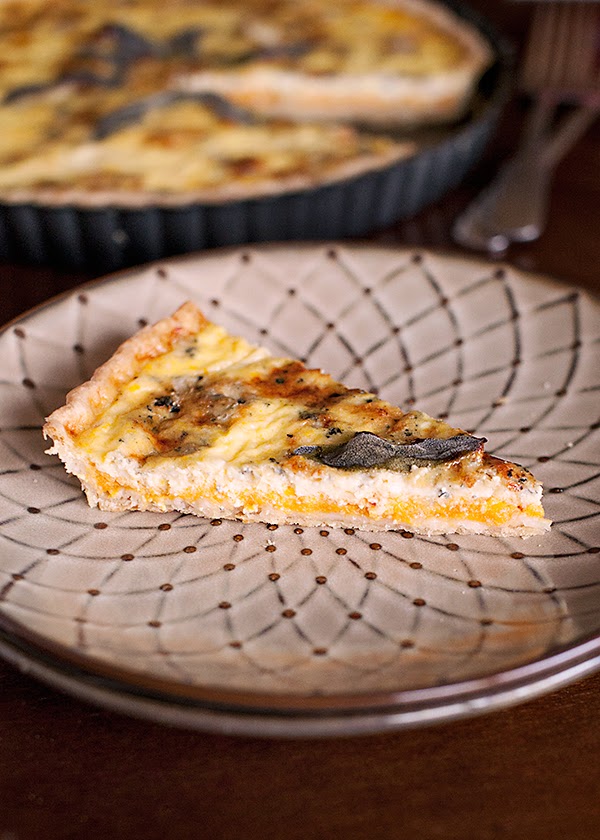
Squash, Sage & Gorgonzola Tart
It's gonna be short and sweet today peeps. My day hasn't started off too well, something involving my morning car ride to school, becoming an official squirrel murderer :( - being 32 weeks pregnant, and either constantly grumpy or in some kind of pain.
It's one of those days.
But a slice of this Squash, Sage & Gorgonzola Tart definitely helps. I'm reviewing this recipe over at Culinary Covers today, and it's a good one. This tart has a layer of creamy butternut squash topped with gorgonzola crumbles, and a baked egg filling topped with fresh sage.
It's good!
For the recipe head on over to Culinary Covers and check it out!
I'm out.
Amber
Brunch Cinnamon Rolls
These breakfast rolls are yeast-free, soft and delicious. Without all the hassle of prep work you'll be making these time and time again!

Do you love cinnamon rolls? I bet you don't love all the rising time and prep work...if you're anything like me. But the gooey delicious results have me making them at certain times of the year when I get the itch.
How about if I told you I found a yeast-free cinnamon roll that was actually GOOD. Seriously. These rolls are fluffy and biscuit-like with a gooey brown sugar pecan filling that will have you going back for seconds.
Maybe even thirds. I'm just sayin'. Have I got you curious yet? Yes? I'm reviewing this Taste of Home recipe today over at Culinary Covers, so stop by and say hi and you can grab the recipe while you're at it!
Enjoy!
Amber
Fresh Berry Cobbler
Orange zest in the crust and the filling adds great flavor to this summer berry cobbler.

This summer has been so busy for me that I've had a hard time keeping up with everything. My poor little blog has had to take a back seat to pregnancy and my growing photography business. Summer and the approaching fall season is the busiest time of year for me as a photographer, and I have sessions filling up my calendar.
So please bear with me if I'm not able to post recipes as frequently as you're used to, I promise to make it up to you with many mind-blowing fall and holiday recipes!
Today I'm reviewing this Berry Cobbler recipe over at Culinary Covers. How can you say no to bowl full of fresh strawberries and fluffy cobbler topping?
You can't. Simple as that. :)
So head on over and say hi, you can grab the printable recipe while you're at it!
Amber

Oatmeal Cookie Sandwiches with Rum-Raisin Filling
Two layers of spiced oatmeal cookies filled with a delicious cream cheese frosting filling.
I've got another tasty treat to share with you today. Who doesn't love oatmeal cream pies? Even better - HOMEMADE oatmeal cream pies with a delicious rum flavored cream cheese frosting filling.
Yep. These are for real.
I'm reviewing this recipe over on Culinary Covers today, so head on over to see how they turned out and grab the printable recipe while you're at it. Enjoy!
Amber
P.S.
My post is short and sweet today, it's the hubby's birthday and we're all heading to enjoy some time at the Magic House before the kiddo heads back to school next week. I can't believe how fast this summer has flown by! First grade...here we come. Sniff.
Lemon Sugar Cookies with Lemon Buttercream Frosting
Luscious lemon sugar cookies with a creamy lemon buttercream frosting.

By now you should know of my love for citrusy desserts. But sometimes you don't want to wait for a cheesecake, cake, or pie to bake, and need the quick sugar fix that a cookie can give you.
That's why when I came across this Tasty Kitchen recipe for Lemon Sugar Cookies with Lemon Buttercream Frosting, I knew I had to try them out.
They're the perfect combination of lemony sweetness and soft, buttery cookies. The frosting is amazing and may or may not have been eaten by itself in vast quantities.
Don't judge. :)
Are you intrigued yet? If you head on over to the Tasty Kitchen Blog, you can read my full step-by-step post and pick up the printable recipe while you're at. What are you waiting for!
Bacon Wrapped Corn On The Cob
Juicy, fresh corn wrapped in a crisp layer of salty bacon. Bacon Wrapped Corn On The Cob is a great twist on your usual side dish.

I'm here today to bring you two things my friends; bacon...and corn.
Say whaaat? Yes, bacon....wrapped around my favorite summer grilling side - fresh corn! If you've never tried corn like this, then you've been missing out. Now, the idea of this dish had an immediate reaction from my six year old, he wisely predicted as only a kid can, "Mommy, THAT is either going to be really delicious...or really, really gross."
I have to agree, the idea of crisp, salty bacon and sweet, juicy corn sounded great...but the thought of a limp, greasy slice of meat sliming up my corn didn't sound as appetizing. The only way to find out was to try it of course, so we dove in feet first. Wanna find out how it turned out? Head on over to Culinary Covers where I'm contributing today, and you can find out...and grab the printable recipe too! That should be a hint - would I have you print the recipe to greasy, slimy, meat corn?? :) Enjoy!
Amber
Peanut Butter S'mores Cookie Bars
I don't know about you, but when it's summertime I have to have a few staples on hand. Homemade lemonade, ice cold sweet tea, and the fixings for some ooey, gooey s'mores of course. These Peanut Butter S'more Cookie Bars are a great variation to your typical gooey graham cracker sandwich.

We had a pretty eventful weekend after finding out that thealien baby taking my body hostage is going to be...drumroll...

A girl!
It looks like our playroom will have to make way for tea sets and babydolls; a weird idea to get used to for me. I'm used to army men with missing limbs and wiping the toilet seat every time I go to the bathroom. I get boys.
Girls are a species completely foreign to me, and I'm pretty sure my husband feels the same, judging by his dazed look and mumblings of, "what am I going to do with a girl?"
But we're all excited for the new change, especially Cade. He can't wait for his baby sister to arrive. So to celebrate I whipped up these Peanut Butter S'more Cookie Bars. Peanut butter, chocolate and marshmallows trapped between a graham cracker base and crumbly topping make these puppies really addicting. Enjoy!
Peanut Butter S'mores Cookie Bars
Yield: 16 bars Printable Recipe
1/2 cup butter, softened
3/4 cup sugar
1 egg
1 tsp vanilla extract
1 cup graham cracker crumbs
1 1/3 cup flour
1 tsp baking powder
1/4 tsp salt
1 1/2 cup milk chocolate chips
1/3 cup peanut butter
3 cups miniature marshmallows
Heat oven to 350 F. Grease an 8-inch square baking pan.
In a mixing bowl, beat the butter and sugar until well blended. Add egg and vanilla, beat well. Stir together graham cracker crumbs, flour, baking powder and salt. Add the flour mixture to the butter mixture, mixing until well combined. Press half of the dough in the prepared pan. Bake 15 minutes.
3. Sprinkle chocolate chips over baked layer, drop peanut butter by spoonfulls over the chocolate chips, using a toothpick to swirl everything around so the bottom cookie layer is evenly covered. Sprinkle with marshmallows and scatter the remaining dough over the marshmallows, forming the top layer. Bake 10 to 15 minutes or just until lightly browned. Cool completely in pan on wire rack. Cut into bars.

We had a pretty eventful weekend after finding out that the
A girl!
It looks like our playroom will have to make way for tea sets and babydolls; a weird idea to get used to for me. I'm used to army men with missing limbs and wiping the toilet seat every time I go to the bathroom. I get boys.
Girls are a species completely foreign to me, and I'm pretty sure my husband feels the same, judging by his dazed look and mumblings of, "what am I going to do with a girl?"
But we're all excited for the new change, especially Cade. He can't wait for his baby sister to arrive. So to celebrate I whipped up these Peanut Butter S'more Cookie Bars. Peanut butter, chocolate and marshmallows trapped between a graham cracker base and crumbly topping make these puppies really addicting. Enjoy!
Amber
Peanut Butter S'mores Cookie Bars
Yield: 16 bars Printable Recipe
1/2 cup butter, softened
3/4 cup sugar
1 egg
1 tsp vanilla extract
1 cup graham cracker crumbs
1 1/3 cup flour
1 tsp baking powder
1/4 tsp salt
1 1/2 cup milk chocolate chips
1/3 cup peanut butter
3 cups miniature marshmallows
Heat oven to 350 F. Grease an 8-inch square baking pan.
In a mixing bowl, beat the butter and sugar until well blended. Add egg and vanilla, beat well. Stir together graham cracker crumbs, flour, baking powder and salt. Add the flour mixture to the butter mixture, mixing until well combined. Press half of the dough in the prepared pan. Bake 15 minutes.
3. Sprinkle chocolate chips over baked layer, drop peanut butter by spoonfulls over the chocolate chips, using a toothpick to swirl everything around so the bottom cookie layer is evenly covered. Sprinkle with marshmallows and scatter the remaining dough over the marshmallows, forming the top layer. Bake 10 to 15 minutes or just until lightly browned. Cool completely in pan on wire rack. Cut into bars.
Canadian Bacon & Goat Cheese Breakfast Sandwiches - Guest Post by Very Culinary

Hello my food loving friends! As you know this preggo has been getting a bit behind in my postings, so I've enlisted the help of some of my foodie friends to keep me on top of things. I've already had the awesome Brandy of Nutmeg Nanny woo us with some of her deliciousness.
Today I'm thrilled to introduce you to Amy over at Very Culinary, she's got a mouthwatering breakfast sandwich to share with us today. Enjoy!
Amber
Hi everyone! This is Amy from Very Culinary here…I'm happily filling in for Amber today.
Let's talk eggs, shall we? And sandwiches. Two of my favorite things. Seriously.
I've often said that eggs are like the perfect food. You can use them as a binder, coating, thickener, emulsifier, clarifier, and leavening agent. You can have fun with them at Easter time, use the shells as a pest repellent, or the whites as a glue! You can fry them, quiche them, meringue them, custard them, hard boil them, soft boil them, scramble them, or make them into an omelet and stuff them!
Then there are sandwiches. Serve cold, warm, toasted, broiled, grilled, open-faced, and with pretty much any combination of ingredients.
And the best part is that both eggs and sandwiches work together…for breakfast, lunch, and dinner. Whew.
This so sandwich…you need this in your life. Or maybe that's just me.
Canadian Bacon and Goat Cheese Breakfast Sandwich
Makes 1 sandwich
Prep time: 10 minutes
Cook time: 5 minutes
Ingredients
• 2 slices of bread (I used Whole Grain Oatnut)
• 2 slices Canadian bacon
• 1 large egg, beaten
• 2 large slices tomato
• 1/4 cup of baby arugula
• 2 tablespoons crumbled goat cheese
• salt and pepper
Directions
In a small nonstick pan, cook the Canadian bacon over medium-high heat, about 1 minute per side.
In the meantime, toast your bread. Transfer the bacon to one of the slices. Coat your frying pan with a little non-stick spray, add in your egg and swirl until it covers the bottom of the pan; cook for about a minute, then flip, season with a touch of salt and pepper, and cook for another minute. Fold in half and put on top of the Canadian bacon. Add your tomato and arugula.
Put the goat cheese in the microwave for 10 seconds just to soften and then spread on the other slice of toast. Place on top of the other and cut your sandwich in half.

Strawberry Thyme Lemonade - Culinary Covers
It's time for my next post over at Culinary Covers, and today I'm bringing you a delicious drink straight from the cover of one of my favorite magazines - Real Simple.
I love this magazine. That about says it all.
I went with the Strawberry Thyme Lemonade and sure was glad I did!
It's sweet, tart, and has just a touch of something extra that'll get your lips smacking. Want the recipe? Head on over to Culinary Covers to see my full post and grab the printable recipe while you're at it
Amber

Banana Bread Muffins - And A Surprise!


I know my posts have been lacking lately, but I've had a good reason - promise. A few months ago we had a very unexpected surprise and found out that I'm pregnant again, and should have a new arrival at the end of the year! Some of you may remember that we lost a pregnancy last winter after a very complicated pregnancy.
I suffer with Hyperemesis Gravidarum when pregnant, which last time required me to be put on home health care. You can read more about my HG story here, and our second trimester miscarriage here.
Well, after a lot of deliberating we had decided that we weren't going to try again, but you know how you're never supposed to say NEVER - right?
Yeah.
I'm not gonna lie. I was scared. Anyone who has experience with HG can probably understand the thoughts going through my head. Being hooked up to daily IV's until my veins were completely shot, stabbing myself in the stomach every day with a medication pump that lets me at least keep water down, and being confined to bed 24/7 is not something to enter lightly.
I had a lot of people praying for me this time around, hoping that maybe, just maybe I might not get the short end of the stick. My doctor had my protocol already set up and I started on it from day 1. Early intervention has the best success of keeping it at bay. I'm SOOO relieved to be able to say that this time around is much better. I've avoided the IV's and medication pump so far. Yay!
I've actually been able to be in the kitchen a little bit when I feel well enough, and whipped up these tasty Banana Bread Muffins the other day. I threw some white chocolate chips on top to change it up a bit. These were really good.
Note: If you are unfamiliar with HG, please read my post on it. HG is NOT morning sickness and does not respond to any traditional remedies. It is dangerous for both the mother and baby.
Banana Bread Muffins
Yield: 18 Printable Recipe
3 cups all-purpose flour
1 tsp baking soda
1 tsp salt
1/2 tsp baking powder
1/2 tsp ground cinnamon
1/2 tsp ground nutmeg
1 3/4 cup sugar
1 cup vegetable oil
3 eggs
1 tbsp vanilla extract
4 ripe bananas, mashed
1/2 cup white chocolate chips, for topping
Preheat the oven to 325 degrees F.
Combine the flour, baking soda, salt, baking powder, cinnamon, and nutmeg in a medium bowl. Beat the sugar, oil, eggs, and vanilla in a large bowl. Stir in the mashed bananas. Add the dry ingredients and stir just until blended.
Divide the batter among your muffin tin cups. Bake the muffins on the middle rack until the tops are golden brown and a toothpick inserted into the center comes out clean. about 25 minutes. Transfer the muffins to a rack and cool slightly.
Notes: I added some white chocolate chips to the tops of half of my muffins to switch it up a bit. You could milk chocolate chips too, or even add some crunchy pecans. I didn't have enough muffin pans for the batter, so I used 4 mini tartlet pans for the remaining batter, which turned into little muffin tops that were so good!
Source: Recipe loosely adapted from Food Network

Darn Good Ham & Cheese Sliders - A Tasty Kitchen Post

I've got another quick and easy meal for you that's delicious and great for those busy work weeks.
I love sliders. There's just something about tiny delicious sandwiches that make me smile. Plus, you don't feel as guilty eating a cute little slider, right?
Never mind that I've never met a person who can eat just one, we'll still delude - ahem - I mean tell ourselves we're being good.
These ham and cheese sliders are a great recipe I found over at Tasty Kitchen, but the secret is in the yummy sauce that's poured over the top. After baking these puppies until golden and caramelized, you definitely won't be able to stop at just one.
Hungry yet? Hop on over to the Tasty Kitchen Blog to read my full step-by-step post and grab the recipe while you're at it.

Cherries Jubilee Ice Cream Pie - Culinary Covers Post
I've got another contributing post for the new site Culinary Covers. What's on the menu today? How about Cherries Jubilee Ice Cream Pie!
A delicious brandy infused cherry topping on top of a creamy, swirly, frozen pie. Don't forget the graham cracker crust. Yum!
For the recipe head on over to Culinary Covers and grab it. Stop and say hi while you're at it too!

A delicious brandy infused cherry topping on top of a creamy, swirly, frozen pie. Don't forget the graham cracker crust. Yum!
For the recipe head on over to Culinary Covers and grab it. Stop and say hi while you're at it too!
Amber
Fried Goat Cheese & Beet Salad: Nutmeg Nanny Guest Post
I've got a great guest post for you today from the talented Brandy of Nutmeg Nanny. Since I haven't been able to be in the kitchen as much lately, I've enlisted the help of a few of my fellow blogger friends, who've graciously offered to guest post on Sprinkled With Flour, and help "fill in the gaps" so to speak.
I certainly don't want to leave you hanging when I could be sharing some of the delicious recipes from these friends. So read on below and meet Brandy!
.jpg)
Howdy Sprinkled with Flour readers! I’m Brandy from the blog
Nutmeg Nanny. Today I’m bringing you a
tasty salad that is perfect for spring and summer.
I have always had a special place in my heart for pickled beets.
I grew up eating them and even requested them with dinner as a kid. Most of my
friends would freak out at the thought of eating a beet but I was so on board
with the idea. Especially when they are perfectly pickled and harvested from
your own garden. You cannot go wrong.
It wasn’t till I was in my 20’s that I finally tried goat
cheese. I feel head over heels in love. I was a little annoyed with myself for
waiting so long to finally bite the bullet and give it a try. Now I will put it
on just about anything. I have even been known to spread it on crackers and
call it lunch. To each his {or I guess in my case, her} own….right?
So naturally beets and goat cheese are a perfect pair. The
tanginess from the pickled beets and the creaminess from the goat cheese just
work together in a way that can only be described as amazing. Who knew one
person could be so in love with a vegetable and cheese?
For this salad I like to do a quick pickle on my beets and
pan fry the goat cheese so it’s crispy and super creamy. If you don’t feel like
going through the whole process of pickling your own beets {which I swear is
easy!} you can always buy them at the store. Fresh pickled beets are normally
found in the produce section in the case near all the pre-chopped vegetables
and fruits. Oh and a small fun tip. Freeze your goat cheese for about 30
minutes so it’s firm and slice it with plain dental floss. It will make perfect
little rounds that are ideal for frying!
Fried goat cheese and beet salad
Yield 2 servings
For pickled beets:
2 regular sized fresh red beets
2 tablespoons apple cider vinegar
2 teaspoons brown sugar
2 teaspoons olive oil
1/4 teaspoon dry mustard powder
For fried goat cheese:
16 ounce log fresh goat cheese
1 cup panko bread crumbs
2 teaspoons Italian blend seasoning
Salt and pepper, to taste
2 large eggs, beaten
1/2 cup all purpose flour
Olive oil
For salad:
8 cups mixed baby greens
Balsamic vinegar
Extra virgin olive oil
1/2 cup walnuts, toasted
For beets:
Cut off beet tops and slice beets into four equal
pieces. Add to small pot and cover with
water. Boil for about 30 minutes until soft. You do not want them falling
apart, just fork tender.
Rinse and immediately cool down by running cold water over
the beets. Using your hands simply rub the peel of the beet off. It should come
off very easily at this point.
Chop beets into bite size pieces or slices.
In a medium sized bowl whisk together apple cider vinegar,
brown sugar, olive oil and dry mustard powder. Add in cut beets, toss and let
sit for at least 30 minutes at room temperature.
For fried goat cheese:
Freeze your goat cheese for about 30 minutes until it’s
solid but not totally frozen.
While your cheese is hardening mix together panko bread crumbs,
Italian seasoning, salt and pepper, set aside. Set up a breading line in the
following order: flour, egg, bread crumbs, parchment/wax paper covered large
wooden cutting board.
Remove cheese from freezer and slice into 1/2 inch rounds by
using plain dental floss or a knife. If using a knife make sure to wipe it off
after each cut to stop it from crumbling.
If any of your pieces fall apart just pat it together and
try to keep a somewhat round shape. It does not have to be perfect.
Take goat cheese rounds and dip in flour, then egg and then
goat in panko/herb mixture. Lay onto lined cutting board. Continue until all
slices have been coated.
If your cheese is really soft pop it into the freezer for
about 5 minutes to chill.
Take a large high-sided skillet, cover the bottom with olive
oil and add to range over medium-high heat. Once oil is hot, fry goat cheese
rounds until crispy on both sides.
Gently remove fried goat cheese from the skillet onto a
paper towel lined plate to help soak up any remaining olive oil. Serve fried goat cheese warm.
For salad:
Lay out four salad bowls and add 2 cups mixed green per
bowl. Top with equal amounts pickled
beets and walnuts. Drizzle with a little balsamic vinegar and olive oil. Top
each salad with an equal amount of goat cheese rounds. You should get enough
for at least 2 – 3 rounds per salad.

Ravioli with Creamy Poppy Seed Sauce

Well, I asked everyone on Facebook what my next post should be - sweet or savory - and you all surprised me with a savory dish request.
Sorry my sweet-toothed friends, the savory fans won out this time...but never fear...I'll have a sinfully sweet treat ready for you soon!
I've been meaning to share this dish with you all for a while, it's so good and it gets extra points for being really quick and easy. Perfect for busy weeknights, but just as good to please company.
Who doesn't love a good pasta dish? Throw in a creamy sauce made just a tad more special with poppy seeds and a touch of fresh parmesan, and you're golden. I also used a squash filled ravioli that I picked up at Wold Market - LOVE that place! Let's get started shall we?
Ravioli with Creamy Poppy Seed Sauce
Yield: 4 Servings Printable Recipe
2 tbsp unsalted butter
1 1/2 cup heavy cream or half & half (I was being good and used half & half)
freshly ground black pepper
3-4 tbsp poppy seeds
salt, to taste
1/3 cup freshly grated parmesan cheese
12 oz cooked ravioli
Melt the butter over medium heat in a large saucepan. Whisk in the cream and stir over medium heat until hot but not bubbly. Add the cooked ravioli and season with freshly ground black pepper. Simmer gently until the sauce has thickened. Stir in the poppy seeds, add salt to taste if desired, and serve with freshly grated parmesan cheese.
Enjoy!
Amber

Chicken Mango Tacos - Culinary Covers
Just a couple more weeks and summer will officially be here.Well okay, I believe "officially" it's starts in June...but I always see Memorial Day weekend as the kickoff to the summer festivities.
Don't you?
Pull out your bbq grill, sharpen your knives (for all that fresh fruit and veggie chopping of course!) and get ready to enjoy to a summer full of delicious recipes perfect for summer entertaining.
I've got a great one to start out with today - Chicken-Mango Tacos. These tacos are super easy to whip up, taste great, and they're full of good for you vitamins from the fresh mango and avocado.
I shared these tacos in my contributing post to Culinary Covers today, so why don't you head on over there and grab the recipe. Stop and say hi while you're at it!
Enjoy!
Caramel Pie - Culinary Covers Contributor
I've got a super delicious post to share with you today, and I'm also excited to share a new project I'm participating in. I'm sure you're familiar with the talented Lori Lange of Recipe Girl, well, she's created a new site called Culinary Covers that features the cover recipes of all those deliciously amazing magazines you drool over as you check out with your groceries.
I'm exited to be part of a group of a great group contributors that Lori as put together, and spending my time cooking and reviewing recipes? Yes please! For my first post, I decided to review the cover recipe for Louisiana Cookin's: Cajun & Creole Cookin' May/June issue. What's the tasty concoction you say?

I'm exited to be part of a group of a great group contributors that Lori as put together, and spending my time cooking and reviewing recipes? Yes please! For my first post, I decided to review the cover recipe for Louisiana Cookin's: Cajun & Creole Cookin' May/June issue. What's the tasty concoction you say?
Try this fabulous Caramel Pie!
To read my full review and get the recipe, head on over to Culinary Covers and say hi!
Amber
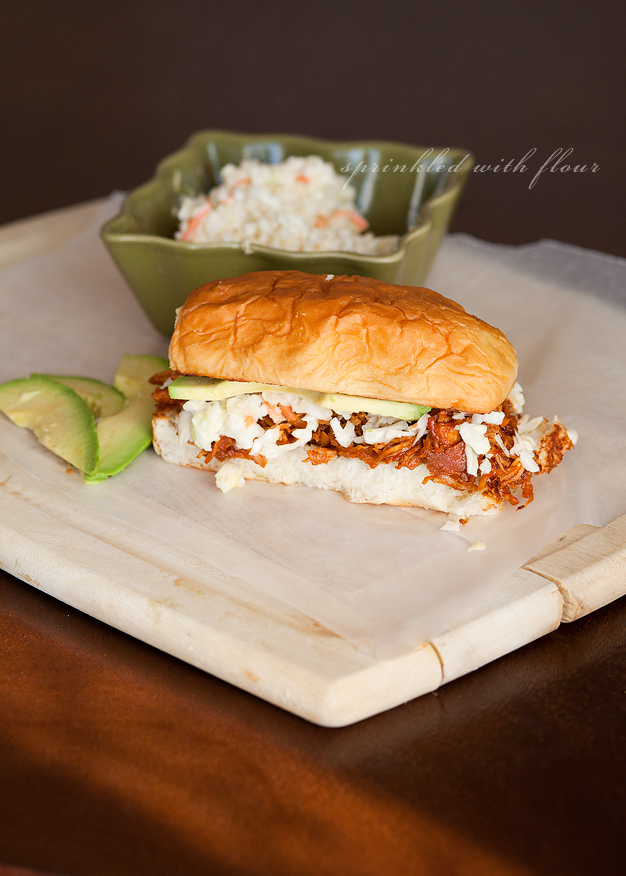
Slow Cooker Peach BBQ Chicken Sandwiches

Do you like barbeque? How about pulled chicken sandwiches? How about easy slow cooker recipes?
Oh you do?
Well then, pull up a chair, get comfy, and be prepared to drool - because amazing barbeque is about to happen.
Barbeque and pulled chicken are two of my favorite things, and when you put them together you get one awesomely delicious meal. In my humble opinion at least.
I found this recipe for Slow Cooker Peach BBQ Chicken Sandwiches on Tasty Kitchen and knew it was going on my menu plan - STAT. The chicken is slow simmered in a spicy sweet barbecue sauce that has a great kick from peach preserves. I loved the peach flavor and ate copious amounts of the chicken by itself while I was shredding it. I also used my Amazing Barbeque Sauce - I like to call it Awesome Sauce, but you can use any kind that floats your boat.
So we've established the chicken is good. Now add a heaping of your favorite coleslaw, and a few healthy slices of fresh avocado, and you have yourself one really delicious sandwich.

For the recipe head on over the the Tasty Kitchen blog where you can check out my full step-by-step post and grab the printable recipe too!

Strawberry Avocado Gorgonzola Salad

I have to confess, I've been gorging myself on some pretty indulgent food lately. Sometimes you just need a plate (or two) of some good homemade comfort food.
But when your pants start getting a teeeny bit snug, it's a sign that maybe you need a break from those delicious calories. For me, a good crunchy salad is the first thing I turn to when I need to jump off the jiggly thigh train. The only problem is my salads tend to get boring. I don't keep exciting salad fixings in my fridge on a regular basis, but this time I was lucky to have picked up a few extra goodies at the store. I eyed some strawberries, a package of gorgonzola cheese left over from my Creamy Gorgonzola Dressing, some bacon, and a bundle of fresh avocados.
It all sounded good to me - so in it all went! I added some grilled chicken and a bit of chopped pecans for texture - gotta have texture. This salad was really good and hit the spot. If you wanted to trim off some extra calories you could forego the bacon, but I love my bacon. Next time you want to liven up your salad, try this one out. Enjoy!
Amber


Strawberry Avocado
& Gorgonzola Salad
Yield: 1 salad Printable Recipe
2 cups leafy greens
1/2 cup grilled chicken, sliced
1/2 avocado, sliced
2 slices bacon, cooked crisp and crumbled
1/2 cup fresh strawberries, hulled and sliced
1/4 cup crumbled gorgonzola cheese
1/8 cup chopped pecans
Creamy Gorgonzola Dressing to garnish, as desired
Directions:
Wash greens and drain. Slice your grilled chicken, avocado and strawberries. Cook bacon until crisp, drain grease and crumble or chop bacon into pieces. Fill your bowl or plate with your greens, top with sliced chicken, avocado, crumbled bacon and sliced strawberries. Sprinkle the crumbled gorgonzola cheese and pecans on top. Drizzle on some homemade Creamy Gorgonzola Dressing if desired, but this salad is just as good on its own. Grab a fork and dig in!
You can grab the recipe for the dressing in my Creamy Gorgonzola Dressing post.
Blueberry Kuchen


It's raining here today, AND snowing, at the same time. I love rain - call me crazy, and I love the snow, but the two together make for a very gross combination. Dirty slush is no fun to get out in, so that's why I'm staying in today - with a slice of this breakfast treat.
Blueberries. Check. Amazingly good crumbly topping. Check. No kid or husband around to see me finish off the entire pan. Check.
A good coffee cake and cup of hot tea or coffee is the perfect answer to dark, dreary days like today. This Blueberry Kuchen is another delicious recipe from Tasty Kitchen, submitted by TK member Deborah. I had to stop myself from eating the crumb topping by itself when creating the step-by-step post. The topping is kinda crucial to this cake. Are you hungry yet?
Head on over to the Tasty Kitchen blog to read my full post and grab the printable recipe while you're at it. Enjoy!
Amber


Let's connect! Follow me on Pinterest
Chunky Twix Cookies: Before & After

I think it's time for another before and after post, don't you? If you missed my last one and are wondering what the heck I'm talking about, you can read about it in my Browned Butter Pecan Shortbread: Before & After post.
In a nutshell, I'm slowly updating my older posts with newer, improved photos - and adding a critique of my older photos rather than just deleting them willy nilly.
While I'd love to banish them to the dark recesses of my computer's recycle bin forever, I thought it more helpful to share them and add the tips I've learned along the way. Today I chose one of my most popular recipes, my Chunky Twix Cookies. I don't use the term "The Best" very often, but these cookies really are the best cookies I've made to date. They've made it around the blogging world quite a bit, and are highly coveted by my family. Since these are my best cookies, I thought they deserved a better photo. Now let's trash my photo! :)
Here is the Before:

When I first started trying to improve my food photography, I decided to jump on the bandwagon with everyone else, and tried to do what everyone else was doing. This led me to Michael's to stock up with all kinds of patterned papers to act as "backdrops" to my recipes. A few bucks poorer, a few years wiser, and I learned that SIMPLE is better.
What makes a striking photo? Usually an image that has a single theme or idea, with clutter kept to a minimum makes for the best photo. Successful photos rely on elements of composition: line, shape, form, texture, pattern, and color. Every photo whether intentional or not, contains one or more of these elements.
In this image, the patterned paper clashes with the patterned plate and the deeply textured cookies. There's also too much color going on. When composing an image, try to keep the colors to 3 or less. More than that and your picture can become distracting. There's just too much going on in this picture and it stresses the eye out trying to decide what to focus on.
2. Awkward Focus Spot:
When choosing where to focus on your food, it's best to focus on the area that is closest to you, this is especially true when you're using a large aperture (small number) because your depth of field (the area that is in focus) will be shallow. In this image you can see I placed my focus point near the center of the image, rather than the area of cookie closest to me. This makes the front of the food out of focus, which doesn't work in this image.
The way the plate is angled, the out of focus part of the cookie is the center of attention, and where your eye naturally wants to fall. For this reason, I should have set my focus point to the closest area of cookie, or stopped down my aperture setting so more of the cookies were in focus.
3. Composition Too Tight:
As in my last post, here is a prime example of when to back up already Amber! :) I'm either too close to my food or have cropped it too close. The plate, glass of milk, and background are so close together there's no room to breathe. When looking at a photo you want to have room for your eye to move around the image. That's not too say don't ever have a close up, but in this photo it doesn't work very well.
Now here's the After:

Settings: f4.0; Shutter 1/160; ISO 1250
A little easier on the eyes don't you think? I kept it simple with a plain white napkin under the serving dish, the milk and and cookie rack are arranged in the background to allow the eye to wander around the image and come back to the main point of focus - those yummy cookies!
I also made sure to place my focus point on the front edge of the closest cookie, to eliminate any out of focus areas on the cookie. You'll notice I set my aperture to f4.0 so my depth of field wasn't too shallow. I was lazy and didn't want to pull out my tripod, so this shot was handheld. But if I wanted to decrease my ISO I could have lowered my shutter speed accordingly. I used my 85mm lens for this shot, and generally you want to keep your shutter speed to about 1 to 1 1/2 times the focal length of your lens (if hand holding), to avoid camera shake. So for an 85mm focal length, you want to keep your shutter speed at least 1/80 or 1/100. For a 50mm focal length - 1/50 or higher, etc.
You can find the recipe in my original post for Chunky Twix Cookies. If you have any questions about this critique or want me to go into more detail, just leave a comment and I'll be happy to answer them! If you found this helpful I'd love to hear from you. Thanks!
Note: I don't claim to be an expert, but I have learned a thing or two over the years and will gladly share those things with people. I'm also a family photographer in the St. Louis area, so if you're interested in seeing my work outside of food photography, visit Amber Potter Photography.
Update: If you're just starting out in the photography world and need some help understanding all that photo jibber-jabber, my pal Karly at Buns In My Oven has started a great series called So You Want To Be A Better Photographer? Her tutorials are sure to help you "see the light". Hehe...bad pun? Anyway, her tips combined with my before and after critiques are a good way to see the photography principals put into practice, and learn to recognize what's wrong with an image. When you can tell what's wrong with a photo and why it doesn't work, then you can better improve your own skill!
Amber

This month I also joined a new project - The Leftover's Club. This is a group of blogger's who get paired up with another blogger each month, to share the leftovers from the goodies we made. It's a great way to get to know each other, and have someone else take some of the temptation off our hands. This month I'm paired up with Budget Gourmet Mom, and can't wait to share our goodies! Sound like fun? Visit The Leftovers Club online to learn more and sign up!
Savory Simple - Cappuccino Cookies
Damn Delicious - Blueberry Lemon Bars
Give Peas a Chance - Spiced Vanilla Honey Biscotti
Kelly Bakes - Dulce de Leche Digestive Cookies
Sprinkled With Flour - Chunky Twix Cookies
Pineapple and Coconut - Cinnamon Dolce Oatmeal Cookies
Budget Gourmet Mom - Salted Caramel Peanut Butter Stuffed Cookies
Creamy Gorgonzola Dressing

 I don't know about you but I love cheese with flavor. Growing up in the U.K. we had really good cheese and really good bread, which are just two of the things I miss most. I especially love blue cheese, and anything of the moldy variety for that matter.
 I do love me some mold - er, on my cheese that is. As long as it's not in my husbands dirty socks - or found behind my child's bed, I'm good.
Roquefort, Stilton, Gorgonzola, the list goes on - I could be happy with any of these. I ran across this container of Gorgonzola cheese at the store the other day, and I knew I had to grab it. I didn't know what I was going to do with it, but I finally decided on whipping it up into a creamy salad dressing.
Fresh, crunchy greens can only get better under a creamy layer of Gorgonzola deliciousness, right? I experimented on amounts, adding a little of this and a little of that, and finally ended up with this dressing. It's pretty tasty if I do say so myself.
Creamy Gorgonzola Dressing
Yield: 1 cup Printable Recipe
1/4 cup mashed Gorgonzola cheese
1/4 cup mayonnaise
1/4 cup sour cream
1/4 cup buttermilk
1 clove garlic, finely minced
1 tsp fresh lemon juice
salt, to taste
fresh cracked black pepper, to taste
In a small bowl mash the gorgonzola cheese with the back of a spoon. Add the mayonnaise, sour cream, buttermilk, minced garlic, and lemon juice. Whisk until well combined. Add salt and fresh ground black pepper to taste. Now pop it in the fridge overnight for the flavors to marry together. Serve over your favorite salad or have a veggie dipping palooza. Enjoy!
Amber


Subscribe to:
Posts (Atom)


