
Decorated Sugar Cookies: Daring Bakers Challenge

The September 2010 Daring Bakers’ challenge was hosted by Mandy of “What the Fruitcake?!” Mandy challenged everyone to make Decorated Sugar Cookies based on recipes from Peggy Porschen and The Joy of Baking.
September has been an eventful month for me. Amid the back to school activities for my son, my parents visiting from out of the country, and near blinding myself, I also joined the Daring Bakers. This month is my first time participating in the challenges, and I'm excited to be a part of the baking fun. The challenge this month was to bake decorated sugar cookies, with the theme being September - and whatever that symbolized to you. Since the posting date was for the 27th, which also just happens to be my 7th wedding anniversary, my theme was a no brainer.
I have never decorated cookies with royal icing before, and while it may sound like a simple challenge, there is more skill involved in using royal icing than you would believe. After three hours of outlining, flooding, drying, and randomly decorating cookies with no design scheme in mind - my feet were throbbing, my back resembled a hunchback's, and my fingers were permanently cramped into claw-like talons. But at least my cookies turned out pretty. I used the color scheme from my wedding, which was different shades of purple, and was pleased with my experiment in the world of royal icing.


Basic Sugar Cookies:
Makes Approximately 36 / 4" Cookies200g / 7oz / ½ cup + 6 Tbsp Unsalted Butter, at room temperature
400g / 14oz / 3 cups + 3 Tbsp All Purpose / Plain Flour
200g / 7oz / 1 cup Caster Sugar / Superfine Sugar
1 Large Egg, lightly beaten
5ml / 1 tsp Vanilla Extract / Or seeds from 1 vanilla bean
Directions
• Cream together the butter, sugar and any flavourings you’re using. Beat until just becoming
creamy in texture.
• Tip: Don’t over mix otherwise you’ll incorporate too much air and the cookies will spread during
baking, losing their shape.
• Beat in the egg until well combined, make sure to scrape down the sides of the bowl.
*Add the sifted flour and mix on low until a non sticky dough forms.
• Knead into a ball and divide into 2 or 3 pieces.
• Roll out each portion between parchment paper to a thickness of about 5mm/1/5 inch (0.2 inch)
• Refrigerate for a minimum of 30mins.
• Tip: Recipes commonly just wrap the whole ball of dough in clingwrap and then refrigerate it for an
hour or overnight, but by rolling the dough between parchment, this shortens the chilling time and
then it’s also been rolled out while still soft making it easier and quicker.
* Once chilled, peel off parchment and place dough on a lightly floured surface.
• Cut out shapes with cookie cutters or a sharp knife.
• Arrange shapes on parchment lined baking sheets and refrigerate for another 30mins to an hour.
• Tip: It’s very important you chill them again otherwise they’ll spread while baking.
• Re-roll scraps and follow the above process until all scraps are used up.
• Preheat oven to 180°C (160°C Fan Assisted) / 350°F / Gas Mark 4.
• Bake until golden around the edges, about 8-15mins depending on the size of the cookies.
• Tip: Bake same sized cookies together otherwise mixing smaller with larger cookies could result in
some cookies being baked before others are done.
• Tip: Rotate baking sheets half way through baking if your oven bakes unevenly.
• Leave to cool on cooling racks.
• Once completely cooled, decorate as desired.
• Tip: If wrapped in tinfoil/cling wrap or kept in airtight containers in a cool place, un-decorated
cookies can last up to a month.
Royal Icing:
315g – 375g / 11oz – 13oz / 2½ - 3 cups Icing / Confectioner’s / Powdered Sugar, unsifted
2 Large Egg Whites
10ml / 2 tsp Lemon Juice
5ml / 1 tsp Almond Extract, optional
Directions
• Beat egg whites with lemon juice until combined.
• Tip: It’s important that the bowls/spoons/spatulas and beaters you use are thoroughly cleaned and
grease free.
• Sift the icing sugar to remove lumps and add it to the egg whites.
• Tip: I’ve listed 2 amounts of icing sugar, the lesser amount is good for a flooding consistency, and the larger amount is for outlining, but you can add even more for a much thicker consistency good for writing. If you add too much icing sugar or would like to make a thinner consistency, add very small amounts of water, a few drops at a time, until you reach the consistency you need.
• Beat on low until combined and smooth.
• Use immediately or keep in an airtight container.
• Tip: Royal Icing starts to harden as soon as it’s in contact with air so make sure to cover containers with plastic wrap while not in use.
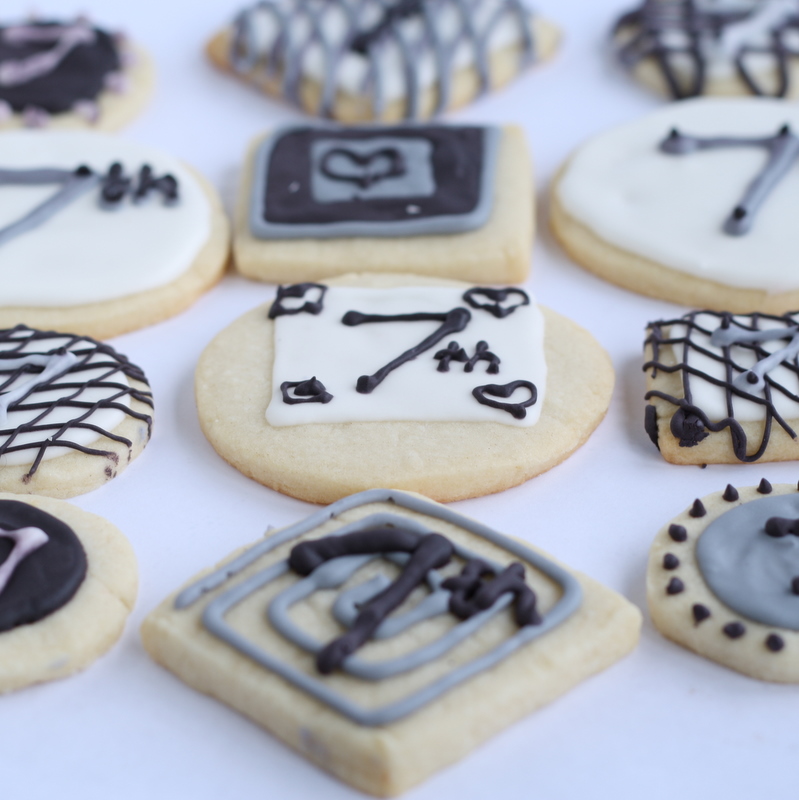
I was feeling in a creative mood, so I saved a few to decorate a little differently. I wanted to try painting with food coloring, and came up with these little scenes in honor of our anniversary.

My husband couldn't tell they were owls, but my three year old could. So either my drawing skills are on a level with a preschooler - or my three year old has an eye for art. I choose to go with the latter :)
Spiced Raspberry & White Chocolate Truffle Tarts

My post today has a decidedly red theme, beginning with a trip to historic downtown Branson, MO, where I bought a checkered red apron, a speckled red ladle, and fresh red raspberries.
My parents visited us last week, they live out of the country and only get to visit every few years. Consequently, I'm always trying to think of fun things we can do when they visit, but it always ends up with each of us staring at the other saying, "What do you want to do?" Then the other replies, "I don't know, what do YOU want to do?" Then we sit around trying to decide what to do until we've wasted half our day. I come from a long line of Indecisionators. Indecisionator: A person who, lacking the ability to make a decision in a reasonable amount of time, brings about the destruction of order in the day, thus creating chaos.
Imagine my pleasant surprise when my dad has a clear plan of wanting to go Branson, eat at "that little place that has the good pies", and "go to that shoe store". Obviously we have done this enough that I am able to decipher his vague references, and we hop in the car for the trip. Note: I only live 30 minutes from Branson, MO.
Upon finding a parking space in the historic downtown area of Branson, we head to "the place with the good pies", also known as the Farmhouse Restaurant. Here, you can order good, homestyle southern food; chicken fried steak, fried chicken, sandwiches, blackberry cobbler, pies, fresh lemonade and sweet tea, etc. After lunch we head over to Dick's Five & Dime, an old fashioned five and dime store with an eclectic mix of odds and ends.

I picked up this super cute enamel wear ladle.

I ended the day buying some fresh raspberries since they were on sale really cheap. I've had an idea floating around in my head for a raspberry dessert for a while, and decided this was a good time to play around with it. So these little berries were turned into Spiced Raspberry Curd, which I then turned into Spiced Raspberry & White Chocolate Truffle Tarts. I added a little cinnamon and allspice to the curd, which gave just a tiny bit of spice, but you can always add more if you want more of a spiced flavor. The first tart I ate was chilled in the refrigerator, and I froze the second one. They both turned out delicious and will be on my make again list :)
Spiced Raspberry & White Chocolate Truffle Tarts
Raspberry Curd
10 oz raspberries
3 Tbsp fresh lemon or lime juice
1/2 cup butter, cut into pieces
3 Tbsp sugar
4 Eggs
1/4 tsp ground cinnamon
1/8 tsp ground allspice
White Chocolate Truffle Filling
(adapted from Epicurious)
1 cup heavy cream
4 Tbsp butter
16 oz good quality white chocolate chips
1/8 tsp pure vanilla extract
Tartlette Shells
(from Dorie Greenspan's Baking: From My Home To Yours)
1 1/2 cups all purpose flour
1/2 cup powdered sugar
1/4 tsp salt
9 Tbsp unsalted butter, very cold
1 large egg yolk
White Chocolate Whipped Cream
1 cup heavy cream, chilled
remaining white chocolate truffle filling
For the Curd: Set aside six raspberries. Combine the rest of the raspberries and lemon/lime juice in a blender, cover and process until smooth. Press the mixture through a strainer to remove seeds. In a saucepan, melt the butter over medium heat. Reduce to low; add the raspberry puree, sugar, eggs and spices. Cook for 10-15 minutes, or until mixture is smooth and thickened, and reads 160F. Remove from heat. Press plastic wrap over the surface of the curd. Refrigerate for several hours or overnight.
For the Truffle: Bring one cup of cream and butter to a simmer over medium heat, stirring until butter melts. Remove from heat. Add white chocolate and stir until smooth. This may take a few minutes. Whisk in the vanilla. Pour 1 1/2 cups of the white chocolate filling into a small bowl; cover and refrigerate until chilled. Let the remaining white chocolate mixture cool to room temperature for about 15 minutes.
For the Whipped Cream: In the bowl of an electric mixture, pour the remaining 1 cup of cream and beat until soft peaks form. Pour in about half of the lukewarm white chocolate mixture; continue whipping until stiff peaks form. Cover and refrigerate. Pour the remaining white chocolate mixture into a resealable bag; cut the tip off the corner of the bag, and use the filled bag to pipe filling into the raspberries. Take the 6 berries you set aside earlier, and pipe the white chocolate filling into the center of the berries. Place the berries in the freezer until set up.
For the Tart Shells: Put the flour, sugar and salt in a bowl or a food processor. Stir or pulse to mix. Scatter the butter pieces over the flour and cut in with a fork, or use your fingers until you have coarse crumbs; if using a food processor then pulse until coarse crumbs form. You should have some pieces the size of oatmeal flakes, and some the size of peas. Stir the egg yolk to break it up, then add it to the flour mixture and pulse in 10 second intervals until clumps form.
Turn the dough onto a work surface, and very lightly knead just until any dry pieces are incorporated. Butter 6 small tart pans, and using your fingers press the dough into the bottom and up the sides of the pans. Freeze the crusts for at least 30 minutes before baking. Center a rack in a 375F oven. Butter the shiny side of 6 pieces of foil, big enough to cover each tart shell. Fit the foil, buttered side down, tightly over each tart crust. Put the tarts on a baking sheet, and bake for 30 minutes. Remove from oven and gently remove the pieces of foil. If necessary, use the back of a spoon to push down any areas that have puffed up. Let cool completely on a wire rack.
Once the crusts have cooled, remove from the pans, and pour some of the chilled white chocolate filling into the bottom of each tart crust. Enough to fill the crust about 1/3 full. Place the tarts in the freezer to let the filling harden. Once the filling is firm to the touch, spoon enough of the chilled raspberry curd into the shells to fill them up. Top with a little of the white chocolate whipped cream, and garnish with a white chocolate filled raspberry. Serve and enjoy! These are also delicious served frozen.

(raspberry curd adapted from Taste of Home)
Caramel-Chocolate Dipped Sugar Pears

I am back in business with a mostly healed eye, and I wanted to share this recipe with you, the same one that caused me so much trouble yesterday. I picked up a carton of little sugar pears at Sam's Club the other day, the tiny versions of grown up pears were too cute for me to resist. Pears are a perfect fall fruit, and I just had to turn these little guys into Caramel-Chocolate Dipped Pears. What better way to welcome the upcoming new season.
The first day of Fall is quickly approaching and the crispness in the air is easily recognizable. This time of year is like reacquainting myself with an old friend, as I pull out chunky sweaters, patterned rain boots and my favorite pair of jeans.
The dappled sunlight glinting off the burnished leaves, and the lengthening darkness of the cooler evenings, makes me switch gears from the energy and excitement of summer, and slow down for the simple pleasures of this season. Visiting the pumpkin patch in a favorite knit sweater, sipping warm apple cider, or roasting marshmallows over a roaring fire. It's a time for scarves and cozy hats, pumpkin pie lip balm and spiced lattes, reading a new book in that oversized stuffed chair in the corner, and sniffing the calming scent of the crisp, new pages.
Fall is definitely my favorite time of the year, as I get to relax, unwind and let the pleasures of this season wash over me. For me, it's about slowing down and enjoying the little things in life, spending time with my family and building memories for my son. If I could, I would make it fall every day of the year, with the exception of one snow filled day for Christmas. What do you love about this season? Do you have a favorite activity or a family tradition? Apple picking, canning preserves, making pies, camping, making Smore's over a bonfire, falling into a pile of golden leaves with your kids? I'd love to hear what fall means for everyone.

Caramel-Chocolate Dipped Pears
15-20 ripe sugar pears
2 cups granulated sugar
1 cup brown sugar
2/3 cup butter, cut into pieces
2/3 cup corn syrup
1 cup cream
1 tsp kosher salt
2 tsp pure vanilla extract
1/2 cup semi-sweet chocolate chips
2 tsp coconut oil
In a large heavy bottom pan, mix the sugars, butter, corn syrup, cream, salt, and vanilla. Cook over medium-high heat until the butter melts and mixture reaches 246 degrees (Fahrenheit) on a candy thermometer. Stir constantly to prevent burning the mixture. Remove from heat and cool slightly.
Holding the pears by the stem, dip them into the caramel and twist until they are evenly covered. Let the excess drip off into the pan, and quickly roll the caramel dipped portion in garnish of choice; nuts, sugar, sprinkles, etc. This caramel will set quickly, so the garnish needs to be applied as soon as possible. Place the pears on waxed paper and let dry. Refrigerate until completely set, before drizzling with melted chocolate.
Put the chocolate chips and coconut oil in a small microwavable bowl, microwave on low in 10 second intervals until the chocolate has melted and is a pouring consistency. You can add more coconut oil to get the right consistency if needed. Place chilled pears over waxed paper, and using a spoon drizzle the chocolate over the pears. Return to the refrigerator to allow chocolate to set up. If desired, you can remove the stems and cut a little slit in the top of the pear. Firmly insert a cookie stick into the slit and push into the pear to form a handle. Serve and enjoy!
Amber

Poke a stick in 'em, and kids will gobble them up...or just eat all the candy coating off like my son did:)

(caramel recipe adapted from Fresh)
Blinded & Maimed: Where's The Recipe?
Hi there. Did you wonder where I had disappeared to? Are you confused about my crazy post title?Besides having my parents visiting which left little time for posting, I had the good fortune to acquire a corneal abrasion, which has left me half blind. As a bonus I have three burned fingers - from boiling hot caramel. Word to the wise - don't try to make homemade caramel while you are half blind - it's that easy.
It all started so simply, I was standing in my kitchen minding my own business, when out of nowhere an evil speck of who-knows-what landed in my eye. Thinking nothing of it, I rubbed my eye and went merrily on my way, with a slightly more watery eye. Well, slightly more watery turned into a burning, stinging, swollen eye which I continued to ignore - I like to think I'm tough (ignore the fact that spiders make me squirm and the dark void under my bed still gives me the jeebs.) Trying to sleep that night was a hoot, imagine trying to sleep with buckets of sand, soaked in acid, and lit on fire, under your eyelids. Think I'm being dramatic? I'm not. 7:59am came around with me holding the phone, just waiting for one more minute to tick by so I can call my eye doctor. Long story short, she saw me, she treated me, and put me on the road to recovery. I really need to bake her a cake, or cookies, or something, right?
Well, after being told to try to keep my eye closed as much as possible, I got really bored. There's only so much sleeping a person can do. Boredom tends to lead to people doing stupid things - like deciding to make homemade caramel with one working eye - and accidentally sticking three of your fingers in the pot containing all of that thick, sticky, gooey, boiling hot caramel. Do I really need to tell you that I have not had a good day today? I had decided that I was not going to write a new post until my eye was completely healed; a dilated eye has me sitting inside a dark house with sunglasses on, so staring at a bright computer screen is not exactly comfortable. My spell check was my best friend today, otherwise I might have written some very questionable things. The main reason for this post was to share with you something that made my whole day, blinded eye, burned fingers and all.
I'm sure many of you are familiar with the Tasty Kitchen website, done by The Pioneer Woman. If not, you really need to check it out. It's a fun community to share recipes, and a great source of inspiration. They feature a few recipes each day on their main page, and then the editors also dedicate a post to a new recipe. What made me smile was my Cinnamon Chai Cream Pie being featured in their latest post, and my Caramelized Pineapple Cinnamon Creme Brulee was also a featured recipe on the main page. This may not be too big a deal for all you veteran bloggers, but for this newbie, it made my day.
Well, thanks for listening to this blinded and maimed rambling girl, and sorry there was no recipe today. I'll be posting a yummy recipe tomorrow though, the same culprit that wounded my poor fingers today.
Not Another Chocolate Chip Cookie: Browned Butter Chocolate Chipsters
I was thinking about browned butter the other day, and pondering the fact that it would probably take the basic chocolate chip cookie to the next level. Rather than using my own recipe, and incorporating the browned butter, I searched the internet to find a new recipe to try out. I came across this one and was not disappointed. It is unusual in the fact that it calls for active dry yeast, and this addition caught my attention enough to decide to try it. I'm not sure what the addition of yeast does in this cookie - I'm no Alton Brown - but I would guess is lends to the the flavor, and although these cookies were fluffier than any of my previous cookies, I'm not sure if that was due to the yeast.
The recipe uses a combination of browned butter and regular butter, which I think makes the browned butter part a nice subtle hint, and not a screaming browned butter cookie. We still want the hero of the show - the illustrious chocolate chip - to be the main star here :) I substituted semi-sweet chocolate chips for the bittersweet chocolate, since that was all I had on hand, and I made the cookies a bit smaller. This cookie is crispy and chewy on the edges, and soft in the middle. It is a cookie with substance and a perfect partner for an ice cold glass of milk. Try one.

Browned Butter Chocolate Chip Cookies
(recipe adapted from Emily of Sugar Plum)
1/2 cup unsalted butter
2 1/4 cups all-purpose flour
3/4 teaspoon baking soda
1 teaspoon active dry yeast
1 teaspoon kosher salt, plus additional for sprinkling
1/4 cup unsalted butter, softened
1 cup firmly packed brown sugar
1/2 cup granulated sugar
2 large eggs
2 teaspoons pure vanilla extract
8 ounces semisweet chocolate chips
3/4 cup coarsely chopped walnuts, toasted
Preheat oven to 375F and generously butter a baking sheet. Cut one stick of butter into small pieces, and melt in a small pan over medium heat. Continue to cook the butter, whisking frequently, until it starts to brown and foam, about 3-4 minutes. Set aside.
In a medium sized mixing bowl, sift together flour and baking soda. Stir in yeast and salt until combined.
Using an electric mixer on medium speed, beat softened butter, brown sugar and granulated sugar until well combined and grainy, about 1 minute; beat in browned butter for 1 additional minute. Beat in eggs and vanilla until well combined. Reduce mixer speed to low and gradually beat in flour mixture until just combined; stir in chocolate and walnuts with a wooden spoon until combined. Chill dough in the refrigerator for 1 hour, or the freezer for about 40 minutes.
For large cookies: Drop 1/4 cup measures of dough onto cookie sheet, forming into large mounds, and flatten slightly. Bake for 12-14 minutes, or until golden brown around edges. Cool 2 minutes before transferring to wire racks. Makes 16 large cookies.
For medium sized cookies: Drop by rounded tablespoons onto a cookie sheet, flatten slightly, and bake for 10-12 minutes, or until golden brown. Cool for 2 minutes before transferring to wire racks. Makes about 28 medium cookies.

Pineapple Cinnamon Creme Brulee

The second installment of my pineapple cinnamon extravaganza is....Caramelized Pineapple and Cinnamon Creme Brulee. This was a new challenge for me, as I have never made creme brulee before. The logical thing to do would be to start with a traditional vanilla recipe, but I have never been under the illusion that I am logical. Since the base for creme brulee and ice cream is so similar, and the Pineapple Cinnamon Ice Cream turned out so well, I thought that the flavors would probably work in a creme brulee too. It turned out I was right!
I don't really have anything to compare it with, since I've never even tasted creme brulee - gasp! But this treat was so good! I did not have a blowtorch, so I had to compromise and use my broiler. While I'm sure the blowtorch would have yielded superior results with the hard, crackling sugar effect, my broiler worked just fine for this creme brulee novice. The caramelized pineapple added a rich, sweet surprise at the bottom of the smooth and creamy creme brulee. While my sugar topping may not have been perfect, the extra crunch on top of the velvety custard was so good.
Caramelized Pineapple and Cinnamon Creme Brulee
1 fresh pineapple, cut into pieces
1/2 cup brown sugar
1 1/4 cups heavy cream
1/2 cup whole milk
1 tsp ground cinnamon
3 egg yolks
1/3 cup sugar
2 tsp pure vanilla extract
About 6 Tbsp sugar or sifted brown sugar, for topping
Heat oven to 500F, and position oven rack 6 inches from the broiler. Slice up the pineapple and arrange on a buttered baking sheet. Sprinkle brown sugar evenly over the pineapple. Place the baking sheet under the broiler, and broil until the pineapple turns golden brown, about 5 minutes. Remove from oven and set aside. Center the oven rack and reduce temperature to 200F.

In a medium saucepan, heat the cream, milk and cinnamon until it just begins to boil. In a 1 or 2 quart measuring cup, whisk the egg yolks, sugar and vanilla until well blended but not airy. While whisking, slowly drizzle in about one quarter of the hot cream. Still whisking, slowly add the remaining cream, this will prevent the eggs from curdling. Arrange the caramelized pineapple pieces in the bottom of your baking dishes.

Tap the measuring cup against the counter to remove any air bubbles, then strain the mixture over the pineapple pieces in your baking dishes. You can use 6 ramekins or any small, shallow dish that will hold 3/4 cup of liquid. Bake the custards for 50 to 60 minutes, or until the centers are set. This took about 80 minutes in my oven. Tap the sides of the dish, and the custards should hold firm.
Place the custards on a cooling rack until they reach room temperature. Cover each dish with plastic wrap and refrigerate until well chilled, at least 3 hours. They can be kept in the refrigerator for up to 2 days.
To caramelize the sugar with blowtorch: When ready to serve, sprinkle the top of each custard evenly with about 1 tablespoon of sugar. Using a blowtorch, brown the sugar until it bubbles and colors. Repeat for each custard.
To caramelize the sugar in a broiler: Preheat the broiler and fill a shallow roasting pan with ice cubes. Sprinkle the custards with the sugar topping, and put the baking dishes on the bed of ice. Place the pan under the broiler. Watch the custards carefully, depending on your oven, it can take a few seconds or minutes to caramelize the sugar. When the sugar bubbles and browns, remove the custards from the oven and out of the ice bed. Let them settle down before serving.

(adapted from Baking: From My Home to Yours by Dorie Greenspan's: Creme Brulee)
Pineapple Cinnamon Ice Cream
.jpg)
I don't know about you, but when I get the hankering to make something new, I usually think of what flavors I want to work with first, and then how I can incorporate those flavors into a dish. Most of the time, I have too many ideas and have to whittle it down to just one. Lately, I've been thinking what's the point of having you're own blog, if you can't make you're own rules? I decided there's no reason to limit myself, so I'm going to dedicate a whole month to the flavor/ingredient of choice, and make as many (or few) dishes as I like from that ingredient. What inspired this imaginary-rule-breaking-idea? Pineapple and Cinnamon. I had three distinct ideas of how to use these flavors together, and stubbornly refused to pick just one. So here I am: One month. Two ingredients. Three recipes. Let's get started.
When I envision pineapple I think of summer, and cinnamon inevitably conjures up images of fall. So with that in mind, I believe the combination of these two ingredients is a good segue from summer to fall. My first recipe - with a nod to the end of summer, hot days, and frozen treats - will be of course, ice cream.
Pineapple Cinnamon Ice Cream
2 cups heavy whipping cream
1 cup milk
1/2 cup brown sugar
1/2 cup granulated sugar
2 eggs
1 1/2 tsp ground cinnamon
1 cup fresh pineapple (very ripe and sweet) pureed or 8 oz canned crushed pineapple (with juice)
Bring the cream to a simmer over medium heat, add the cinnamon, brown sugar and stir. Remove from heat and let cool for a few minutes. Whip the eggs and white sugar together until light and fluffy. Slowly whisk the egg mixture into the cream mixture. Cook over medium heat until the mixture begins to thicken, about 3-4 minutes. Remove from heat and let cool. Chill the cream mixture in the refrigerator until cold. Once cold, stir in the fresh pineapple. Add the ice cream to your ice cream machine, and make according to the machine's directions. Place the ice cream in the freezer until firm. Serve and enjoy!
Stay tuned to see the next brainchild of this project...
.jpg)
Roasted Brown Sugar Papaya
.jpg)
I like to think of myself as an adventuresome eater. This started one night many years ago, when as an unsuspecting kid I sat down to our typical family dinner. At least, what I thought was a typical dinner and just good ol' hamburgers. The recollection in my memory goes like this:
Sneaky Mom: "Dinner's ready!"
Me: "What are we having?"
Co-Conspirator Dad: "Burgers."
Me: "Mmmm. They look good."Sounds of chewing, chomping, and general satisfied sounds coming from me and the little brother.
Co-Conspirator Dad: "How do those burgers taste?"
Sidelong glances passed between Mom and Dad.
Me: "They're good!"
Poor chump little brother: "Yeah, good."
Co-conspirator Dad: "They don't taste funny...or weird...or anything huh?"
Mom and Dad are smirking at each other.Me: "I don't think so...."
Evil Father: "Good! Cause you're eating Kangaroo burgers!"
Poor chump little brother and I start choking in surprise, faces are turning blue, and breathing is relatively difficult. But at least the parents are having a good ol' laugh at our expense.
The moral of this story? Parents, don't wait until your child's mouth is stuffed full of food before telling them they are eating something suspect. It could result in a trip to the hospital, or at the very least having to administer the Heimlich maneuver. "The Kangaroo Incident", as I like to call it, was the beginning of me starting to try new and different foods. The child version of myself realized that just because something looks or sounds gross, doesn't meant it will be.
On a related note, I picked up a papaya at the store the other day, because I had actually never tried one. I know they are readily available, and not too adventuresome, but I decided it was time I try one. I wasn't sure what to do with it, other than eat it raw, and I wanted to try something different. So I came across a recipe that called for roasting it in the oven, and adapted it to my tastes. It turned out pretty good, but I don't think it will become a favorite fruit of mine.
.jpg)
Roasted Brown Sugar Papaya
1 large papaya, slice in half with seeds removed
1/4 cup brown sugar
juice of one lemon
1/8 tsp ginger
3 drops rum essence
heavy cream
Mix brown sugar, lemon juice, ginger, and rum essence in a small bowl. Stir until sugar dissolves. Spoon the mixture into the center of the papaya half. Brush syrup over edges. Broil at 500F for about 15 minutes, or until the papaya flesh is tender. Remove from oven and place on serving dish. Drizzle with heavy cream and serve immediately.
.jpg)
(recipe adapted from Rachel Ray, Roasted Papaya)
Herbes De Provence & Cheddar Buttermilk Biscuits
.jpg)
I have a confession. I am addicted. I should probably preface this by saying, "Hello. My name is Amber, and I'm a TJ Maxxaholic." If you're lucky enough to have one of these stores near you, you probably know what I mean. It is my weekly crack. My shameful obsession. On any given day (OK, maybe not EVERY day) I can be seen slinking from my car and making a dash for the front doors. My mission: The feeling of glee when I find my treasure - er- great deal, and take said treasure home. Some TJ Maxxistas may head for the purse section, others the clothing department, but I make a beeline for the housewares department. It's like walking into a candy shop, with rows of shiny dishes, gleaming utensils, and gadgets galore. I can always find something I need, and not blow my budget either.
What does this have to do with biscuits you say? Well, I happened to pick up a giant tub of Herbes de Provence on their clearance shelf the other day, and since I have been wanting to buy this seasoning for a while, plopped it in my cart. I didn't know at first what I wanted to do with it, but I ended up roasting a chicken with sweet potatoes and apples, and rubbed the chicken with this seasoning. I also whipped up some buttermilk biscuits, and added the Herbes de Provence into the batter. I used my favorite buttermilk biscuit recipe, which I've posted about before here, and they turned out so tasty!
Herbes de Provence & Cheddar Buttermilk Biscuits
1 1/4 cup cake flour
3/4 cup all-purpose flour
1 1/2 tsp baking powder
1/2 tsp baking soda
1/2 tsp salt
1 Tbsp Herbes de Provence
1/4 cup butter, cut into small chunks
1 cup grated sharp cheddar cheese
3/4 cup buttermilk
Set your oven to 500 degrees. It is important to have everything set up before you make your biscuits: Cut your butter into small pieces, place in a bowl and return to the fridge. Put your buttermilk in a measuring cup, and set aside. Lightly flour your work surface and keep a little extra flour aside for your biscuit cutter and hands. Set out your biscuit cutter and an ungreased baking sheet.
**In a medium-large bowl, whisk flours, baking powder, baking soda and salt until well blended. Cut in butter with a fork, pastry blender, or your fingertips, until you get coarse crumbs. Stir in the shredded cheese. Add the buttermilk to the flour mixture and stir lightly until the dough just comes together in a ball. It will look shaggy and uneven.
.jpg)
**Turn dough out onto floured surface. With floured hands, gently knead the dough a few times to finish mixing. Pat into a 3/4-1 inch thick circle. Cut biscuits my pressing straight down, do not twist the cutter. Form any scraps into extra biscuits using your hands. Don't re-roll the dough. Place the biscuits on a baking sheet so that the sides are touching. Optional: Brush melted butter over the tops of biscuits before baking.
.jpg)
**Put the baking sheet on the middle rack of your preheated oven. Bake for 8-10 minutes, or until the tops are golden brown. Mine took about 9 minutes. Remove biscuits to a cooling rack for a few minutes. Eat warm and enjoy!
Tips: My mom always taught me to handle your biscuit dough as little as possible. Also, my grandfather (who was a baker) said to never twist the biscuit cutter while pressing down, this pinches the dough and they will not turn out as fluffy. Make sure your butter is cold. Do not bring it out until you are ready to cut it into the flour.
.jpg)
(adapted from Pinch My Salt)
Subscribe to:
Posts (Atom)


