Carrot-Pineapple Cake

Happy Memorial Day! I hope you’re enjoying your holiday weekend, I know I am. I am so thankful for all the wonderful military men and women who protect us and serve our country. To celebrate, I want to share one of my favorite cake recipes with you. This is a family recipe, passed to me from my mother-in-law, and it’s a definite keeper.
I love Carrot Cake, and this is a really good one…PLUS it’s super easy to make. No messy shredding of carrots here. Just a few jars of pureed baby food.
Yep, you heard me right. Baby food. This recipe uses pureed carrots to add that familiar carrot cake taste, and a can of crushed pineapple makes it super moist. This is definitely not a dessert for those watching their waste-line, but you could easily reduce the oil and sugar without affecting the taste and consistency too much.
Carrot-Pineapple Cake

Serves: 8-1-0 Printable Recipe
2 cups all-purpose flour
2 cups sugar
2 teaspoons baking soda
2 teaspoons cinnamon
1 teaspoon salt
1 ½ cups oil (your choice)
4 eggs
2 jars of carrot baby food 6 oz. size
1 can crushed pineapple 8 oz. size (drained)
Directions:
In a large bowl combine the dry ingredients. In a medium bowl, whisk the oil, eggs, pureed carrots and drained pineapple until thoroughly mixed. Add the wet ingredients to the dry ingredients and stir just until combined. Pour batter into an ungreased 9x12 baking dish (or similar size).
Bake at 350 F for approximately 35-40 minutes, or until a toothpick inserted into the middle comes out clean. Cool completely, then add frosting.
Frosting:
1 package cream cheese 8 oz. size – softened to room temperature
½ cups butter, softened
1 teaspoon vanilla
3 ¾ cups powdered sugar
In the bowl of an electric mixer, combine the cream cheese, butter and vanilla until smooth. Slowly add the powdered sugar and beat until combined. Now it’s ready to add to your cake!
Enjoy!
Amber

Just in case you ever wondered what happens to the sugary goodness around my house. There is usually a certain person with sticky fingers, hovering impatiently, waiting to do this....

and this.....

Pinteresting Monday’s–Devil’s Food Cake Love
Did you know May 19th was Devil’s Food Cake Day? I didn’t. I wasn’t even aware there was a day dedicated solely to the king of all chocolate cake. But I’ll know for next year now. I thought a dedication in honor of this yummy chocolate cake was in order, and a perfect theme for my next Pinteresting post.
This tempting dessert, considered the counterpart to angel food cake, is more moist and airy than other types of chocolate cake. Why? Baking Soda! Baking soda raises the pH level of the cake, making it a deeper and darker color. It also uses hot or boiling water as the cake's main liquid rather than milk.
This collection of Devil’s Food Cake recipes is just the tip of the iceberg, but should be enough to get your taste buds watering, and the kitchen bowls to mixing. You can find the list of goodies below.

1. Devil’s Food Cake Cookies, courtesy of Bakingdom.
2. Chocolate Chip Cookie Dough Devil’s Food Cake Cheesecake. This sounds insanely delicious. Courtesy of Sprinkle Bakes.
3. Perfect Devil’s Food Cake. Photo courtesy of Notions & Notations of a Novice Cook, recipe by David Lebovitz.
4. Heaven and Hell Cake. Describes this perfectly! Courtesy of Whisk Kid.
5. Devil’s Food Cake Balls. Who doesn’t love a cake ball? Courtesy of Pillsburybaking.com
This tempting dessert, considered the counterpart to angel food cake, is more moist and airy than other types of chocolate cake. Why? Baking Soda! Baking soda raises the pH level of the cake, making it a deeper and darker color. It also uses hot or boiling water as the cake's main liquid rather than milk.
This collection of Devil’s Food Cake recipes is just the tip of the iceberg, but should be enough to get your taste buds watering, and the kitchen bowls to mixing. You can find the list of goodies below.
Enjoy!

1. Devil’s Food Cake Cookies, courtesy of Bakingdom.
2. Chocolate Chip Cookie Dough Devil’s Food Cake Cheesecake. This sounds insanely delicious. Courtesy of Sprinkle Bakes.
3. Perfect Devil’s Food Cake. Photo courtesy of Notions & Notations of a Novice Cook, recipe by David Lebovitz.
4. Heaven and Hell Cake. Describes this perfectly! Courtesy of Whisk Kid.
5. Devil’s Food Cake Balls. Who doesn’t love a cake ball? Courtesy of Pillsburybaking.com
Mom’s Berry Dumplings

My grandfather was a professional baker, so you’d think that my mother would have automatically been a great cook. Such was not the case however, her skill came through trial and error, sweat and tears…the old fashioned way.
Does your family have inside jokes, stories you hear over and over again? Mine does. One of them revolves around my dad’s favorite dessert – cherry dumplings. When my mom and dad starting dating (they were high school sweethearts), my mom really wanted to impress my dad and make his favorite dessert. She had seen it made often enough, with the sweet fruit bubbling merrily on the stove and fluffy dollops of dumpling dough resting on top.
She did NOT, however, really know what was in the dumping dough. So she threw some flour and water together, feeling pretty proud of herself for making homemade dumplings, and dropped what she thought was going to be delicious dumplings over the skillet of cherries.
Fast-forward to dessert time, my dad was served a bowl full of yummy cherries topped with piles of hard as rock dumplings. We’re talking projectile missile material people. This was the first cooking lesson my mom learned the hard way – dumplings were more than flour and water. After 45 years of marriage, my mom has perfected her cooking skills, and makes the best fruit dumplings. You can easily switch out the fruit for whatever you want. Some of my favorites are: blackberry, strawberry, peach, strawberry-rhubarb, cherry, etc…you get the idea.
Topped with heavy cream or ice cream, these dumplings really hit the spot!

Mom’s Fruit Dumplings
Serves: 4-6 Printable Recipe
2 cups all-purpose baking mix (homemade or store bought. See homemade recipe below.)
2/3 cups milk
4 cups berries (or any fruit of your choice)
1/3 cup sugar
Directions:
Stir together the strawberries and sugar in a skillet, let sit for about 10-15 minutes until juice forms. Bring to a simmer over medium heat, and cook uncovered for about 10 minutes. Just until the berries begin to soften, but aren’t mushy.

While the berries are simmering, mix together 2 cups of the all-purpose baking mix and 2/3 cups milk until a soft dough forms. Using a small spoon, drop dough evenly over the berry mixture.

Cover the pan, reduce heat to low and cook for another 8-10 minutes. Until the dumplings have doubled in size and look dry on top.

Remove from heat and let stand for about 5 minutes. Serve warm, drizzled in cream. This is pure heaven.
 Homemade All-Purpose Baking Mix recipe can be found below.

All-Purpose Baking Mix:
2 cups all-purpose flour
1 tbsp baking powder
1 tsp salt
1/3 cup vegetable shortening or butter
Sift flour, baking powder and salt in a large bowl. Cut shortening/butter in with a fork until mixture resembles fine crumbs. Store mixture in an airtight container in the fridge for up to 4 months.
Enjoy!
Amber
Homemade Breakfast Sandwiches

I wish I was one of those people who was so prepared that they had weeks worth of frozen meals made up, just waiting to be reheated for a quick and easy meal.
I’m not. I’m a procrastinator.
I tend to leave things to the last minute, just hoping that some magic fairy will do it for me. After thirty years I’ve come to realize…there is no such magic fairy. So, in light of this very disappointing revelation, I’ve decided to try to be more organized and prepared. My first project? Breakfast. I love the results of the Overnight Oatmeal Jars so much, I decided to experiment with other make-ahead breakfasts. My husband likes a certain morning breakfast sandwich, and since the fast food version is so unhealthy I wanted to make our own at home.
These are sooo easy to make in large batches, and you can eat them right away, or with a few modifications freeze them to reheat later. This is a totally awesome idea from the Macheesmo blog. I adapted it a bit by adding some bacon and I changed the cooking method a bit. These were so delicious and easy to assemble. You can customize each sandwich however you like it. I like my eggs a tad runny and cooked them that way, but you can easily scramble the eggs instead and add any kind of veggies and meat you like.
Homemade Breakfast Sandwiches
Serves: 12 Printable Recipe
12 english muffins
12 large eggs
12 slices of cheese
12 slices of precooked bacon
butter or cooking spray
salt, to taste
pepper, to taste
Add-In's
Tomato
Avocado
Spinach
Directions:
1. Preheat oven to 350F. Separate the english muffins and place them with the inside facing up on a cookie sheet. Place a slice of cheese on the tops of each muffin, then layer a slice of bacon over the cheese. I use precooked bacon to it bakes quickly in the oven.


3. After the eggs have cooked for about 4-5 minutes, place the prepared english muffins in the oven also, for the cheese to melt and bacon to become crisp. This will allow the muffins to become lightly toasted too.
4. Remove the eggs and and muffins when done. Slide a knife gently around the edges of the cooked eggs to remove them. Spread some butter over the bottom half of each muffin, then place a cooked egg over each buttered half. Season with with salt and pepper, then place the cheesy bacon top over the eggs. Feel free to add any kind of toppings you want: fresh avocado, spinach, tomato, etc…the possibilities are endless!

5. You can eat them immediately, or wrap each muffin with foil, place them in a large freezer bag and keep in the freezer. When ready to reheat, just pop in a 350 F oven and cook for about 20-30 minutes, or until heated through. These are easy to reheat while you are getting ready in the morning, just pop one in the oven, go about your morning routine, then you’ll have a warm, toasty muffin ready for you.
Tip: Don’t reheat in the microwave…unless you like soggy bread. If you’re a soggy bread lover, go for it! If you want to add fresh vegetables to your sandwich and you are freezing these for later, I would wait to add the veggies until you’re ready to reheat.
Enjoy!
Amber

Skillet Asparagus Tart

Do you have a favorite vegetable? I do. I love Asparagus. Serve it to me any way, grilled, roasted, pureed in a soup...thrown across the room while I catch it like a seal. Yes, I am slightly weird. Yes, I love it that much.
With spring in full bloom, it's the perfect season to enjoy my favorite vegetable. So when I came across this Tasty Kitchen recipe for Skillet Asparagus Tart, my watering taste buds were begging me to make this dish. Not only does this tart feature the most amazing vegetable ever made, it's filled with lemon zest, cream, and fresh parmesan. When you top it with fresh basil or any other herb of your choice, the result is truly delicious.

For the recipe, head on over the the Tasty Kitchen Blog, where you’ll find my post and you can snag this yummy recipe. Thanks Tasty Kitchen!
Enjoy!
Amber

Pinteresting Friday
Today’s post is going to be short and sweet. As I’m writing this, there are four movers in my house carrying hoards of boxes and furniture to the gigantic moving semi parked outside our house. Needless to say, I’m a tad busy today!
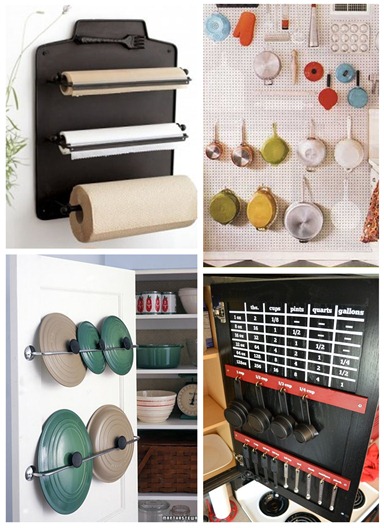
I haven’t been able to browse Pinterest in a while, but since my life has been all about moving and packing lately, I thought a “Organization” theme was in order. I have a Pinterest board dedicated to all my favorite organization finds. Here’s just a few of my favorites. I can’t wait to put these into practice in my new house!
1. Pottery Barn Cucina Wall Mount Kitchen Roll. I love how this organizes your paper towels, plastic wrap and foil. Plus, it makes cutting off piece super easy. No more wrestling with those pesky boxes!
2. Pegboard Kitchen Organizer. I’ve always secretly coveted my husbands pegboard that organizes his tools so nicely. I never thought to use it for my kitchen “tools”.
3. Towel Rod Lid Organizer. So simple but such a great idea!
4. Cabinet Door Utensil Organizer. LOVE THIS! What a unique way to use a typically unused space. Paint the inside of your cabinet and add a measurement conversion table. Also a great space to organize your measuring spoons.
I haven’t been able to browse Pinterest in a while, but since my life has been all about moving and packing lately, I thought a “Organization” theme was in order. I have a Pinterest board dedicated to all my favorite organization finds. Here’s just a few of my favorites. I can’t wait to put these into practice in my new house!
1. Pottery Barn Cucina Wall Mount Kitchen Roll. I love how this organizes your paper towels, plastic wrap and foil. Plus, it makes cutting off piece super easy. No more wrestling with those pesky boxes!
2. Pegboard Kitchen Organizer. I’ve always secretly coveted my husbands pegboard that organizes his tools so nicely. I never thought to use it for my kitchen “tools”.
3. Towel Rod Lid Organizer. So simple but such a great idea!
4. Cabinet Door Utensil Organizer. LOVE THIS! What a unique way to use a typically unused space. Paint the inside of your cabinet and add a measurement conversion table. Also a great space to organize your measuring spoons.

Blueberry Maple Pecan French Toast Casserole

Well, those who have been following our relocation to St. Louis know we only have 6 days left in our house. I’m not sure how I feel about it. On one hand I’m excited to move into our new home and start the next chapter in our lives. On the other hand, I’m sad to leave the house and town we’ve lived in for the past 8 years. This is the home we bought as newlyweds, the home we brought our newborn son to, and the home we’ve built memories in. It will definitely be a bittersweet day for me.
Since this next week I’ll be too busy for updating posts, I wanted to get this really tasty recipe up today. It’s been overcast and dreary here today (kind of like my mood), so I decided some comfort food was in order. What’s more comforting than Blueberry Maple Pecan French Toast Casserole? Let me tell ya, NOT MUCH!
This french toast casserole is filled with juicy blueberries, topped with crunchy, toasted pecans, and drizzled with cinnamon-brown-sugar-buttery goodness. Oh yeah, can’t forget the Blueberry Honey Maple Syrup…and if you’re feeling reeeeally bad…a good drizzle of fresh cream. Mmmmm. I normally make this in a 9x13 casserole dish, but I decided mini french toast casserole’s would be fun for me and my son today. I loved how these turned out!
Blueberry Maple Pecan French Toast Casserole
Serves 8 Printable Recipe

2 large loaves of french bread (day old an stale is good!)
6 large eggs
3 cups milk
1 cup brown sugar (divided)
1 tsp pure vanilla extract
1/2 tsp ground nutmeg
1/2 stick butter plus 1 tbsp
1/2 tsp ground cinnamon
3 cups blueberries (fresh or frozen)
1 cup pecans
salt, to taste
1/2 cup honey
1/2 cup maple syrup
1 tbsp lemon juice
Directions:
For the syrup: in a small saucepan combine 1/4 cup of honey, 1/4 cup of maple syrup and 1 cup blueberries. Cook for 2-3 minutes or until berries have burst. You can strain the syrup if you want to, but I like to leave the blueberries in. Add lemon juice.
For the nuts: Preheat oven to 350°F. Spread pecans on a baking sheet sheet and toast about 6-7 minutes until fragrant. Toss with 1 Tbsp butter and some salt (to taste) and set aside.

Cut French bread into 1" pieces. Butter a 9 x 13 baking dish and spread the bread cubes in the pan (You may not need to use all of them). Whisk together milk, eggs, 3/4 cup brown sugar, vanilla and nutmeg. Pour over the top of the bread, cover and let stand 1 hour or overnight in fridge. If you want to make these individual sized like I did, just spread the bread crumbs and milk mixture evenly between your ramekins. You will probably have more filling than you need, just gauge it by your eye. I halve the recipe when I make individual servings. Increase oven temperature to 400°F. Layer the 2 cups of blueberries over the bread, then sprinkle the toasted pecans over the blueberries.

Heat 1/2 stick butter, 1/4 cup brown sugar and 1/2 tsp cinnamon in a small sauce pan. When butter has melted drizzle over the bread. Bake for 1 hour or until puffed up and browned, and liquid from blueberries is bubbling. Casserole may need to cook longer if its taken directly from the refrigerator than if at room temp. When done, allow the casserole to sit for at least 10 minutes to set up.
Now drizzle some of that warm Honey Blueberry Maple Syrup over the top….and a little cream…if you’re bad – like me.

Enjoy!
Amber

Subscribe to:
Posts (Atom)






 Posts