Blueberry Chicken Salad
July 7, 2010
Since I had leftover chicken from the mammoth size split chicken breasts I grilled last night, I wanted to be thrifty and use them for my lunch today. I opened the fridge door and perused the shelves to see what I could put together. There was a pint of blueberries that were nearing their shelf life, and an almost empty tub of sour cream.
I decided to do some experimenting and came up with this blueberry chicken salad. I was pleasantly surprised that all of the flavors went well together, and other than almost choking on a piece of bone that got mixed in with the chicken...it was a yummy lunch. Some of the measurements are approximations, since I did a lot of throwing in a little of this and that, but it's pretty close. You can adjust things to suit your own tastes. Next time I'll add some toasted pecans or walnuts and a little celery for added crunch, but I was short on ingredients today so I had to work with what I had.
Blueberry Chicken Salad
1 1/2 cups cooked chicken breast
1/3 cup fresh blueberries
1/4 cup chopped apples (I used about 1/4 - 1/3 cup; gala or braeburn are my favorite)
1/4 cup sour cream
1-2 Tbsp mayonnaise
1/2 tsp fresh lemon juice
1/4 tsp chopped fresh rosemary (I used about 1/4 - 1/2 tsp)
1/8 tsp dill
salt & pepper to taste
Place chicken, blueberries, and apples in a medium sized bowl. In a separate bowl combine sour cream, mayonnaise, lemon juice, rosemary, dill, salt and pepper. Add some of the sour cream mixture to your chicken, until you reach your desired consistency. Gently toss together. I don't like too much mayonnaise in my chicken salad, so I only used about half of the sour cream/mayonnaise mixture. Alternately, you could use another cup of chicken to use up the rest of the sauce. Serve on a bed of spinach or make into a tasty sandwich. Enjoy!
Split Chicken Breast with Orange-Tomato Glaze
July 6, 2010
I bought some huge split chicken breasts for dinner tonight. They were the Smart Chicken brand, which I like because the chickens are raised without the use of hormones, animal by-products or antibiotics. The quality is great and the chicken tastes really fresh. I knew I wanted to grill them with some sort of glaze, and went with an orange-tomato based marinade. The result was really good and will be my go-to chicken marinade from now on. I served it with some fresh corn on the cob brushed with an herb infused butter.
Orange-Tomato Glazed Chicken
1/2 cup light brown sugar (I used turbinado sugar)
1 1/2 cups freshly squeezed orange juice
1/2 cup canned tomato sauce
2 Tbsp soy sauce
1 tsp worcestershire sauce
1 tsp minced garlic
2 bone in split chicken breasts
In a saucepan: bring brown sugar, orange juice, tomato sauce, soy sauce, worcestershire sauce and garlic to a boil. Stir to dissolve sugar. Simmer for 5 minutes then let sauce cool. Reserve about one cup of the glaze for basting later on. Place the chicken breasts in a dish and pour the rest of the glaze over them. Cover and let marinade in the refrigerator for a couple of hours. Place chicken on the grill and cook for about 10-15 minutes per side, depending on the size of your chicken breasts. A few minutes before the chicken is done, brush some of the reserved marinade over the chicken and finish cooking. Chicken is done when juices run clear, or an internal instant read thermometer reads 170 degrees. I only cooked two chicken breasts, and there was plenty of marinade left over, so this would probably be enough for 4 breasts.
(marinade adapted from Apples for Jam )
)
Rosemary-Basil Herb Infused Butter
4 oz unsalted butter, melted
1-2 fresh basil leaves
1/2 sprig fresh rosemary
Melt the butter in a saucepan and add the fresh herbs. Let simmer for a few minutes, then reduce heat and cook for about 10 minutes.
For Corn: Peel back husks from corn, but leave intact, and remove strings. Brush herb butter over corn and then pull husks back up over the kernels. Place over indirect heat on the grill, and cook for about 20 minutes, rotating as needed.
Fried Mozzarella Sandwiches
I've been waiting for today to make these yummy looking fried mozzarella sandwiches. Again, I found a great recipe in my Apples For Jam
Fried Mozzarella Sandwiches
2 Eggs
Salt
4 to 5 Tbsp all-purpose flour (whole wheat flour would work too)
5 Tbsp Italian bread crumbs
3oz Mozzarella cheese, thinly sliced
4 Slices good, crusty bread
Olive oil, for frying
Whisk the eggs with some salt in a shallow bowl. Sprinkle the flour over one plate and the breadcrumbs over another. Place the thinly sliced mozzarella cheese on two slices of the bread, top with the other two slices to make two sandwiches. Cut each sandwich in half. Heat enough oil to come about 1/4 inch up the side of your frying pan. Holding each sandwich firmly together, dip them first in the flour, making sure all sides are covered. Then dip them in the egg, then in the bread crumbs until well coated. Fry them over medium heat until they become golden brown on each side. Place them on a plate covered in paper towels, to allow the excess oil to drain off. Serve immediately.
(adapted from Apples for Jam
Peanut Butter Sheet Cake
July 5, 2010
When planning what I was going to take to our family 4th of July get-together, I had my own peanut butter hankerings to think of, and that of little buddy - who was just dying to make cupcakes with Mommy.
Now, a normal person would just kill two birds with one stone and make peanut butter cupcakes.
Peanut butter goodness...check.
Cupcake cuteness...check.
But alas, I have never been under the illusion that I am normal, so I went with making two different desserts. Seriously, who ever heard of too much dessert?
I decided to go with a Peanut Butter Texas Sheet Cake, and Red, White & Blue Cupcakes (with Almond Cream Cheese Frosting).
My husband is a fan of chocolate sheet cake - the thin, dense kind with lots of luscious, chocolatey frosting that sets with a thin glaze on top. I like sheet cake as well as the next person, but I am always wondering how I can make a dessert fit with different flavors. Since the only other thing my husband likes as well as chocolate is peanut butter, I knew that sheet cake + peanut butter would be a winner. I came across this recipe and decided to give it a try...I'm glad I did.
The cake itself was dense, moist and not too sweet....which paired very well with the peanut butter frosting that went on top. The frosting was the star of the show for me, this is definitely a dessert I will make again.
2 cups sugar
2 cups flour
2 eggs
1 teaspoon baking soda
1 cup sour cream
2/3 cup creamy peanut butter
1 cup butter
1 cup water
Frosting
1/2 cup butter
2/3 cups creamy peanut butter
6 tablespoons milk
2 1/2 cups powdered sugar 1 teaspoon vanilla
Preheat oven to 400 degrees.
Cake: In a bowl combine the sugar and flour. In a separate bowl (I used my mixer bowl) mix eggs, baking soda, and sour cream well. Set aside. In a small saucepan combine peanut butter, butter, and water. Bring to a boil. Stir the boiled peanut butter mixture into the flour mixture, then add to the sour cream mixture. Pour into a 15×10 inch sheet/jellyroll type pan. Bake 20 minutes or until done. Cake is done when toothpick inserted in the center of the cake comes out clean.
Frosting: Combine the butter, peanut butter, and milk in a saucepan. Bring to a boil stirring constantly. Add the powdered sugar and mix well. let the frosting cool for a few minutes, then add vanilla. The frosting will be thick, mix well. Pour over cake while both are still warm. Let cool, then serve.
(adapted from an old church cookbook)
Red, White and Blue Cupcakes
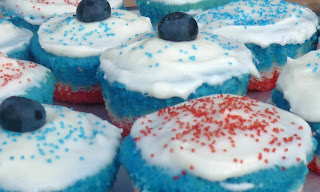
For the second half of my desserts from the 4th, I made Red, White & Blue Cupcakes, with an Almond Cream Cheese Frosting. I adapted the White Velvet Butter Cake from The Cake Bible, by substituting half of the vanilla for almond extract. Since I love almond flavor I try to put it in whatever I can. I separated the batter into three bowls, and used Wilton gel food dye to color one bowl red, the second blue, and the third I left white. Then I layered each color to make the red, white, and blue layers. I used a basic cream cheese frosting recipe, and flavored it with almond to pair with the cake. The cake was light and fluffy, and I loved the look of the layered colors.
Red, White & Blue Cupcakes
(White Velvet Butter Cake)
4 large egg whites (4 oz egg whites)
1 cup milk
1 1/4 tsp vanilla extract
1 tsp almond extract
3 cups sifted cake flour (cake flour-NOT all-purpose flour)
1 1/2 cups sugar
1 tbsp + 1 tsp baking powder
1/2 tsp salt
12 tbsp (1.5 sticks) unsalted butter, softened
 Preheat oven to 350F and fill two 12 count cupcake trays with cupcake wrappers.
In a medium bowl, combine egg whites, vanilla and almond extracts, and 1/4 cup milk.
In a large mixing bowl, combine cake flour, sugar, baking powder, salt and mix together to blend. Add the butter and remaining 3/4 cup milk. Mix on low speed until dry ingredients are moistened.
Increase to medium speed (high if using a hand mixer) for 1.5 minutes. Then add the egg, vanilla and milk mixture in three equal parts, beating for 20 seconds between additions. Separate the batter into three bowls.
Put a few drops of blue gel dye into one bowl, until you reach desired shade. Put several drops of red gel dye into the second bowl, until desired shade. Leave the third bowl white.
Put a layer of red batter into cupcake liners, try to keep layers even. Spoon a layer of white batter on top of the red layer. You can use the tip of your finger to lightly spread the layer if needed. Spoon a layer of blue batter on top of the white layer, spreading until previous layer is completely covered. Try to fill each cake with an equal amount of batter. Each cupcake wrapper will be about 2/3-3/4 full.
Place trays in the oven for 15-20 minutes, remove when top of cupcakes spring back when touched, or toothpick stuck in the center comes out clean. Let cool for 10 minutes in the pan, then place on a cooling rack. Let cool completely before frosting.
Almond Cream Cheese Frosting
1 cup (2 sticks) unsalted butter, room temperature
12 ounces cream cheese, cold
1 pound (4 cups) confectioners’ sugar, sifted
1/2 teaspoon almond extract
1/4 tsp vanilla extract
Using an electric mixer on medium-high, beat the butter and cream cheese until fluffy, about 2 to 3 minutes. Reduce speed to low. Add sugar, ½ cup at a time, then almond and vanilla extracts, and mix until smooth and combined, scraping down sides of bowl as needed.
If needed, frosting can be refrigerated up to 3 days in an airtight container. Before using, bring to room temperature, and beat on low speed until smooth again.
Tip: Don't over beat the cream cheese, this will cause it to break down and make it too soft to pipe.
Healthy Whole Wheat Pancakes
July 2, 2010
I woke up this morning to the little one crying that he was, "so hungry." So I decided to whip up something that was both filling and healthy. I've been experimenting with replacing white flour and sugar in my recipes for a while now, and for the most part find it's easy to substitute whole what pastry flour for white flour 1:1. You can also use white whole wheat flour if you can't find ww pastry flour. Both flours allow for a lighter texture than regular whole wheat flour. Instead of white sugar I use raw turbinado sugar, since it is not processed with chemicals like white sugar, and it retains much of its nutrients. These substitutions go great in pancakes, so I made some of my favorite Whole Wheat Pancakes. They turn out light and fluffy every time, and you feel good about eating them.
Healthy Whole Wheat Pancakes
2 cups whole wheat pastry flour
1 tsp baking powder
1/2 tsp baking soda
1/3 cup turbinado sugar
1/2 tsp salt
2 1/4 cups buttermilk
2 eggs, lightly beaten
2 Tbsp butter, melted
Combine the flour, baking powder, baking soda, sugar, and salt in a bowl. Add the buttermilk, eggs, and melted butter. Stir the batter just until combined, it's OK if it's lumpy. Heat a griddle to medium hot and brush with a little butter. I just rub the end of a stick of butter lightly across the griddle. This will add nice grill marks to your pancakes, and give them that homey look. Pour 1/3 Cup of batter to form your pancakes. Cook until the bottom is a deep golden color, and the top has formed bubbles. Another way to tell if they are ready to turn, is the edges will loose the wet glossy look and become dry. Now flip your pancakes and cook for another 1-2 minutes, or until done. We like to eat our pancakes drizzled with a little honey and garnished with fruit, but your favorite syrup will work great too. Enjoy!
Tip: If you don't have buttermilk, add 1 tbsp white vinegar to 1 cup of milk, let sit a few minutes before using.
Chicken Sauteed with Cheese & Milk, and Pan Roasted Potatoes with Rosemary
July 1, 2010

In keeping with the Apples for Jam recipe theme, I decided to make dinner tonight from the yellow and gold sections.
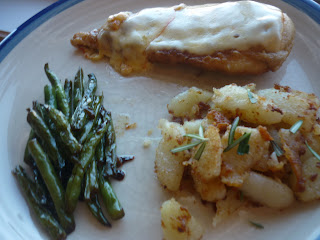
Chicken Sauteed with Cheese & Milk, and Pan Roasted Potatoes with Rosemary. The picture of this recipe enticed me more than the title. It was beautifully photographed with two juicy looking chicken breasts, and shamefully draped in a gooey, melted cheese sauce. This is another simple recipe of Tessa Kiros, with only five ingredients. It was very quick and easy to make and while my finished product was not as visually appealing as the cookbook, I was pleased anyway. The chicken stayed tender and moist, I think in part due to the milk added to the pan, and the Muenster cheese I used melted perfectly.
The Pan Roasted Potatoes turned out good, but not what I was hoping for. They were more like fried potatoes than roasted potatoes, although I may have added too much oil to the pan. I think I will try roasting them in the oven next time. All in all, this turned out to be a very tasty dinner. Cade even told me, "Mommy I love this dinner." High praise from a three year old.
 Chicken Sauteed with Cheese and Milk
(from Apples for Jam)
2 small chicken breasts
about 4 tablespoons flour
2 1/2 tablespoons olive oil
salt
4 large thin slices of Fontina cheese ( I used Muenster)
1/2 cup milk
Slice each chicken breast horizontally to make it into two thin cutlets. Dip in flour. I seasoned my flour with a little seasoned salt and garlic powder. Heat the oil in a large pan. Add the four chicken pieces and cook over medium heat until they are nicely brown underneath. Turn over and season the top with salt. Cook until the underside is golden, then turn again and season the top with salt. Put a slice of cheese over each piece of chicken, making sure the chicken is covered completely. Add the milk to the pan, put the lid on, and cook until the cheese is nice and melted. There should be a thickened, bubbly sauce also. Cook the chicken until it is soft and cooked through, but not overcooked. Remove from the heat and leave the lid on until ready to serve.
Subscribe to:
Posts (Atom)


