Showing posts with label Holiday Baking. Show all posts
Showing posts with label Holiday Baking. Show all posts
My Favorite Christmas Sugar Cookie


This is going to be a super quick post, I'm sure you're all neck deep in holiday baking, last minute christmas shopping, and wrapping mountains of presents.
But I just had to share a great recipe I tried today for cut-out sugar cookies. This recipe is by the awesomely talented Laurie, at Simply Scratch, and it's the best recipe I've tried for cut-out sugar cookies.
Usually my doughy men resemble some kind of Frankenstein mutation, turning into those cookies you stuff out of sight, never to embarrass you by actually being seen, let alone offered to company. But these babies had the perfect consistency making them super easy to roll out all pretty. Did I mention they taste awesome too? So buttery and light, and when you slather them with Laurie's Vanilla Frosting...oh man!


For the recipe, head over to Laurie's blog, Simply Scratch!
Enjoy!
Amber
Homemade Pumpkin Spice Mocha Frappe - Holiday Flavors

Do you remember my Homemade Iced Mocha Frappe's? I love being able to make my own coffee drinks at home, without having to kill my wallet by going to Starbucks. It's so easy to make your own, and you can customize them any way to want.
Not a fan of cold drinks in the winter? Not a problem, just leave out the ice and keep your coffee hot instead of chilling it...now you've got yourself a snuggly, warm version.
Some of my favorite versions are Pumpkin Spice, White Chocolate Peppermint, Caramel, and Cinnamon. I just make a homemade syrup to flavor the mocha's how I want. For a Pumpkin Spice Mocha, I like to use the Pumpkin Spice Syrup I used in the Pumpkin Spice Hot Apple Cider.
So, here's a remix on my homemade Mocha Frappe's - holiday style!
Pumpkin Spice Mocha Frappe
Serves: 2 Printable Recipe
1/2 cup strong brewed coffee
1/2 cup milk
2 cups ice cubes
2-3 tbsp sugar
2-3 tbsp chocolate syrup
2-3 tbsp pumpkin spice syrup
whipped topping (for garnish)
chocolate syrup (for garnish)
1/2 cup pumpkin puree
1/2 cup sugar
1/2 tsp vanilla
1 1/4 cup water
1 tsp cinnamon
1/2 tsp all spice
1/2 tsp ginger
Directions:
Brew up your coffee...make it strong baby. Nobody likes weak, watery coffee. Now allow it to chill for a bit. You do the same.
To make the pumpkin syrup: Combine everything in a pan and bring to a boil. Reduce heat to low, and let cook for about 15 minutes, stirring occasionally until the mixture becomes thick and syrupy. Store in the fridge until ready to use.
To make the pumpkin syrup: Combine everything in a pan and bring to a boil. Reduce heat to low, and let cook for about 15 minutes, stirring occasionally until the mixture becomes thick and syrupy. Store in the fridge until ready to use.
For frozen Pumpkin Spice Mocha Frappe: Add chilled coffee, milk, chocolate and pumpkin syrups, sugar, and ice cubes into your blender, blend until smooth. Pour into a nice frosty glass, top with whipped cream, chocolate syrup, and whatever else your coffee-loving heart desires.
For hot Pumpkin Spice Mocha: Combine hot coffee, chocolate and pumpkin syrups, sugar and milk. Pour into mugs and top with whipped cream and extra syrup.
Enjoy!
Amber

Cinnamon Bark Cookies: An Oldie But A Goodie

I've got a really unique Christmas cookie in my archives. It was just sitting there....all lonely...thinking it would never again get to share its Christmas deliciousness with food lovers again. So, I decided to dust it off and share it again. It's been a couple of years since I first posted this one, so I thought it was time to give it some love.
This cookie is kind of time consuming to make, but the results are so pretty it's worth it. It's a crisp, slightly buttery cookie with a mild cinnamon flavor. Perfect for eating with a hot mug of cocoa or cup of coffee.
Want the recipe? You can get it in my original post for Cinnamon Bark Cookies.
Enjoy!
Amber

Candy Cane Kiss Shortbread Bars

I have a confession. I may or may not have eaten an embarrassing amount of Hershey's candy cane kisses yesterday.
The evidence.

Oh come on. Do you really think I ate all those by myself? No, wait...don't answer that. But let's just say I had, can you blame me?
Look how pretty they are.

While I did eat one or two, ahem, let's just say an indeterminable amount. Most of them went into making these puppies. I call them Candy Cane Kiss Shortbread Bars. A buttery shortbread crust, a layer of toasted macadamia nuts and melty candy cane kisses, make these bars delicious.

Candy Cane Kiss Shortbread Bars
Yield: 16 bars Printable Recipe
2 cups all-purpose flour
1 cup brown sugar
3/4 cup (1 1/2 sticks) unsalted butter, room temperature
1/2 tsp vanilla extract
1/8 salt
1/2 cup macadamia nuts, chopped
2 (10-oz) bags Hershey's Candy Cane Kisses
Directions:
Preheat oven to 350 F. In an electric mixer, combine the flour, sugar, butter, vanilla, and salt. Press the mixture into the bottom of a greased 13 x 9 pan. Spread the chopped nuts evenly over the crust.
Bake for 15 minutes. Remove from oven.
Place the unwrapped candy cane kisses in a blender or food processor and pulse until roughly chopped. Spread the candy pieces evenly over the hot crust/nuts layer. Allow to sit until the heat from the crust has melted the candy. You may need to use a spoon to evenly spread the melted candy. It doesn't need to be smooth, just make sure all of the crust is covered.

Allow to cool in the refrigerator until the candy has hardened and set back up. Cut into bars. Eat and enjoy!

Recipe Notes:
I experimented with several ways to spread the candy on the crust. Spreading the blended pieces was the best way to keep the pretty swirly effect of the candy cane kisses, while getting even coverage. Melting the candy beforehand then pouring over the crust will result in a solid pink candy layer, rather than the swirled effect. Also, when cutting the bars, make sure your knife goes all the way to the pan and your cuts are clean. Otherwise the candy layer will separate when trying to remove the bars.
Pumpkin Pie Cheesecake

Do you ever come across desserts that surprise you?
Now, I'm not usually surprised when I come across sugary concoctions. I've been blessed cursed with a sweet tooth that pretty much makes me salivate over any sweet treat you put in my face.
However, once in a while, a certain dessert just happens to taste so much better than I imagined. Like this Pumpkin Pie Cheesecake with an Oreo crust.
My brother-in-law's girlfriend Liz, brought this amazing treat to our Thanksgiving meal last week. A layer of spiced pumpkin goodness, layered on top of creamy cheesecake, on top of a sweet, chunky Oreo crust that just makes every bite better and better.
This is greatness people. Try it, your hips will hate you but your lips will love you!
Disclaimer: Liz put all the hard work that went into making this deliciousness. I totally took advantage of her efforts and snapped a few picks to use for sharing this treat with you guys. I couldn't trust myself to make an entire cheesecake and have it sitting around the house. There's only so much self control a girl can have!
Enjoy!
Amber
Pumpkin Pie Cheesecake
(recipe from Girl Meets Bowl)
Yield: 8 servings Printable Recipe
Filling:
2 (8 oz) packages cream cheese, softened
1 (14 oz) can condensed milk
1/2 tsp vanilla extract
2 tbsp maple syrup (the real stuff people)
2 eggs
1 1/2 cup pumpkin puree
1/2 tsp ground cinnamon
1/2 tsp ground nutmeg
1/2 tsp ground cloves
Crust:
2 sleeves Oreo's (crushed into crumbs)
4-6 tbsp butter, melted
For the crust: Combine crumbs and butter and press into a 9” springform pan. Press a little up the sides of the pan and then wrap the bottom in foil, so you can catch all that great caramelized butter that leaks through.
For the filling: Combine cream cheese, condensed milk, vanilla and syrup. Beat until smooth. Blend in eggs one at a time. Remove 1 1/2 cup of batter and spread into bottom of crust; set aside. Add pumpkin, cinnamon, cloves and nutmeg to the remaining batter and stir gently until well blended. Carefully spread over the batter in the crust.
Preheat oven to 325 F. Bake for 35 to 40 minutes, or until center is almost set. Turn oven off, open door, and let the cheesecake just chill out in the oven for awhile. Once cool, refrigerate at least overnight. Tastes even better if you wait a few days.

Cranberry Orange Bars: A Tasty Kitchen Recipe

Do you like cranberries? I think they're one of those love 'em or hate 'em foods. For me, I can't have a holiday meal without my precious cranberry sauce.
There's just something about the sweetness mixed with the tart, that makes each bite of turkey, stuffing, and whatever else you have piled on your plate, taste infinitely better.
In my humble opinion at least. I even sneak into the fridge to grab spoonfuls of the sauce - all on it's own. That's my relationship with cranberry sauce.
Anyway, enough about my love of sauce - the cranberry kind.
I also love cranberries in my desserts, and when I came across this Tasty Kitchen recipe for Cranberry Orange Bars, I just had to give them a try. I love how simple they are, and with just a few ingredients, you can have a great dessert to add to your holiday meal in no time. This also a great way to use up any leftover cranberry sauce you have from your turkey day meal!
You can snag the printable recipe and see my full post over on the Tasty Kitchen blog. So go check it out!
What's your favorite Thanksgiving leftover? Leave a comment below and let me know. :)
Enjoy!
Amber

Patriotic Parfaits with Honey Ginger Cream Cheese Fluff

I love simple desserts. When it's a holiday, and I have to prepare a meal for more people than I'm used to...simple desserts are my best friend.
Parfaits are one of the easiest things you can throw together to please a large crowd. They taste great and look so cute, especially when served in mini mason jars like these Patriotic Parfaits I made for our 4th get-together.
Just whip up some homemade pudding (yes, you can use the boxed kind...but it's just doesn't taste the same to me), then customize it any way you like with different fruits, candy, whipped topping, etc. You can get really creative with parfaits, or keep it simple with a layer of strawberries, pudding, and blueberries. I topped these with a Honey Ginger Cream Cheese Fluff that I had leftover from a post coming soon. Yum! These are definitely slurp-worthy.
I hope you all have a great holiday. Happy 4th of July!
Patriotic Parfaits
Serves: 4 Printable Recipe
1 cup vanilla pudding (preferably homemade)
1 cup sliced strawberries
1 cup blueberries
3 tbsp sugar
colored sugar for decorating glasses/jars
Honey Ginger Cream Cheese Fluff:
4 oz cream cheese - softened
1 1/2 tbsp honey
4 oz whipped topping (thawed) or whipped cream
1/4 tsp ginger
1/8 tsp nutmeg
1. Make up your pudding, refrigerate until chilled.
2. Whip the cream cheese, honey, ginger and nutmeg together until smooth and creamy.
3. Gently fold in the whipped topping. Refrigerate until needed.
4. Thinly slice your strawberries and toss with about 3 tbsp sugar, depending on how sweet you like your strawberries.
5. Once pudding is chilled, start assembling your parfaits:
- Spread a thin layer of honey around the rim of your glasses or jars (you can use lime juice too).
- Turn jar upside down and dip in the sugar until evenly coated.
- In each jar, add a layer of strawberries, a layer of pudding and a layer of blueberries.
- Top with a dollop of the ginger cream cheese fluff. Sprinkle with additional decorative sugar if desired. Refrigerate if not serving immediately.
Enjoy!
Amber


Valentine Fortune Cookies

I'm a sucker for most holidays. During December you will see me giggling with glee, as I make my husband trek up to the attic in search of my boxes of holiday wonder (aka, Christmas decorations). He faithfully does his duty, perched precariously on each attic board designated as "safe", to prevent
In November, I start scouring my cookbooks to plan the big turkey day meal, and browse the internet for fun table decorations that I always say I'll have time to make, but never do. July 4th is the epitome of Americana here; Red, white and blue, stars galore, strawberry pie and sparklers too:) This balmy summer night, we sit in our very classy walmart brand lawn chairs, to watch the fireworks overhead and set off our "city approved" fountains in the driveway. See what I mean? Holidays are fun.
Valentine's Day has never really been a big deal at our house though. Why? I don't know. Maybe because we get tired of being saturated with red hearts and pink polka dots the second that Christmas is over. Maybe we think it's ridiculous how much restaurants charge for a meal on this day. Maybe we're just crotchety Valentine's scrooges:) Don't get me wrong, we still celebrate it in our own way, we just don't shower ourselves in copious amounts of roses and giant boxes of chocolate. While way shy away from some of this holiday's festivities, there's no denying how much I love my family, and I love to show them in my own way- like these Valentine's Fortune Cookies:)
I thought it would be fun to create something with my son for a Valentine's post, and we turned out these super cute Valentine's Fortune Cookies. They are quick and fairly simple to make, are a great kid friendly activity, and chances are you already have most of the ingredients in your kitchen.

Valentine's Fortune Cookies
Prep: 5 min; Cook: 12 min; Servings: 24
1/2 cup all-purpose flour
1 tbsp cornstarch
1/4 cup sugar
1/4 tsp salt
1/4 tsp ground cinnamon
1/8 tsp ground nutmeg
1/4 cup vegetable oil
2 large egg whites
1 tbsp water
1 tsp vanilla extract
semi sweet chocolate chips for melting
red decorator sugar
heart shaped sprinkles
paper and pen to write your valentine notes
In a medium bowl whisk together the flour, cornstarch, sugar, salt, cinnamon, and nutmeg. Add the oil and egg whites, whisking until smooth. Whisk in the water and vanilla.
Drop a rounded teaspoon of batter onto a well-greased baking sheet. Using the back of a spoon or an offset spatula, spread the batter into a 3" circle. Repeat with another rounded teaspoon of batter. Bake at 300F for 8 to 12 minutes or until lightly golden. The cooking time will depend on your oven, mine were done at 8 minutes. If the cookies break when you are trying to shape them, try cooking them for less time.
Working quickly, immediately remove each cookie from the pan with a spatula (an offset spatula works well), and flip over into gloved hand. Place your prepared valentine message in the center of each cookie and fold each cookie in half. Grasp the end of each cookie, and place over the edge of a bowl, pulling the edges down to form a crease. Place cookies, ends down, in a muffin pan to maintain shape while cooling. Let cool completely. Repeat procedure with the remaining batter, baking only 2 cookies at a time.
To Decorate: Microwave the chocolate chips in a small bowl at medium power for 2 minutes, stirring every 30 seconds. Dip the outer edge of the cooled cookie into the melted chocolate, then into decorator sugar or sprinkles. Place on waxed paper to let the chocolate harden. You can place the cookies in the refrigerator for about 15 minutes to harden the chocolate faster.


Happy Valentine's!
Mince Pies with Brandy Glaze

There are certain things in life that evoke memories from your childhood. The smell of your mother's perfume as she tends to your scraped knee, the taste of holiday treats that were baked, unfailingly, each year until it turned into a tradition, and watching those old movies that you can remember from when they first came out. For me, Christmas memories are filled with the smell of cinnamon and spice drifting through the house, and the sounds of "Oh Holy Night" and other Christmas hymns as the music softly strains through a winter evening. I almost forgot. It also, absolutely, without fail, includes the rich taste of Mince Pies.
These little pies are a Christmas & New Years staple in Wales, where I grew up amid rolling, patchwork hills dotted with woolly sheep, and winding roads lined with brick row houses and the occasional thatched roof cottage. While my mother continued to cook mainly American cuisine at home, she threw in the occasional British treat that we had grown to love. Every Christmas she would go to a little bakery that sold the best mince pies, and the box she brought home would be received by us all in a hushed silence. As the lid to this box full of treasure was lifted, you could almost see the lights from heaven shining down on this glorious concoction:) And if you listened really close, you might even hear the "Hallelujah Chorus" being sung. O.K...I may be exaggerating just a little, but they were really that good.
These pies are a traditional British sweet pastry, that is usually eaten during Christmas and New Years. They can have a pastry top, or my favorite is a mince tart. The mincemeat filling is made from apple, raisins, sultanas, candied peel, spices and either suet or vegetable shortening. Mincemeat originally did contain meat in addition to the fruit, as the fruit, spices, and alcohol provided a means to preserve the meat. But nowadays the meat is usually left out. There are some that still make it with meat, but I prefer not to include it.
This year, I had a craving for these little pies that I couldn't get rid of. So I determined I would make my own - because really, where was I going to find Mince Pies in my little Missouri town? Well, my hopes of making some from scratch were dashed, since I couldn't find half of the ingredients I needed, so I settled for a jar of mincemeat filling that I found. After tasting the filling from the jar, I realized it needed some doctoring. So I added a little orange zest, orange juice, cinnamon and rum flavoring, and pronounced it decent enough. The Brandy Glaze was an experiment of random ingredients, but the end result was very tasty. The ingredients for the glaze are a rough estimate, but it should be fairly close.

Mince Pies with Brandy Glaze
Filling:
1 jar mincemeat filling (or whatever homemade mincemeat filling you like)
1 orange, zested and juiced
1/2 tsp cinnamon
1 tsp rum flavoring
Shortcrust:
1 1/2 cups + scant 2 Tbsp all-purpose flour
pinch of salt
7 Tbsp unsalted butter
3-4 Tbsp ice water
Brandy Glaze:
1 cup powdered sugar
1-2 Tbsp Brandy
1 Tbsp butter
1 tsp vanilla extract
milk
For the shortcrust pastry:
Combine the flour and salt in a large bowl. Cut the butter into small cubes and add to the flour. Using your fingertips, rub the butter into the flour, lifting the mixture up and dropping it back into the bowl – you want to keep the mixture light and airy. Keep mixing until the texture resembles fine breadcrumbs. Sprinkle the ice water into the bowl, a little at a time, and mix through with a fork. Use your fingers to bring the pastry together; it’s ready when and the sides of the bowl are clean and it’s formed a solid ball. Cover the bowl with plastic wrap and allow the pastry to rest in the fridge for at least 30 minutes.
For the mince pies
Heat oven to 400F. In a small saucepan over medium heat, mix your jar of mincemeat together with the orange zest, orange juice, cinnamon and rum flavoring. Bring to a simmer and cook for about 5 minutes. Lightly grease your tart pans
Flour your work surface and roll out the pastry as thinly as possible (about 1/8 inch). Cut out approximately 12 rounds with a pastry cutter, and place them in the base of your mini tart pans. Prick all the pie bases with a fork to stop them rising. Fill each case with about 3 tablespoons of the mincemeat mix – don’t overfill your cases or the mixture will leak through the pastry when cooking. Place the tart pans on a baking sheet, and bake for approx 20 minutes. Remove from oven and allow to cool on a wire rack.
For the glaze:
In a small microwavable bowl, combine the powdered sugar, brandy, butter, vanilla, and enough milk to reach your desired consistency. Microwave in 10 second intervals until the alcohol has cooked off, but the brandy flavor remains. Drizzle the brandy glaze over the tart filling. Store in the refrigerator and serve cold, with a dollop of whipped cream if desired.
If you want to make mini pies instead of tarts. Brush the edges of the bottom pastry with a little milk. Cut out another 12 rounds for the tops, and place over the filling. Pinch the pie edges together to seal. Brush over with egg wash and pierce the tops with a fork. Bake in the oven for approx 20 minutes until golden brown. Remove from the oven and allow to rest for 1 minute before placing on a wire rack to cool. Sprinkle the pastry tops with powdered sugar and serve warm or cold.

I hope you had a Merry Christmas, and have a Happy New Years!
Amber
Cinnamon Bark Cookies
There are some ingredients that go hand in hand with the holiday season, and cinnamon is at the top of that list for me. Sprinkle it on a dollop of whipped cream that tops a cup of hot chocolate, mix it with sugar crystals that dust a snickerdoodle, or just use the cinnamon sticks as a holiday garnish. When I came across a recipe for Cinnamon Bark Cookies in my local paper, they looked so festive I just had to make them. While the ingredients seem simple enough, there is a bit of a learning curve when making these.
Let's just say my first few attempts to assemble these cookies, resulted in a pathetic mess that you would definitely not want to leave out for Santa. I quickly disposed of those, too embarrassed to capture my failure on camera, and set about making another batch. After about the third or fourth batch, I finally got the hang of it, and was able to produce a few that weren't too shabby. These little cookies are crispy and a little buttery, with a hint of cinnamon. Yum!
 Cinnamon Bark Cookies
Printable Recipe
8 large egg whites
2 cups sugar, plus 1/4 cup
2 cups all-purpose flour
pinch of salt
1 tsp cinnamon extract
10 tbsp unsalted butter, melted and cooled
1/3 cup heavy cream
brown gel food coloring
2 tsp cinnamon
Heat the oven to 375 F. Line a baking sheet with a nonstick silicon baking mat.
In a large bowl, use an electric mixer to whisk together the egg whites and 2 cups of sugar until foamy. Add the flour and salt and mix to incorporate. Add the cinnamon extract, butter and cream, then beat again until completely smooth. In small amounts, add the brown food coloring a drop at a time until desired color is reached, stirring thoroughly between additions. In a small bowl, combine the remaining 1/4 cup sugar with the cinnamon.
Scoop a teaspoon of batter onto the prepared baking sheet. Using a small offset spatula spread the batter thinly and evenly into a rectangle about 2-by-5-inches. Depending on the size of your baking sheet, you should be able to fit 2 to 4 cookies on at a time.
Sprinkle each rectangle lightly with the cinnamon-sugar. Bake the cookies for about 5-8 minutes, or until the surface looks dry. The edges should not be browned.
Working quickly and as soon as the baking sheet comes out of the oven, use an offset spatula to flip each rectangle over. Tightly roll both long sides of each rectangle toward the center, similar to forming a scroll. Set aside to cool and repeat in batches with remaining dough.
TIPS
* These cookies must be shaped into the rolled cinnamon stick as soon as they come out of the oven.
* Only cook 2-4 cookies at a time, or the rest will cool too quickly before you can roll them.
* For best results use a silicone baking mat, but if you don't have one use a well greased baking sheet.
* To remove the cookies from the sheet, use an offset spatula.
* Spreading the batter thinly ensures even baking of this cookie. Working with the delicate cookie while still warm and pliable is essential.
(adapted from Springfield News-Leader, December 2010)Ritzy Halloween Spiders
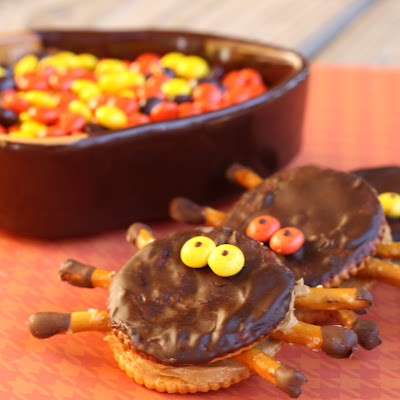
In the spirit of the holiday, I took my son to his first Halloween party last night, and brought the creepy spiders along. They turned out to be a success, so much so that my son decided they were too special to eat and befriended them, calling them his "fuzzy buddies". This new friendship was followed by a solemn oath, extracted by him from me, that I would NEVER, NEVER, NEVER, eat them. How quickly he turned on his new buddies however, when the growl of a tiny tummy got the better of him, and ended with each spider loosing a few legs, and a big chomp taking out one poor fellow's head. These little Halloween snacks are easy to make with just a few ingredients, and probably ones you already have in your cabinet.

Ritzy Halloween Spiders
(makes 15 spiders)
30 Ritz crackers
1 cup chocolate chips or candy coating chocolate (like Candiquik)
1 tsp shortening (I used non-hydrogenated coconut oil shortening)
45 pretzel sticks
1 cup peanut butter
30 mini Reece's Pieces

Place chocolate chips and shortening in a small microwavable bowl. Omit the shortening if using candy coating chocolate. Microwave on high in 30 second intervals, stirring in between, until chocolate is melted and smooth. Dip one side of 15 of the crackers in the chocolate. Place the cracker, chocolate side up, on wax paper to dry. Break the pretzel sticks in half, and dip the unbroken end of each one in the chocolate. Place on wax paper to dry. Take the 30 mini Reece's Pieces, and using a toothpick place a dot of melted chocolate in the center to make the eyes. Allow to dry. If desired, you can put your dipped item in the freezer to dry more quickly.

When the dipped crackers and pretzels are dry, take one of the 15 remaining undipped crackers, and spread with a generous amount of peanut butter. Take 6 of the dipped pretzel sticks, and place 3 on each side of the cracker, to make the legs. Take one of the dipped crackers, and smear a little more peanut butter on the undipped side, place peanut butter side down on the other cracker to make the spider. Take two of the mini Reece's Pieces eyes, and put a small dot of melted chocolate on the back. Now place the eyes on the chocolate cracker to complete the spider. You may need to adjust the pretzel legs to look right. Return the completed pretzel spiders to the refrigerator or freezer to set.

When ready to eat, remove from refrigerator, serve and enjoy!

HAPPY HALLOWEEN!

(adapted from candiquik.com)
Subscribe to:
Posts (Atom)



 Posts
Posts