Showing posts with label Kids Korner. Show all posts
Showing posts with label Kids Korner. Show all posts
Dr.Seuss Strawberry Marshmallow Skewers


I've got a super easy, super quick treat to share with you today. This week has been celebrate Dr. Seuss week at my son's school, and each day they've done something different to celebrate it and a love for reading. Today he got to dress up with the Dr. Seuss theme.
I packed him a Dr. Seussified snack that will be sure to make his classmates green...and not the green eggs kind. (Yeah, kinda dumb pun - I know.)
I call these Dr. Seuss Skewers because of the red and white layered effect. Just alternately slide a strawberry and a marshmallow on a skewer - I used a straw for safety reasons - wouldn't want an angry mom calling me because her kid poked his eye out.
You never know with Kindergartener's. Accidents are just waiting to happen around EVERY corner.
These are a really fun way to dress up some fruit. Served with a side of yogurt dipping sauce they're a great strawberry snack. Try them out with your kids, they'll love them!


Dr. Seuess Strawberry & Marshmallow Skewers
Yield: 1 skewer Printable Recipe
4-5whole strawberries, washed and stem removed
4-5 large marshmallows
1 straw or skewer
Slide one strawberry onto the skewer, then a marshmallow, repeat until you've filled your skewer or straw. Serve with side of creamy yogurt for a yummy dipping sauce. Easy peasy. Enjoy!
Amber


Sugar Cookie Bar Pops– Hello Spring!

I’m a sucker for anything on a popsicle stick – no pun intended! Okay, maybe a LITTLE bit intended. I was wracking my brain trying to figure out what I wanted to do for my next post, and a tiny idea formed that turned into a decidedly tasty outcome.
I’m sure you’ve seen the multiple sugar cookie bar recipes floating around the blogosphere, and since I hadn’t tried them yet myself (gasp!) I decided this was a great time to dive in. I wanted to add my own twist to it though – enter the popsicle stick. After baking the cookie bars, I cut out flower shaped bars, impaled the poor little guys with a popsicle stick, and them drowned them in a candy coating.
My son and his friends LOVED these treats. Of course, what little boy doesn’t love something that’s green?
Note: I intended to use a shamrock shaped cookie cutter for St. Patrick’s Day treats, but I couldn’t find one, so let’s imagine they turned into more of a springtime themed treat.

Sugar Cookie Bar Pops

serves 8-10 pops | printable recipe
1 stick of butter, softened
1 cup sugar
2 eggs
1 tsp pure vanilla extract
2 1/2 cups flour
1/2 tsp salt
1/4 tsp baking soda
candy melts
sprinkles/decorations
food coloring (optional)
Directions:
Cream the butter and sugar until fluffy. Add the eggs, one at a time, mixing after each. Add vanilla and mix well. In a separate bowl combine the flour, salt and baking soda. Add the flour mixture to the sugar mixture, mixing just until combined. Spread the dough onto a greased sheet pan (I used a 9x12 pan ).
Bake at 375 F for 12-15 minutes, until lightly golden and a toothpick inserted into the center comes out clean. Cool completely. Using a cookie cutter or knife, cut out your desired shape. Insert a popsicle stick into the bottom of each bar.

In a microwaveable bowl, cook the candy melts on low until they are melted. If desired, add some food coloring to make them festive! Spoon the melted candy coating over your cooled sugar cookie bar, then sprinkle with your decorations. Allow the candy coating to set. You can serve as is, or for something a little different, pop the sugar cookie pops into the freezer for about an hour. Now you have a frozen sugar cookie pops. Yum!
Enjoy!
(recipe adapted from Anissa’s Kitchen)
Valentine Fortune Cookies

I'm a sucker for most holidays. During December you will see me giggling with glee, as I make my husband trek up to the attic in search of my boxes of holiday wonder (aka, Christmas decorations). He faithfully does his duty, perched precariously on each attic board designated as "safe", to prevent
In November, I start scouring my cookbooks to plan the big turkey day meal, and browse the internet for fun table decorations that I always say I'll have time to make, but never do. July 4th is the epitome of Americana here; Red, white and blue, stars galore, strawberry pie and sparklers too:) This balmy summer night, we sit in our very classy walmart brand lawn chairs, to watch the fireworks overhead and set off our "city approved" fountains in the driveway. See what I mean? Holidays are fun.
Valentine's Day has never really been a big deal at our house though. Why? I don't know. Maybe because we get tired of being saturated with red hearts and pink polka dots the second that Christmas is over. Maybe we think it's ridiculous how much restaurants charge for a meal on this day. Maybe we're just crotchety Valentine's scrooges:) Don't get me wrong, we still celebrate it in our own way, we just don't shower ourselves in copious amounts of roses and giant boxes of chocolate. While way shy away from some of this holiday's festivities, there's no denying how much I love my family, and I love to show them in my own way- like these Valentine's Fortune Cookies:)
I thought it would be fun to create something with my son for a Valentine's post, and we turned out these super cute Valentine's Fortune Cookies. They are quick and fairly simple to make, are a great kid friendly activity, and chances are you already have most of the ingredients in your kitchen.

Valentine's Fortune Cookies
Prep: 5 min; Cook: 12 min; Servings: 24
1/2 cup all-purpose flour
1 tbsp cornstarch
1/4 cup sugar
1/4 tsp salt
1/4 tsp ground cinnamon
1/8 tsp ground nutmeg
1/4 cup vegetable oil
2 large egg whites
1 tbsp water
1 tsp vanilla extract
semi sweet chocolate chips for melting
red decorator sugar
heart shaped sprinkles
paper and pen to write your valentine notes
In a medium bowl whisk together the flour, cornstarch, sugar, salt, cinnamon, and nutmeg. Add the oil and egg whites, whisking until smooth. Whisk in the water and vanilla.
Drop a rounded teaspoon of batter onto a well-greased baking sheet. Using the back of a spoon or an offset spatula, spread the batter into a 3" circle. Repeat with another rounded teaspoon of batter. Bake at 300F for 8 to 12 minutes or until lightly golden. The cooking time will depend on your oven, mine were done at 8 minutes. If the cookies break when you are trying to shape them, try cooking them for less time.
Working quickly, immediately remove each cookie from the pan with a spatula (an offset spatula works well), and flip over into gloved hand. Place your prepared valentine message in the center of each cookie and fold each cookie in half. Grasp the end of each cookie, and place over the edge of a bowl, pulling the edges down to form a crease. Place cookies, ends down, in a muffin pan to maintain shape while cooling. Let cool completely. Repeat procedure with the remaining batter, baking only 2 cookies at a time.
To Decorate: Microwave the chocolate chips in a small bowl at medium power for 2 minutes, stirring every 30 seconds. Dip the outer edge of the cooled cookie into the melted chocolate, then into decorator sugar or sprinkles. Place on waxed paper to let the chocolate harden. You can place the cookies in the refrigerator for about 15 minutes to harden the chocolate faster.


Happy Valentine's!
Superhero Birthday Party

I have a superhero obsessed son - this is his latest phase. Before that it was race car mania, which had an impressive run of at least two years, before the superpowers of certain caped crusaders caught the attention of his sponge-like mind. Don't get me wrong, he still loves his cars, and has more hot wheels than any kid you will ever meet. Seriously, he has over 1000 (a lucky hand me down, not bought by us!)
Realizing that another birthday was fast approaching, I used my own mommy super powers (mothers intuition, eyes in the back of my head, and go-go-gadget arms, ) to plan a superhero themed birthday party for him. We had already been informed from our super hero in training, that he wanted his party at Chuck E. Cheese, so I worked with that and planned around what that kid-crazy-party infested place didn't provide. That left invitations, the cake, and goody bags. I scoured the internet for inspiration and put together a frankenstein hodge podge of party ideas. Several free printables later, along with some scrapbook paper, a little glue, and some imagination, I had the beginnings of a really cute theme.
The Superhero Invitations
These were made by cutting out the images I wanted, then typing up an invitation and gluing the images where I wanted them. This gave me my "prototype". I took this copy to Kinko's and made high quality color copies for the finished product. Fold the invitations up letter style, put them in an envelope marked TOP SECRET, and you have yourself a cute superhero party invitation.

The Superhero Cupcake Stand
I ordered a superhero themed scrapbook set that was on clearance at Oriental Trading, along with the clearanced superhero ribbon. I then covered my homemade cupcake stand with the superhero paper and ribbon.

The Cupcake Wrappers
I bought some scrapbook paper from Hobby Lobby that would work with the theme, and made these superhero cupcake wrappers. I used this printable cupcake wrapper template from Skip To My Lou.

The Superhero Cupcakes
I made these Blue Velvet cupcakes from Sprinkle Bakes, which are just red velvet cupcakes colored blue instead of red, and iced with yummy cream cheese frosting. Then I made superhero themed sugar paste cake toppers to place on top. Find the Blue Velvet recipe below.

Blue Velvet Cupcakes
Printable Recipe
2 cups sugar
2 sticks butter, softened
2 eggs
1 Tbs. cocoa powder
1 Tbs. Wilton food coloring gel in Royal Blue
Wilton food coloring gel in Violet – stick a toothpick in the bottle and use that amount
a teaspoon or two of water
2 1/2 cups cake flour
1 tsp. salt
1 cup buttermilk
1 tsp. vanilla
1/2 tsp. baking soda
1 Tbs. vinegar
Heat the oven to 350 degrees. Put cupcake liners in the cupcake pans.
In a mixer bowl, cream the butter and sugar. Add the eggs, one at a time, mixing well. In a small bowl, mix the cocoa, food coloring gel and water together to form a paste. Add to the ingredients in the mixer bowl and blend well. Stir the flour and salt together and add to the wet ingredients, alternating with the buttermilk. Mix well. Blend in the vanilla. In a small bowl, combine the baking soda and vinegar and then add that to the other ingredients in the mixer.
Fill the cupcake liners with batter, about 2/3 of the way full. The batter will be thick. Bake for 25-30 minutes or until a toothpick comes out clean. Cool completely before frosting. Makes 24 cupcakes.
Cream Cheese Frosting
1 pound cream cheese, softened
4 cups sifted confectioners’ sugar
1 cup unsalted butter softened
1 teaspoon vanilla extract
1 teaspoon lemon extract (optional)
Mix cream cheese with butter until smooth. Add extracts. Slowly add sugar and blend until light and fluffy! Use a piping bag with a round #8 tip to create fluffy cupcake tops!
The Birthday Boy's Cake
I used the same Blue Velvet recipe as the cupcakes, and iced with cream cheese frosting and royal icing. The cake topper is made from sugar paste.

The Superhero Masks
These masks are so simple to make, with some felt and an elastic string. I used this printable as a template and embellished the masks with felt stars. Sorry I forgot to take a picture of my own, but you can see what they look like here.
The Superhero Goody Bags
These masks are so simple to make, with some felt and an elastic string. I used this printable as a template and embellished the masks with felt stars. Sorry I forgot to take a picture of my own, but you can see what they look like here.
The Superhero Goody Bags
A quick trip to the dollar store gave me most of what I needed to customize these bags. I got some Marvel Superhero matching cards for a dollar a piece, and a container of small play dough pots for a dollar. I used the same printable superhero images that I used for the invitations, some scrapbook paper, and superhero ribbon to make these themed favors.

I had a lot of fun with this birthday theme, but am glad all of the work is over! The party was a success, and my little super hero loved his cake. Now I only have about 350 days of rest before the next one:) Thanks for stopping by!
Amber
Ritzy Halloween Spiders
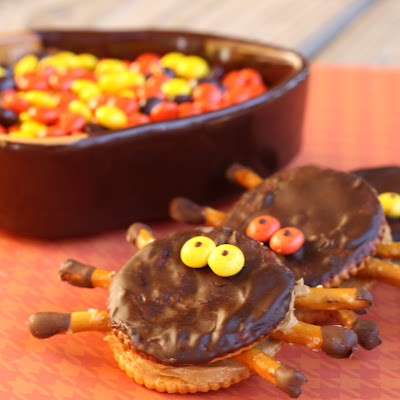
In the spirit of the holiday, I took my son to his first Halloween party last night, and brought the creepy spiders along. They turned out to be a success, so much so that my son decided they were too special to eat and befriended them, calling them his "fuzzy buddies". This new friendship was followed by a solemn oath, extracted by him from me, that I would NEVER, NEVER, NEVER, eat them. How quickly he turned on his new buddies however, when the growl of a tiny tummy got the better of him, and ended with each spider loosing a few legs, and a big chomp taking out one poor fellow's head. These little Halloween snacks are easy to make with just a few ingredients, and probably ones you already have in your cabinet.

Ritzy Halloween Spiders
(makes 15 spiders)
30 Ritz crackers
1 cup chocolate chips or candy coating chocolate (like Candiquik)
1 tsp shortening (I used non-hydrogenated coconut oil shortening)
45 pretzel sticks
1 cup peanut butter
30 mini Reece's Pieces

Place chocolate chips and shortening in a small microwavable bowl. Omit the shortening if using candy coating chocolate. Microwave on high in 30 second intervals, stirring in between, until chocolate is melted and smooth. Dip one side of 15 of the crackers in the chocolate. Place the cracker, chocolate side up, on wax paper to dry. Break the pretzel sticks in half, and dip the unbroken end of each one in the chocolate. Place on wax paper to dry. Take the 30 mini Reece's Pieces, and using a toothpick place a dot of melted chocolate in the center to make the eyes. Allow to dry. If desired, you can put your dipped item in the freezer to dry more quickly.

When the dipped crackers and pretzels are dry, take one of the 15 remaining undipped crackers, and spread with a generous amount of peanut butter. Take 6 of the dipped pretzel sticks, and place 3 on each side of the cracker, to make the legs. Take one of the dipped crackers, and smear a little more peanut butter on the undipped side, place peanut butter side down on the other cracker to make the spider. Take two of the mini Reece's Pieces eyes, and put a small dot of melted chocolate on the back. Now place the eyes on the chocolate cracker to complete the spider. You may need to adjust the pretzel legs to look right. Return the completed pretzel spiders to the refrigerator or freezer to set.

When ready to eat, remove from refrigerator, serve and enjoy!

HAPPY HALLOWEEN!

(adapted from candiquik.com)
Subscribe to:
Posts (Atom)



 Posts
Posts