Showing posts with label Daring Bakers. Show all posts
Showing posts with label Daring Bakers. Show all posts
Cherry Crunch Coffee Cake

The March 2011 Daring Baker’s Challenge was hostedby Ria of Ria’s Collection and Jamie of Life’s a Feast. Ria and Jamie challenged The Daring Bakers to bake a yeasted Meringue Coffee Cake.
I had a lot of fun with the challenge this month, since I’ve never made a yeasted coffee cake before. While, some people are afraid of working with yeast, it has always held a certain form of fascination for me.
Perhaps, being the granddaughter of a baker, I’ve been bitten by the bug. More likely, the kid in me just likes sticking my hands in a big ball of sticky goo.
I also wanted to try my hand at practicing some pastry making technique’s, and decided to form the dough into a braided coffee cake. While it may look tricky, it is really simple, and just takes a little practice to get the form even.
My first try at this style isn’t perfect, but it turned out fairly decent – at least in my opinion. If you think otherwise – please don’t burst my bubble

Part of this challenge was to use your own creativity for the filling, and while I had many crazy ideas swirling around in the gray matter of my brain, I decided on a cherry and cream cheese filled treat. While I wanted to use fresh cherries, I had to settle on cherry pie filling, since I couldn't find any fresh ones locally. It turned out pretty tasty anyway!
Cherry Crunch Coffee Cake
(prep: 3 hours: bake: 30 min; yield: two coffee cakes)
Note: This recipe can be easily halved to make one coffee cake (which I did).
Ingredients:
For the yeast coffee cake dough:
 4 cups (600 g / 1.5 lbs.) flour
 ¼ cup (55 g / 2 oz.) sugar
¾ teaspoon (5 g / ¼ oz.) salt
1 package (2 ¼ teaspoons / 7 g / less than an ounce) active dried yeast
¾ cup (180 ml / 6 fl. oz.) whole milk
¼ cup (60 ml / 2 fl. oz. water (doesn’t matter what temperature)
½ cup (135 g / 4.75 oz.) unsalted butter at room temperature
2 large eggs at room temperature
For the meringue:
3 large egg whites at room temperature
¼ teaspoon salt
½ teaspoon vanilla
½ cup (110 g / 4 oz.) sugar
For the filling:
8-oz cream cheese, softened
3 tbsp butter, softened
1/4 cup powdered sugar
1 tsp vanilla extract
1 can cherry pie filling
1 cup chopped nuts (walnuts or pecans)
For the glaze:
1 cup powdered sugar
1 tbsp butter
2 tbsp milk
1 tsp almond extract
Prepare the dough:
1. In a large electric mixing bowl, combine 1 ½ cups (230 g) of the flour, the sugar, salt and yeast.
2. In a saucepan, combine the milk, water and butter and heat over medium heat until warm and the butter is just melted.
3. With the mixer on low speed, gradually add the warm liquid to the flour/yeast mixture, beating until well blended.
Increase mixer speed to medium and beat 2 minutes. Add the eggs and 1 cup (150 g) flour and beat for 2 more minutes.
4. Using a wooden spoon, stir in enough of the remaining flour to make a dough that holds together. Turn out onto a floured surface (use any of the 1 ½ cups of flour remaining) and knead the dough for 8 to 10 minutes until the dough is soft, smooth, and elastic, keeping the work surface floured and adding extra flour as needed.
5. Place the dough in a lightly greased (I use vegetable oil) bowl, turning to coat all sides. Cover the bowl with plastic wrap and a kitchen towel and let rise until double in bulk, 45 – 60 minutes. The rising time will depend on the type of yeast you use.
Prepare your filling:
In an electric mixer, combine the cream cheese, butter, powdered sugar and vanilla until creamy. Set aside.
Once the dough has doubled, make the meringue:
In a clean mixing bowl – ideally a plastic or metal bowl so the egg whites adhere to the side (they slip on glass) and you don’t end up with liquid remaining in the bottom – beat the egg whites with the salt, first on low speed for 30 seconds, then increase to high and continue beating until foamy and opaque. Add the vanilla then start adding the ½ cup sugar, a tablespoon at a time as you beat, until very stiff, glossy peaks form.
Assemble the Coffee Cakes:
Line 2 baking sheets with parchment paper.
1. Punch down the dough and divide in half. On a lightly floured surface, working one piece of the dough at a time (keep the other half of the dough wrapped in plastic), roll out the dough into a 14 x 12-inch rectangle.
2. Using a pizza cutter or knife, lightly score the rectangle into thirds lengthways. Now make diagonal slices, to make strips on the two outer thirds sections, about every 1/2 inch. Carefully cut away the top strips on the top and bottom.
3. Spread half of the meringue evenly over the center third (the section between the strips you just cut). Spread some of the cream cheese mixture over the meringue. Now spread a layer of the cherry pie filling. Sprinkle some nuts over everything.


4. Now fold down the top and bottom flap, then start folding the side strips over the filling. Right, then left, right again, etc, all the way to the bottom.

5. Repeat with the remaining dough, meringue and fillings.
6. Slip your hands under the pastry, and carefully transfer it to the lined baking sheet. Cover the 2 coffee cakes with plastic wrap and allow them to rise again for 45 to 60 minutes. Preheat the oven to 350°F.
7. Brush the tops of the coffee cakes with the egg wash. Bake in the preheated oven for 25 to 30 minutes until risen and golden brown. The dough should sound hollow when tapped.
8.Remove from the oven and slide the parchment paper off the cookie sheets onto the table. Very gently loosen the coffee cakes from the paper with a large spatula and carefully slide the cakes off onto cooling racks. Allow to cool.
Just before serving, dust the tops of the coffee cakes with confectioner’s sugar, or drizzle with almond glaze. These are best eaten fresh, the same day or the next day.

Amber
Chai Panna Cotta with Honey Jelly- DB Challenge

The February 2011 Daring Bakers’ challenge was hosted by Mallory from A Sofa in the Kitchen. She chose to challenge everyone to make Panna Cotta from a Giada De Laurentiis recipe and Nestle Florentine Cookies.
I am late posting my DB challenge this month. Truthfully, the date just crept up on me until I realized it was the 27th, and I didn't have many of the ingredients I needed.
A quick search of the cabinets showed me that I could make the Florentine cookies, but I'd have to run to the store to make the Panna Cotta. Luckily, I was able to con my husband into being my errand boy. He' s so sweet. Most days:)
Anyway, once I was elbow deep in the baking challenge, I almost threw in the towel with the cookies. I started out by halving the recipe, because I didn't need a ton of buttery cookies sitting around on a Monday. Things were going well...until I forgot to half the amount for the last couple of ingredients. So that led me to a mad dash of dumping in another half of the first few ingredients, trying to even everything out. Are you following me? Have I confused you yet?
Well, somewhere along the way I must have messed something up, because my Florentines turned out thicker than I believe they are supposed to be. I decided to go with it anyway, and just dipped and drizzled a few with chocolate, instead of sandwiching them. They turned out OK.
The panna cotta was an experiment that turned out a lot better though. I substituted liquid chai concentrate for the milk, and the result was a smooth, creamy, spicy concoction that was very yummy. Since I pretty much ruined the cookies, I tried to salvage my pride by layering the chai panna cotta with a honey jelly - the layered effect was inspired here. I have to say, I was pretty proud of myself for the visual effect, even if the cookies were blah:)
Honey Jelly
(adapted from Kitchen Wench)
1 2/3 cups cold water
1/3 cup strongly flavored honey
3 tsp powdered gelatin
Chai Panna Cotta
(adapted from Giada De Laurentis)
1/2 cup cold liquid Chai concentrate (I used Taco)
1 1/2 tsp unflavored powdered gelatin
1 1/2 cups cold heavy cream
2 Tbsp + 2 tsp honey
1 1/2 tsp granulated sugar
pinch of salt
For the Honey Jelly: Pour the water and honey into a pot, and sprinkle the gelatin evenly over the top. Set aside for 5 minutes, then cook over low heat, stirring constantly until it begins to come to a boil and the gelatin is dissolved. Set aside to cool slightly.
For the Chai Panna Cotta: Place the chai concentrate in a cold pan and sprinkle the gelatin evenly over the top. Set aside for 5 minutes. Now cook the chai mixture over low heat, stirring constantly until the gelatin is dissolved, about 5 minutes. Do no let the mixture boil. Combine the cream, honey, sugar and salt, then pour over the gelatin mixture. Cook over medium-low heat, stirring occasionally, until the honey and sugar is dissolved and the mixture is hot, but not boiling, about 5-7 minutes. Set aside to cool slightly.
~ Divide half of the honey jelly between 4 glasses. So you will pour about 1/8 of the mixture into each glass. Carefully place the glasses in the fridge and chill for 30 minutes - 1 hours.
~ When the first layer of honey jelly is set, carefully pour 1/8th of the panna cotta mixture into each glass, over the honey jelly. Carefully place back in the fridge for 30 minutes - 1 hours to set. Repeat with a layer of honey jelly, followed by the panna cotta. When completed, you should have 4 layers, alternating honey jelly and panna cotta. Place back in the fridge for the final layer to set.
When ready to serve, remove from fridge and let sit at room temperature for a few minutes. Enjoy!


Orange Pomegranate Crostata November DB Challenge

The 2010 November Daring Bakers’ challenge was hosted by Simona of briciole. She chose to challenge Daring Bakers’ to make pasta frolla for a crostata. She used her own experience as a source, as well as information from Pellegrino Artusi’s Science in the Kitchen and the Art of Eating Well.
I am late with my Daring Bakers Challenge post this month; throwing a birthday party and Thanksgiving cooking left me with little time to post on the 27th. I finally had time to finish it though, and the challenge this month was another opportunity for to me to try something new and fun. Crostata (tart) is an Italian dessert, with a base of pasta frolla (sweet short crust pastry) and can be filled with whatever you please. Since Thanksgiving was just around the corner, I thought to do a pumpkin filled tart, but I had some pomegranates sitting in my refrigerator and decided to whip up this Orange Pomegranate Tart. I love pomegranates and it's definitely a bonus that they are so good for you!
I have never made pastry cream before, so this was an opportunity for me to gain some experience in something new, and while the pastry cream was good, I think next time I would try an orange curd. I did not have a large tart pan, so I made little tartlets, then filled them with the orange pastry cream and sprinkled with pomegranate arils. I always like to make mini sized desserts, it tricks my brain into thinking that I'm eating an acceptable amount of calories...never mind that I usually eat two of them:)

Orange Pomegranate Tart
Printable Recipes
Orange Pastry Cream
1 cup milk
1/4 cup sugar
finely grated peel from one orange
1/8 teaspoon vanilla (optional)
3 large egg yolks
2 tablespoons all-purpose flour
1 tablespoon unsalted butter, room temperature
In a small bowl, whisk the egg yolks together with 2 tablespoons of the sugar, and the flour until well incorporated. Set aside. In a small, heavy-bottomed pan, place the milk, orange zest, and the other 2 tablespoons of sugar, and heat until barely boiling. Remove from heat and pour half of the milk mixture into the yolk mixture, whisking until combined. Pour the egg mixture back into the saucepan and put on medium-low heat, whisking constantly until mixture is thick (about 2-3 minutes). Remove from heat and add the butter, stirring until melted. If desired, press the pastry cream through a sieve over a bowl. Store in the refrigerator with plastic wrap pressed on the surface for up to 3 days.
Pasta Frolla (sweet short crust)
1/2 c. minus 1 tablespoon superfine sugar, or a scant 3/4 cup of powdered sugar
1 and 3/4 cup unbleached all-purpose flour
a pinch of salt
1 stick cold unsalted butter, cut into small pieces
grated zest of half a lemon
1 large egg and 1 large egg yolk, lightly beaten in a small bowl
In a large bowl, whisk together sugar, flour and salt. Rub or cut the butter into the flour until the mixture has the consistency of coarse crumbs. You can do this in the bowl or on your work surface, using your fingertips or a fork.
Make a well in the center of the mounded flour and butter mixture and pour the beaten eggs into it. Add the lemon zest to your flour/butter/egg mixture. Use a fork to incorporate the liquid into the solid ingredients, and then use your fingertips. Knead lightly just until the dough comes together into a ball.
Shape the dough into a flat disk and wrap in plastic wrap. Place the dough in the refrigerator and chill for at least two hours. You can also refrigerate the dough overnight.

Heat the oven to 350F. Take the pasta frolla out of the fridge, unwrap it, but keep the dough loosely covered. Roll the crostata dough out between the plastic wrap, this prevents the dough from sticking to your surface without using flour, and makes it easier to transfer to your tart pan.
If the dough is very firm, start by pressing the dough with the rolling pin from the middle to each end, moving the rolling pin by a pin's width each time; turn the dough 180 degrees and repeat; when it softens, start rolling. Roll the dough into a circle about 1/8th inch thick. Now flip the dough over the pan, centering it, and delicately press it all around so the corners are well covered. Peel away the plastic wrap. Trim the excess dough hanging over the edges of the pan. Press the remaining dough around the border into the sides of the pan making sure the border is an even thickness all the way around.

Remove the crostata shell from the tart pan, and place on a serving plate. Fill the cooled shell with the prepared pastry cream, then sprinkle the pomegranate arils over the top. Enjoy!


Amber
October Daring Bakers Challenge: Donuts!

The October 2010 Daring Bakers challenge was hosted by Lori of Butter Me Up. Lori chose to challenge DBers to make doughnuts. She used several sources for her recipes including Alton Brown, Nancy Silverton, Kate Neumann and Epicurious.
This month's Daring Bakers challenge had some sentimental value to me , and ties into how I came up with the name for my blog. My grandfather was a baker, and according to my mom he made the best donuts in his bakery. I grew up with stories of how, as a little girl, she would go to the bakery with her parents, and took naps on the big bags of flour they kept in the back. This story always conjured up images of a little girl with smudges of flour on her nose, and a sprinkling of flour dusting her clothes - hence the name Sprinkled With Flour.
My grandfather was a wonderful baker, and that gene was passed onto my mom - who makes the best pies by the way - and it seems the baking itch was passed onto me too. My grandpa died when I was very young, and I never had the chance to get to know him or learn from his talent, so I started this blog to develop my baking talent and hopefully be able to do him proud one day.
I recently came into possession of his famous donut recipe, and attempted to make a batch. There is definitely an art to making donuts, and that art does not include flour flung across the kitchen, and dough hanging from places it shouldn't be hanging from. Do I need to spell out that this foray into the donut making world was a little bit of a baking disaster? Needless to say, I was embarrassed to call myself a bakers granddaughter that day. So, when I saw the Daring Baker's Challenge this month was to make donuts, I determined that I would get it right this time around - hopefully. The challenge was to make either yeast or cake donuts, and since I had already tried yeast donuts, I decided to go with "the cake". (Sorry guys, this is not my grandpa's recipe. That recipe has to stay locked in the family vault :)
I used my Halloween cookie cutters to make my donuts festive, and made bat eyes with Reece's Pieces with a dot of chocolate glaze. The glaze also works to make the ghost faces.

Old-Fashioned Buttermilk Cake Doughnuts: by Nancy Silverton
(Yield: About 15 doughnuts & 15 doughnut holes, depending on size)
1/4 cup Sour Cream
3 1/4 cup all-purpose flour (16oz + extra for dusting surface)
3/4 cup (6oz) granulated Sugar
1/2 tsp baking soda
1 tsp baking powder
1 tsp kosher salt or 1/2 tsp table salt
1 1/2 tsp nutmeg
1 1/8 tsp active dry yeast
3/4 cup + 2 tbsp buttermilk
1 large egg
2 large egg yolks
1 tbsp pure vanilla extract
1/4 cup powdered sugar (optional: for decorating)
Chocolate Glaze (adapted from Alton Brown)
1/4 cup butter, unsalted
1/8 cup whole milk
1 1/2 tsp light corn syrup
1 tsp vanilla extract
2 oz semi-sweet chocolate chips
1 cup powdered sugar, sifted
Over a large mixing bowl, sift together the flour, sugar, baking soda, baking powder, salt, nutmeg; make a large well in the center. Place the yeast in the well; pour the sour cream over it. Allow it to soften (if using packed fresh yeast), about 1 minute.
Pour the buttermilk, whole egg, egg yolks, and vanilla extract into the well. Using one hand, gradually draw in the dry ingredients. The mixture should be fairly smooth before you draw in more flour. Mix until it is completely incorporated. The dough will be very sticky. Wash and dry your hands and dust them with flour.
Sift an even layer of flour onto a work surface. Don’t be afraid to use a lot of flour. You don’t want the donuts sticking to your counter. Scrape dough out of bowl onto the surface; sift another layer of flour over dough. Working quickly, pat dough into an even 1/2-inch thickness. Dip cutter in flour and, cutting as closely together as possible, cut out the donuts and holes. Place holes and donuts on a floured surface. Working quickly, gather scraps of dough together, pat into 1/2-inch thickness, and cut out remaining donuts and holes.
Drop three to four donuts at a time into the hot oil. Once they turn golden brown, turn them and cook the other side. Cooking times may vary, but with your oil at 375 °F, they should take about 20 to 30 seconds per side. Tip: Try to keep your oil temperature even, if the oil is too hot the outside of your donuts will cook, but the inside will be raw. If the oil is not hot enough, the donuts will absorb too much oil, making them greasy.
Once cooked, place on a baking sheet covered with paper towels to drain. Sift powdered sugar over donuts or dip in glaze. If dipping your donuts in glaze, put the candy pieces on while the glaze is still wet.
For the Glaze: In a small saucepan over medium heat, combine the butter, milk, corn syrup and vanilla. Heat until butter is melted. Decrease heat to low, add the chocolate and whisk until melted. Remove from heat and stir in the powdered sugar, whisk until smooth. Immediately dip the donuts in the glaze. Allow the glaze to set for 30 minutes before serving.


Decorated Sugar Cookies: Daring Bakers Challenge

The September 2010 Daring Bakers’ challenge was hosted by Mandy of “What the Fruitcake?!” Mandy challenged everyone to make Decorated Sugar Cookies based on recipes from Peggy Porschen and The Joy of Baking.
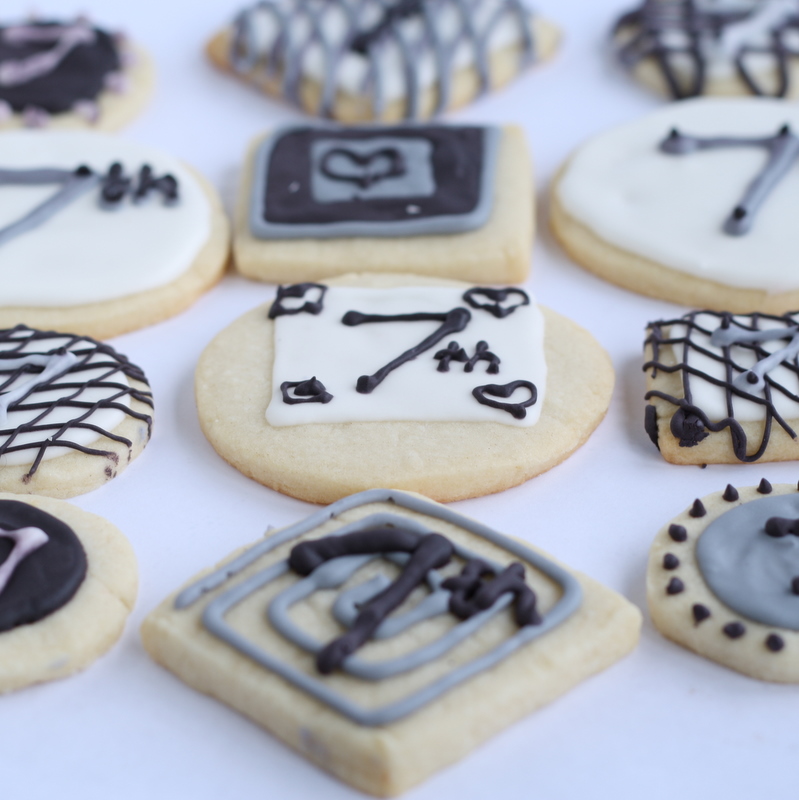
September has been an eventful month for me. Amid the back to school activities for my son, my parents visiting from out of the country, and near blinding myself, I also joined the Daring Bakers. This month is my first time participating in the challenges, and I'm excited to be a part of the baking fun. The challenge this month was to bake decorated sugar cookies, with the theme being September - and whatever that symbolized to you. Since the posting date was for the 27th, which also just happens to be my 7th wedding anniversary, my theme was a no brainer.
I have never decorated cookies with royal icing before, and while it may sound like a simple challenge, there is more skill involved in using royal icing than you would believe. After three hours of outlining, flooding, drying, and randomly decorating cookies with no design scheme in mind - my feet were throbbing, my back resembled a hunchback's, and my fingers were permanently cramped into claw-like talons. But at least my cookies turned out pretty. I used the color scheme from my wedding, which was different shades of purple, and was pleased with my experiment in the world of royal icing.


Basic Sugar Cookies:
Makes Approximately 36 / 4" Cookies200g / 7oz / ½ cup + 6 Tbsp Unsalted Butter, at room temperature
400g / 14oz / 3 cups + 3 Tbsp All Purpose / Plain Flour
200g / 7oz / 1 cup Caster Sugar / Superfine Sugar
1 Large Egg, lightly beaten
5ml / 1 tsp Vanilla Extract / Or seeds from 1 vanilla bean
Directions
• Cream together the butter, sugar and any flavourings you’re using. Beat until just becoming
creamy in texture.
• Tip: Don’t over mix otherwise you’ll incorporate too much air and the cookies will spread during
baking, losing their shape.
• Beat in the egg until well combined, make sure to scrape down the sides of the bowl.
*Add the sifted flour and mix on low until a non sticky dough forms.
• Knead into a ball and divide into 2 or 3 pieces.
• Roll out each portion between parchment paper to a thickness of about 5mm/1/5 inch (0.2 inch)
• Refrigerate for a minimum of 30mins.
• Tip: Recipes commonly just wrap the whole ball of dough in clingwrap and then refrigerate it for an
hour or overnight, but by rolling the dough between parchment, this shortens the chilling time and
then it’s also been rolled out while still soft making it easier and quicker.
* Once chilled, peel off parchment and place dough on a lightly floured surface.
• Cut out shapes with cookie cutters or a sharp knife.
• Arrange shapes on parchment lined baking sheets and refrigerate for another 30mins to an hour.
• Tip: It’s very important you chill them again otherwise they’ll spread while baking.
• Re-roll scraps and follow the above process until all scraps are used up.
• Preheat oven to 180°C (160°C Fan Assisted) / 350°F / Gas Mark 4.
• Bake until golden around the edges, about 8-15mins depending on the size of the cookies.
• Tip: Bake same sized cookies together otherwise mixing smaller with larger cookies could result in
some cookies being baked before others are done.
• Tip: Rotate baking sheets half way through baking if your oven bakes unevenly.
• Leave to cool on cooling racks.
• Once completely cooled, decorate as desired.
• Tip: If wrapped in tinfoil/cling wrap or kept in airtight containers in a cool place, un-decorated
cookies can last up to a month.
Royal Icing:
315g – 375g / 11oz – 13oz / 2½ - 3 cups Icing / Confectioner’s / Powdered Sugar, unsifted
2 Large Egg Whites
10ml / 2 tsp Lemon Juice
5ml / 1 tsp Almond Extract, optional
Directions
• Beat egg whites with lemon juice until combined.
• Tip: It’s important that the bowls/spoons/spatulas and beaters you use are thoroughly cleaned and
grease free.
• Sift the icing sugar to remove lumps and add it to the egg whites.
• Tip: I’ve listed 2 amounts of icing sugar, the lesser amount is good for a flooding consistency, and the larger amount is for outlining, but you can add even more for a much thicker consistency good for writing. If you add too much icing sugar or would like to make a thinner consistency, add very small amounts of water, a few drops at a time, until you reach the consistency you need.
• Beat on low until combined and smooth.
• Use immediately or keep in an airtight container.
• Tip: Royal Icing starts to harden as soon as it’s in contact with air so make sure to cover containers with plastic wrap while not in use.
I was feeling in a creative mood, so I saved a few to decorate a little differently. I wanted to try painting with food coloring, and came up with these little scenes in honor of our anniversary.

My husband couldn't tell they were owls, but my three year old could. So either my drawing skills are on a level with a preschooler - or my three year old has an eye for art. I choose to go with the latter :)
Subscribe to:
Posts (Atom)



 Posts
Posts