Showing posts with label Breakfast. Show all posts
Showing posts with label Breakfast. Show all posts
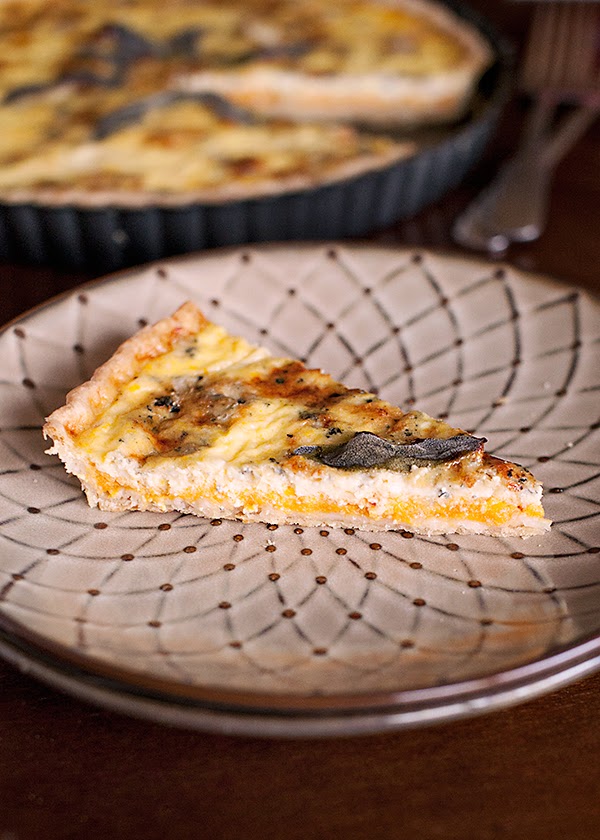
Squash, Sage & Gorgonzola Tart
It's gonna be short and sweet today peeps. My day hasn't started off too well, something involving my morning car ride to school, becoming an official squirrel murderer :( - being 32 weeks pregnant, and either constantly grumpy or in some kind of pain.
It's one of those days.
But a slice of this Squash, Sage & Gorgonzola Tart definitely helps. I'm reviewing this recipe over at Culinary Covers today, and it's a good one. This tart has a layer of creamy butternut squash topped with gorgonzola crumbles, and a baked egg filling topped with fresh sage.
It's good!
For the recipe head on over to Culinary Covers and check it out!
I'm out.
Amber
Brunch Cinnamon Rolls
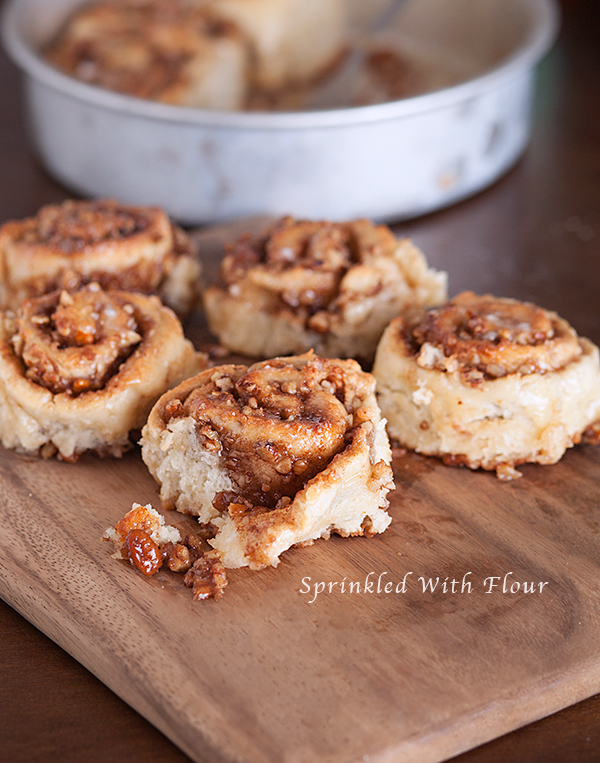
These breakfast rolls are yeast-free, soft and delicious. Without all the hassle of prep work you'll be making these time and time again!

Do you love cinnamon rolls? I bet you don't love all the rising time and prep work...if you're anything like me. But the gooey delicious results have me making them at certain times of the year when I get the itch.
How about if I told you I found a yeast-free cinnamon roll that was actually GOOD. Seriously. These rolls are fluffy and biscuit-like with a gooey brown sugar pecan filling that will have you going back for seconds.
Maybe even thirds. I'm just sayin'. Have I got you curious yet? Yes? I'm reviewing this Taste of Home recipe today over at Culinary Covers, so stop by and say hi and you can grab the recipe while you're at it!
Do you love cinnamon rolls? I bet you don't love all the rising time and prep work...if you're anything like me. But the gooey delicious results have me making them at certain times of the year when I get the itch.
How about if I told you I found a yeast-free cinnamon roll that was actually GOOD. Seriously. These rolls are fluffy and biscuit-like with a gooey brown sugar pecan filling that will have you going back for seconds.
Maybe even thirds. I'm just sayin'. Have I got you curious yet? Yes? I'm reviewing this Taste of Home recipe today over at Culinary Covers, so stop by and say hi and you can grab the recipe while you're at it!
Enjoy!
Amber
Overnight Ham & Cheese Breakfast Cups

I don't know about you, but I love waking up in the morning and having breakfast all ready. That's just one less thing to have to worry about when trying to get ready on busy mornings. I especially love individual size portions for school mornings, which make it super easy to feed just one kid - or a whole football team - if you have one. This recipe for Overnight Oatmeal In A Jar is one of my favorite make-ahead morning meals.
I really like breakfast casseroles too, they're quick and easy and sure to please the pickiest critics, so I decided to miniaturize it and turn them into these Ham & Cheese Breakfast Cups. You can customize them any way you want - swap the ham for sausage or bacon, add in some cooked veggies or get wild with your cheese. I kept these simple since that's what my kiddo likes best, but I'll definitely be experimenting with some different variations.
Just throw it all together the night before, pop them in the fridge, and have them baking while you're getting ready in the morning. Easy and super yummy, this is a great time saver recipe when you need one.

Overnight Ham & Cheese Breakfast Cups
Yield: 4 cups Printable Recipe
2 1/2 cups of cubed dry bread, you can also use toasted bread
1 cup cubed ham
1 cup shredded cheddar cheese
3 eggs
1 cup milk
2 tbsp butter, melted
1 tsp dry mustard
1/2 tsp salt
1/4 black pepper
Divide the bread cubes into 4 sections and place in 4 ramekins. Place 1/4 cup ham in each ramekin. Then sprinkle 1/4 cup shredded cheese over the ham in each cup. In a medium bowl combine the milk, eggs, melted butter, dry mustard, salt, and pepper. Mix well.
Pour evenly between each ramekin. Cover and chill overnight. When ready to eat, remove from fridge and preheat oven to 350 F. Bake uncovered for 25-30 mins or until set and golden brown. Remove from oven and allow to cool and set up for 5-10 minutes.
Recipe Note: Your cups will be nice and poofy when you remove them from the oven but will sink a little after cooling. That's o.k! :) The type of bread you use can also change your end result. It's best to use a dry bread like challah, french bread, or any stale textured bread, so your casserole isn't too mushy.
More Make Ahead Breakfast Meals You May Enjoy:
Homemade Breakfast Sandwiches
Overnight Oatmeal In A Jar - Berry Crumble Style
Homemade Breakfast Sandwiches
Overnight Oatmeal In A Jar - Berry Crumble Style

Apple Butter Bread with Cinnamon Glaze


This post is for all my fellow mothers of boys. I'm pretty sure that mothers of boys - let's call us M.O.B's for short - should have our own special national holiday. Seriously...complete with marching band and waiving banners applauding us M.O.B's for the craaaaazy crap we deal with on a daily hourly basis.
Case in point: here are just a few of my Facebook posts recently.


Um...yeah. So that's my kid. I don't have girls, but I'm pretty sure girls don't run around urinating on their own faces and sticking their tongues on any random object that happens by.
Buuuuuut, I kinda sorta love him and all...so I overlook his 6 year old neanderthal instincts, and on days when I think I'm going nuts - I dive headfirst into a tasty treat.
Like this Apple Butter Bread with Cinnamon Glaze. It's moist, spicy, and a great way to forget that you birthed a child who pees on his own face. If you're feeling extra motivated, you can even make your very own apple butter with my recipe for Red Hot Apple Butter. Enjoy!
Apple Butter Bread with Cinnamon Glaze
Yield: 1 loaf Printable Recipe
1/2 cup butter, softened
1 cup brown sugar
1 egg
3/4 cup buttermilk
2 tsp baking soda
2 cups all-purpose flour
1 tsp ground cinnamon
1 tsp ground nutmeg
1 tsp ground allspice
1 cup apple butter
3/4 cup chopped pecans
Cinnamon Glaze:
1 cup powdered sugar
2 tbsp butter, softened
1/2 tsp ground cinnamon
1-2 tbsp milk
1/2 tsp vanilla extract
In the bowl of an electric mixer cream the butter and brown sugar. Add the egg and beat well. In glass measuring cup combine the buttermilk and baking soda. Set aside. In a separate bowl, mix together the flour, cinnamon, nutmeg, and allspice. Add the flour mixture to the creamed mixture alternately with the buttermilk mixture, beginning and ending with the flour.
Stir in the apple butter and chopped pecans. Pour into a greased 9-in x 5-in x 3-in loaf pan. Bake at 350 F for 1 hour and 5 minutes, or until a toothpick inserted in the center comes out clean. Depending on your oven, you may need to cook for more or less time. Do not over bake or your bread will turn out dry. Cool in the pan for 5 minutes, then remove to a wire rack to cool completely.
For the Glaze: Mix together the powdered sugar, butter, cinnamon, vanilla, and enough milk to reach your desired consistency. I usually use 1-2 tbsp. Drizzle over the bread and allow to cool completely.


Source: bread adapted from Southern Living Annual Recipes
If you liked this recipe you may also enjoy my Red Hot Apple Butter!
Linked up to What's Cookin Wednesday at Buns In My Oven
Berry Green Smoothie


Don't get me wrong, I love a good salad, but there comes a point (for me anyway) when you feel like one more forkful of lettuce will make you start mooing.
Enter the green smoothie. You can pack as much of your greens in as you want, add some fruit and a few other goodies and you're good to go. I love adding Kefir and Chia seeds into my smoothies. Kefir is amazing for getting probiotics, minerals, vitamins, and amino acids - all good for your immune system.
Chia seeds are full of omega-3 oil, anti-oxidants, and are great for dieting. The tiny seeds can be made to taste like whatever you want, and they keep you feeling full for hours. So what's stopping you? Grab some greens, some frozen berries and jump on the green smoothie bandwagon. You're waist and our lips will thank you.
Yield: 1 serving Printable Recipe
2 cups fresh spinach leaves (you can use any greens you like: kale, chard, collard, etc.)
1 cup frozen berries (blueberries are my favorite)
1/2 cup plain Kefir yogurt
1/2 banana
1/4 - 1/2 cup water, juice or almond milk
2 tbsp chia seeds
Directions:
Place the berries, yogurt, banana, and spinach in a blender. Add your preferred liquid and pulse until smooth. Use as much or as little as you need to reach your desired consistency. If you want your smoothie a little more "frozen", you can add some ice cubes to the blender and pulse until your smoothie is slushy. Add your chia seeds and pulse for a few seconds to combine. Serve immediately and enjoy!
Amber
Do you have a favorite smoothie recipe, or another great way to use Chia seeds? Let me know in the comments, I'd love to hear your ideas!
Awesome Cinnamon Rolls

I hope you all had a great Christmas and New Years, I know we did. Well, we had a great Christmas, but New Year's was questionable.
If you enjoy sniffling colds, fevers, coughing, and just generally feeling like crap...then we had a blast! :) The little man has been pretty sick the last few days, so I've been a bit delayed in re-sharing my cinnamon rolls with you that we

The roll is a soft, pastry like cinnamon roll - not your average giant, puffy Cinnabon-clone. Not that there is anything wrong with giant, puffy, Cinnabon-clone rolls. These are just different, but equally as delicious.

The addition of mashed potato and sour cream in the dough helps to make the dough soft, tender and super yummy. So here you go, enjoy my cinnamon rolls!
Amber
Cinnamon Rolls

Cinnamon Rolls
Yield: 12 Printable Recipe
Dough:
2 pkgs active dry yeast
1 tsp sugar
1/3 cup warm water
1/2 cup warm mashed potatoes (plain)
2/3 cup sugar
1/4 cup sour cream
1/2 cup melted butter
2 eggs
1 tsp salt
3 cups unbleached flour
Smear:
1/3 cup butter
1 cup brown sugar
1/2 cup white sugar
1 egg white
2 tsp cinnamon
Glaze:
1 1/2 cups powdered sugar
1 Tbsp soft butter
1 tsp vanilla extract
enough milk or orange juice to make a thick pouring glaze
Preheat oven to 350F. In a small bowl, combine the water, yeast and sugar; set aside to foam for about 5 minutes. In the bowl of an electric mixer, combine the warm mashed potato (just plain mashed potato, nothing added to it), sugar, sour cream, melted butter, eggs, and salt. Add the flour and yeast mixture. Using the dough hook, mix the dough on speed 2, for 2 minutes.
Add additional flour, 1 tablespoon at a time, until dough just cleans the bowl, but is very soft. Cover with plastic wrap and allow the dough to raise until doubled in bulk, about 2 hours. Punch down and let rise again (about another 2 hours.) On a lightly flour surface, roll the dough into a rectangle and spread with smear. (The size of the rectangle will depend on how large you want the finished rolls.) Roll dough into cylinder. Cut into 1 1/2 inch slices. Place in a greased 9x13 oblong pan.
If baking immediately: Allow the rolls to rise again until doubled. Bake for 30 - 35 minutes at 350. Remove from oven when done and brush with melted butter. Drizzle with glaze while still hot.
Overnight method: Cover the rolls with plastic wrap and place in the refrigerator to raise overnight. When ready to bake in the morning, remove rolls from the refrigerator and let stand at room temperature for about 15 minutes. Then bake at 350F for 30-35 minutes, or until golden brown. Remove from oven and brush with melted butter. Drizzle with glaze while still hot.
While the rolls are baking, combine the powdered sugar, butter, and enough milk to make a thick pouring glaze. Use a spoon or the tines of a fork to drizzle the glaze over the rolls. Use as much or as little as you like.
Add additional flour, 1 tablespoon at a time, until dough just cleans the bowl, but is very soft. Cover with plastic wrap and allow the dough to raise until doubled in bulk, about 2 hours. Punch down and let rise again (about another 2 hours.) On a lightly flour surface, roll the dough into a rectangle and spread with smear. (The size of the rectangle will depend on how large you want the finished rolls.) Roll dough into cylinder. Cut into 1 1/2 inch slices. Place in a greased 9x13 oblong pan.
If baking immediately: Allow the rolls to rise again until doubled. Bake for 30 - 35 minutes at 350. Remove from oven when done and brush with melted butter. Drizzle with glaze while still hot.
Overnight method: Cover the rolls with plastic wrap and place in the refrigerator to raise overnight. When ready to bake in the morning, remove rolls from the refrigerator and let stand at room temperature for about 15 minutes. Then bake at 350F for 30-35 minutes, or until golden brown. Remove from oven and brush with melted butter. Drizzle with glaze while still hot.
While the rolls are baking, combine the powdered sugar, butter, and enough milk to make a thick pouring glaze. Use a spoon or the tines of a fork to drizzle the glaze over the rolls. Use as much or as little as you like.
Homemade Breakfast Sandwiches

I wish I was one of those people who was so prepared that they had weeks worth of frozen meals made up, just waiting to be reheated for a quick and easy meal.
I’m not. I’m a procrastinator.
I tend to leave things to the last minute, just hoping that some magic fairy will do it for me. After thirty years I’ve come to realize…there is no such magic fairy. So, in light of this very disappointing revelation, I’ve decided to try to be more organized and prepared. My first project? Breakfast. I love the results of the Overnight Oatmeal Jars so much, I decided to experiment with other make-ahead breakfasts. My husband likes a certain morning breakfast sandwich, and since the fast food version is so unhealthy I wanted to make our own at home.
These are sooo easy to make in large batches, and you can eat them right away, or with a few modifications freeze them to reheat later. This is a totally awesome idea from the Macheesmo blog. I adapted it a bit by adding some bacon and I changed the cooking method a bit. These were so delicious and easy to assemble. You can customize each sandwich however you like it. I like my eggs a tad runny and cooked them that way, but you can easily scramble the eggs instead and add any kind of veggies and meat you like.
Homemade Breakfast Sandwiches
Serves: 12 Printable Recipe
12 english muffins
12 large eggs
12 slices of cheese
12 slices of precooked bacon
butter or cooking spray
salt, to taste
pepper, to taste
Add-In's
Tomato
Avocado
Spinach
Directions:
1. Preheat oven to 350F. Separate the english muffins and place them with the inside facing up on a cookie sheet. Place a slice of cheese on the tops of each muffin, then layer a slice of bacon over the cheese. I use precooked bacon to it bakes quickly in the oven.


3. After the eggs have cooked for about 4-5 minutes, place the prepared english muffins in the oven also, for the cheese to melt and bacon to become crisp. This will allow the muffins to become lightly toasted too.
4. Remove the eggs and and muffins when done. Slide a knife gently around the edges of the cooked eggs to remove them. Spread some butter over the bottom half of each muffin, then place a cooked egg over each buttered half. Season with with salt and pepper, then place the cheesy bacon top over the eggs. Feel free to add any kind of toppings you want: fresh avocado, spinach, tomato, etc…the possibilities are endless!

5. You can eat them immediately, or wrap each muffin with foil, place them in a large freezer bag and keep in the freezer. When ready to reheat, just pop in a 350 F oven and cook for about 20-30 minutes, or until heated through. These are easy to reheat while you are getting ready in the morning, just pop one in the oven, go about your morning routine, then you’ll have a warm, toasty muffin ready for you.
Tip: Don’t reheat in the microwave…unless you like soggy bread. If you’re a soggy bread lover, go for it! If you want to add fresh vegetables to your sandwich and you are freezing these for later, I would wait to add the veggies until you’re ready to reheat.
Enjoy!
Amber

Blueberry Maple Pecan French Toast Casserole

Well, those who have been following our relocation to St. Louis know we only have 6 days left in our house. I’m not sure how I feel about it. On one hand I’m excited to move into our new home and start the next chapter in our lives. On the other hand, I’m sad to leave the house and town we’ve lived in for the past 8 years. This is the home we bought as newlyweds, the home we brought our newborn son to, and the home we’ve built memories in. It will definitely be a bittersweet day for me.
Since this next week I’ll be too busy for updating posts, I wanted to get this really tasty recipe up today. It’s been overcast and dreary here today (kind of like my mood), so I decided some comfort food was in order. What’s more comforting than Blueberry Maple Pecan French Toast Casserole? Let me tell ya, NOT MUCH!
This french toast casserole is filled with juicy blueberries, topped with crunchy, toasted pecans, and drizzled with cinnamon-brown-sugar-buttery goodness. Oh yeah, can’t forget the Blueberry Honey Maple Syrup…and if you’re feeling reeeeally bad…a good drizzle of fresh cream. Mmmmm. I normally make this in a 9x13 casserole dish, but I decided mini french toast casserole’s would be fun for me and my son today. I loved how these turned out!
Blueberry Maple Pecan French Toast Casserole
Serves 8 Printable Recipe

2 large loaves of french bread (day old an stale is good!)
6 large eggs
3 cups milk
1 cup brown sugar (divided)
1 tsp pure vanilla extract
1/2 tsp ground nutmeg
1/2 stick butter plus 1 tbsp
1/2 tsp ground cinnamon
3 cups blueberries (fresh or frozen)
1 cup pecans
salt, to taste
1/2 cup honey
1/2 cup maple syrup
1 tbsp lemon juice
Directions:
For the syrup: in a small saucepan combine 1/4 cup of honey, 1/4 cup of maple syrup and 1 cup blueberries. Cook for 2-3 minutes or until berries have burst. You can strain the syrup if you want to, but I like to leave the blueberries in. Add lemon juice.
For the nuts: Preheat oven to 350°F. Spread pecans on a baking sheet sheet and toast about 6-7 minutes until fragrant. Toss with 1 Tbsp butter and some salt (to taste) and set aside.

Cut French bread into 1" pieces. Butter a 9 x 13 baking dish and spread the bread cubes in the pan (You may not need to use all of them). Whisk together milk, eggs, 3/4 cup brown sugar, vanilla and nutmeg. Pour over the top of the bread, cover and let stand 1 hour or overnight in fridge. If you want to make these individual sized like I did, just spread the bread crumbs and milk mixture evenly between your ramekins. You will probably have more filling than you need, just gauge it by your eye. I halve the recipe when I make individual servings. Increase oven temperature to 400°F. Layer the 2 cups of blueberries over the bread, then sprinkle the toasted pecans over the blueberries.

Heat 1/2 stick butter, 1/4 cup brown sugar and 1/2 tsp cinnamon in a small sauce pan. When butter has melted drizzle over the bread. Bake for 1 hour or until puffed up and browned, and liquid from blueberries is bubbling. Casserole may need to cook longer if its taken directly from the refrigerator than if at room temp. When done, allow the casserole to sit for at least 10 minutes to set up.
Now drizzle some of that warm Honey Blueberry Maple Syrup over the top….and a little cream…if you’re bad – like me.

Enjoy!
Amber

Pineapple Coffee Cake

Did you eat too much over Easter? I know I did, but it was sooo worth it. Our family gathering had a delicious collection of pot-luck dishes, including this Pineapple Coffee Cake I decided to try from Better than Burger’s blog.
I loved how tall and moist this coffee cake turned out, and the yummy crumble topping was perfect. I also added a pineapple glaze to drizzle on top. I find with most coffee cakes that they taste even better the next day, after they’ve had time to settle a bit. This cake was no exception and was even more moist and flavorful the next day. What was your favorite Easter dish?
Pineapple Coffee Cake

Serves: 8 Printable Recipe
4 c. flour
1 c. sugar
2 T. baking powder (yes, 2 TABLEspoons)
2 t. baking soda
1 t. salt
2 egg
2 c. vanilla yogurt
1 c. oil
2 t. vanilla
1 1/2 c. crushed pineapple (well drained) (reserve the juice)
Topping:
3/4 c. flour
1/2 c. sugar
1/2. c. butter
1/2 c. chopped walnuts
Pineapple Glaze:
2 cups powdered sugar
reserved pineapple juice from crushed pineapple
In a large bowl combine flour, sugar, baking powder, baking soda and salt. In a separate bowl beat the eggs, yogurt, vanilla and oil. Add the wet ingredient to the dry ingredient and mix until blended. Fold in the WELL DRAINED pineapple. Don’t throw out that pineapple juice! Save it for the yummy glaze. Pour cake batter into a greased 9x13 pan.
Topping:
Combine flour, sugar and butter. Cut in butter with a pastry blender until mixture is crumbly. Add chopped nuts and mix well. Sprinkle evenly over cake batter.
Bake cake at 350 F for 40-45 minutes OR until middle is set and cake is lightly browned. Allow cake to cool for 10 minutes before serving.
For the Glaze: Combine the powdered sugar and enough of the pineapple juice to reach your desired consistency. Drizzle the glaze over the top of the cake. Serve and enjoy!
Amber

Overnight Oatmeal In A Jar – Berry Crumble Style
 How does your morning start every day? Mine begins deeply snuggled in my comfy bed, trying to ignore the oh-too-friendly sun obnoxiously peeping in through my window. This usually lasts long enough for me to almost fall back to sleep, right in time for me to hear the familiar bounding footsteps of my 5 year old, running across the hall.
I am of the firm opinion that you can tell a child’s age without even seeing them. Just listen to them walk, or in the case of my child – zoom, through house. Gone are the days of little pitter patter footfalls, now it’s non-stop, no speed control, sound of herding elephants, pretty much all the time.
This house rattling noise is the only warning I have, before his little body comes hurtling through the air to land ungracefully on top of me. The first thing out of his mouth is ALWAYS, “Mama, I’m staaarving. will you make me some brefast?” When asked to pick his poison, he ALWAYS asks for oatmeal.
I’m pretty sure if left on his own, he would eat oatmeal for every meal. Sometimes I try to change it up a bit, keep it interesting with eggs, pancakes or waffles, but he always comes back to his favorite. Lately, I've switched his regular oatmeal to steel-cut oatmeal. Since it can take quite a while to cook, I like to use the overnight method. This method is so simple, you just throw it together the night before and when you wake up you've have smooth, creamy steel cut oatmeal all ready to go. If you want a breakfast on the go, you can even divide up the oatmeal between half pint sized mason jars, and keep them in fridge for a week’s worth of ready made healthy breakfast! When you’re ready to eat once, just take it out of the fridge, pop it in the microwave for 2-3 minutes, then stir in your milk, sugar and whatever other goodies you want to mix in. Unlike regular oatmeal, steel cut oatmeal actually gets better after being in the fridge. So don’t worry about eating a soggy mess.
For a special occasion, it’s really easy to turn these oatmeal cups into oatmeal crumble cups. Like I did here. Crumble makes everything better. Doesn't it?
Berry Crumble Overnight Oatmeal
Yield: 6 cups printable recipe
Oatmeal:
1 2/3 cups steel cut oats
4 cups water
pinch of salt
1 1/2 cups mixed berries
3/4 cup milk
6 tbsp sugar (if desired)
Crumble:
3/4 cups all-purpose flour
4 tbsp butter, chilled
2 tbsp brown sugar
2 tbsp granulated sugar
Directions for Regular Oatmeal Cups:


1. Collect your jars. I used half-pint jars but you can use pint-sized jars for a larger serving.
2. In a large pot, bring the oats, water and salt to a boil. Simmer for about 3 minutes then turn off the heat.
3. Ladle the oats and water into the jars. I use a funnel because I have the worlds shakiest hands. Cover the jars tightly with their caps and rings. Leave on the counter overnight.
4. The next morning, put all but one of the jars in the refrigerator. Take the cap off one jar and stir up the oatmeal inside. Microwave for 2 to 3 minutes, or until nice and warm. Add your milk, sugar, and any other goodies you want to mix in. I love using fresh fruit and nuts, but the possibilities are endless. Serve and enjoy!


Directions for Berry Crumble Oatmeal Cups:
1. Follow steps 1-3 above.
2. The next morning, cut the chilled butter into the flour until mixture resembles coarse crumbs. Stir in the sugars, and then sprinkle a little cold water and stir until you get coarse lumps. Place the crumble in the freezer for about 10 minutes.
3. Take an oatmeal cup, stir the oatmeal a little and add a little milk (as desired) and some berries (as desired) and a little sugar to sweeten (as desired). Sprinkle a few spoonful's of the crumble over the top. Repeat as necessary. Place the oatmeal cups on a cookie sheet, and bake in a 400F oven for about 10-15 minutes, or until the crumble is pale golden and mixture is hot.
Recipe Notes:
You can also add your berries or other mix-ins to the rest of the jars before putting them away in the refrigerator. Then whenever you’re heading out the door just grab one.
(adapted from The Kitchn)
Cinnamon Rum Raisin Swirl Pancakes

Since today is the start of National Pancake Week, I thought these pancakes would be a good start to kick it off. I’ve had this idea rambling around in my head for a while now, and what better time to try them out than a week dedicated to every kind of delicious pancake you can imagine? You’ve probably seen a ton of Cinnamon Swirl Pancakes making the internet rounds, but I had something different in mind. I love raisin bread, with the yummy cinnamon streaks and plump raisins filling every bite, and I just had to see if I could make a pancake version. Of course, if the raisins were rum-soaked and the pancakes were topped with a giant pat of Maple Butter, it couldn’t hurt right? These were so good, whether you drizzle them traditional syrup, or go with a powdered sugar glaze, they’re sure to please any crowd!
Cinnamon Rum Raisin Swirl Pancakes

(Yield: 6 pancakes) Printable Recipe
Pancakes:
3/4 cup milk
2 tbsp white vinegar
1 cup all-purpose flour
2 tbsp white sugar
1 tsp baking powder
1/2 tsp baking soda
1/2 tsp salt
1 egg
1 tsp vanilla extract
2 tbsp butter, melted
Cinnamon Swirl:
2 tablespoons melted butter
1/4 cup brown sugar
1 teaspoon cinnamon
1 tablespoon flour
Rum Soaked Raisins:
1/2 cup raisins
2 tsp rum extract
water to cover
Maple Butter:
1/2 cup butter, softened
1/4 cup maple syrup

For the Rum Raisins: Place raisins into a glass bowl. Add enough warm water to cover all the raisins, add 2 tsp rum extract and let sit for at least 30 minutes. (Alternatively, you can cover the raisins with 1/2 cup of rum.)
For the Maple Butter: Mix the butter and maple syrup with an electric mixer until blended. Set aside.
For the Cinnamon Swirl: In a small bowl combine ingredients for the cinnamon swirl, and pour into a plastic ziploc bag or a disposable pastry bag. Snip a tiny triangle off the end of the bag for piping. Set aside.
For the Pancakes:
- Combine milk with vinegar in a medium bowl and set aside for 5 minutes to "sour". Combine flour, sugar, baking powder, baking soda, and salt in a large mixing bowl. Whisk egg, melted butter and vanilla into the "soured" milk. Pour the flour mixture into the wet ingredients and whisk until lumps are gone. Drain the raisins and gently fold them into the batter.
- Heat a nonstick skillet over medium heat. Grease with butter, if desired, and pour on a 1/2 cup of batter. Use the pastry bag to make a swirl of the cinnamon sugar mixture on top of the batter. When the bubbles on the surface of the pancake begin to pop, and then no longer fill in with more batter, flip, and cook for 30 seconds more. Repeat with remaining batter.
- Top with the Maple Butter and drizzle with syrup or a powdered sugar glaze.

Enjoy! Happy pancake eating!
Amber

Double Pumpkin Applesauce Muffins
 I picked up a new cookbook last week – not that I really needed one. Our local Borders store is closing, and everything has been marked down 70-90%.
 I kind of felt like a vulture, rummaging through the shelves looking for a deal, while in the back of my mind I wondered about the jobs of the people who worked there.
I did find something to take home though – The Oprah Magazine Cookbook. The bright shiny cover and beautifully photographed dishes drew me in, and as I fanned through the pages I knew I had to buy it.
Today I decided to make the Pumpkin Applesauce Muffins, and was happily dumping flour and spices into my butter mixture, when I realized that I had just thrown in the entire can of pumpkin puree – rather than the 1 cup it called for.
I had visions of dense, gooey muffins…not a desirable trait in a muffin. So I panicked and wondered if I should try to double the recipe to salvage it, then realized that this would call for another 4 eggs, 2 cups of sugar and whole stick of butter. At this point, I decided to bite the bullet and just go with it.
I mean, brownies were invented from a botched recipe right?
Well, my decision paid off, since these muffins turned out to be perfectly moist. No soggy dough bricks here.
So that is how Oprah’s Pumpkin Applesauce muffins turned into my Double Pumpkin Applesauce Muffins. I will write the recipe as written in the cookbook, but if you’re feeling a little adventurous, don’t worry if you decide to use the entire can of pumpkin – in fact, I recommend it.

Pumpkin Applesauce Muffins

(recipe from The Oprah Magazine Cookbook)

(prep: 15 min; bake: 20 min; yield 21 full muffins)
1 1/2 tbsp butter, melted
3 1/3 cups all-purpose
2 tsp baking soda
1/2 tsp baking powder
2 tsp ground cinnamon
1/2 tsp ground cloves
1/2 tsp freshly grated nutmeg
1 tsp salt
1 stick unsalted butter, softened
2 cups sugar
4 large eggs
1 cup unsweetened applesauce
1 cup canned mashed pumpkin (or the whole can like I did!)
1 tsp vanilla extract
2/3 cup apple juice, cider, or orange juice (I used orange juice)
1 1/2 cups raisins (optional)
1. Preheat oven to 375F. Grease 12 half-cup muffin cups with melted butter. In a medium bowl, combine flour, baking soda, baking powder, cinnamon, cloves, nutmeg, and salt; set aside.
2. In a large mixing bowl, beat the butter and sugar until cream, 2-3 minutes. Beat in the eggs, applesauce, pumpkin, and vanilla until blended. Add the dry ingredient alternately with the juice, beginning and ending with the dry mixture. Mix until smooth, but don’t over mix. Gently fold in the raisins.
3. Spoon batter into prepared muffin cups, filling each cup all the way. The fuller you make your cup, the higher domed your muffin will be. Bake on center oven rack for 20-25 minutes, or until a toothpick comes out clean. Remove from oven and allow muffins to cool in the pan for several minutes. Turn muffins out onto a cooling rack. Sprinkled with powdered sugar if desired and serve warm or at room temperature. Repeat steps 1 through 3 with any remaining batter. If you don’t have enough batter to fill all 12 cups the second time around, just put a little water in any empty cups. Enjoy!
Amber
Subscribe to:
Posts (Atom)


 Posts
Posts