Showing posts with label Cake. Show all posts
Showing posts with label Cake. Show all posts
Secret Cake: A Tasty Kitchen Recipe


It's called Secret Cake.
I have no idea why it's called that, but I do know I can't keep it a secret from you guys, because it's too good a recipe not to share the chocolate love. I found this cake recipe on Tasty Kitchen, and was immediately intrigued by the title, plus it had no picture with it. How can you not be curious about a mysterious dish called Secret Cake, made all the more mysterious with no picture to put with the name.
The cake is really moist and fluffy, but the kicker for me was the icing. It was so satiny and smooth, and ultra rich...and was made even better with chopped walnuts folded in. It set up with a slight crackled glaze but stayed gooey and rich underneath. Chocolate heaven!
Have I peaked YOUR interest now? For the recipe and my full step-by-step post, head on over to Tasty Kitchen where you can grab the printable recipe too!


Glazed Key Lime Snack Cake
 Well, my husband went back to work today. He took the end of last week off, so he could go with me to drop the kiddo off for his first day of Kindergarten.
We ran around so much and kept busy, that today is a bit of a shock for me. The house is so.....quiet.
I keep expecting to hear stampeding footsteps running down the stairs, mysterious thumps from above, and the assuring sound of toys being clashed together.
A quiet house is just not right.
I have to admit, it was much easier to get my next recipe baked, photographed, and posted. Without having to stop every 5 minutes to snap Iron Man's head back on, or find a particular piece of Lego the size of a flea, it's amazing how much I can get done.
I decided to make a tasty after-school treat for my newly school-bound son - O.K. I admit it, the cake is for me.
This cake is so moist and light, and then drizzled in a tart lime-glaze that seeps down into the cake through poked holes. It's not too sweet and not too heavy. A perfect snack cake.
Glazed Key Lime Snack Cake
Serves: 12 Printable Recipe
1 package (3oz) lime gelatin
1 1/2 cups sugar
2 cups flour, sifted
1/2 tsp salt
1 tsp baking powder
1/2 tsp baking soda
5 eggs
1 1/3 cups cooking oil
3/4 cup orange juice
1/2 tsp vanilla
1/2 lemon, juiced
For the Glaze:
1/3 cup key limes (or regular limes)
1 cup powdered sugar, sifted
Directions:
Soak gelatin in a little bit of cold water (a few tablespoons) for 3-5 minutes. Combine sugar, flour,salt, baking powder, baking soda, and gelatin in a mixing bowl. Add eggs, oil, orange juice, vanilla, and lemon juice. Mix until combined.
Pour batter into a greased 9" x 13" pan and bake at 350F for 30 minutes, or until a toothpick inserted into the center comes out clean. Let cool in the pan for 15 minutes. Prick cake all over with a fork. Drizzle well with the lime glaze.

Chocolate Snickers Layer Cake

Something rich, something chocolaty....something that would be a candy lovers dream.
He is a candy lover. So much so, that I'm pretty sure the cashiers at the convenience store by our house know him by name.
My last candy concoction for him was my Chunky Twix Cookies. Those cookies were so out of this world good, I now have the reputation in our family as the Twix Cookie girl. That recipe has also made it's way around the blogging world. Yes, they are that good.
So for this candy creation I made a super moist chocolate cake, threw in some snickers bars, cream cheese frosting and homemade caramel sauce. Wow. This cake is knock your socks off good. It is rich, but birthday's only come once a year, right?
 Chocolate Snickers Layer Cake
Serves:16 Printable Recipe
1 3/4 cups all-purpose flour, plus more for pans
2 cups sugar
3/4 cups cocoa powder
2 tsp baking soda
1 tsp baking powder
1/2 tsp salt
1 cup buttermilk
1/2 cup vegetable oil
2 large eggs, room temperature
1 tsp pure vanilla extract
1 cup freshly brewed hot coffee
butter, for greasing the pans
12 fun sized snicker bars, cut into small pieces
Homemade Caramel Sauce, recipe follows
Cream Cheese Frosting, recipe follows
Directions:
Preheat the oven to 350 F. Grease two 8-inch x 2-inch round cake pans with butter. Line with parchment paper, then butter and flour the pans.
Sift the flour, sugar, cocoa, baking soda, baking powder, and salt into the bowl of an electric mixer, mix on low speed until combined. In another bowl, combine the buttermilk, oil, eggs, and vanilla. With the mixer on low speed, slowly add the wet ingredients to the dry. With mixer still on low, add the coffee and stir just until combined. Pour the batter into the prepared pans and bake for 35 minutes, or until a toothpick inserted into the center comes out clean. Cool in the pans for 30 minutes, then turn them out onto a cooling rack and cool completely.
Place 1 layer, flat side up, on a flat plate or cake pedestal. With a knife or offset spatula, spread the top with frosting. Scatter some of the snickers pieces over the icing, then drizzle a little caramel sauce over it. Place the second cake layer on top, rounded side up, and spread the frosting evenly on the top and sides of the cake. Press two rows of snickers pieces into the sides of the bottom edge of the cake, all around the cake. Decorate the top of cake with remaining snickers pieces. Drizzle caramel sauce over the cake. Serve and enjoy!
Homemade Caramel Sauce:
(Recipe from The Pioneer Woman)
1 cup brown sugar, packed
1/2 cup half and half
4 tbsp butter
pinch of salt
1 tbsp vanilla extract
Mix the brown sugar, half-and-half, butter and salt in a saucepan over medium-low heat. Cook while whisking gently for 5 to 7 minutes, until it gets thicker. Add the vanilla and cook another minute to thicken further. Turn off the heat, cool slightly and pour the sauce into a jar. Refrigerate until cold.
Cream Cheese Frosting:
12-oz cream cheese, room temperature
1 1/2 sticks of unsalted butter
1 1/2 tsp vanilla extract
5 1/2 cups powdered sugar
In the bowl of an electric mixer, combine the cream cheese, butter and vanilla until smooth. Slowly add the powdered sugar and beat until combined. I like to put my frosting in the fridge to firm up a bit before frosting my cake.
Enjoy!
Amber

Carrot-Pineapple Cake

Happy Memorial Day! I hope you’re enjoying your holiday weekend, I know I am. I am so thankful for all the wonderful military men and women who protect us and serve our country. To celebrate, I want to share one of my favorite cake recipes with you. This is a family recipe, passed to me from my mother-in-law, and it’s a definite keeper.
I love Carrot Cake, and this is a really good one…PLUS it’s super easy to make. No messy shredding of carrots here. Just a few jars of pureed baby food.
Yep, you heard me right. Baby food. This recipe uses pureed carrots to add that familiar carrot cake taste, and a can of crushed pineapple makes it super moist. This is definitely not a dessert for those watching their waste-line, but you could easily reduce the oil and sugar without affecting the taste and consistency too much.
Carrot-Pineapple Cake

Serves: 8-1-0 Printable Recipe
2 cups all-purpose flour
2 cups sugar
2 teaspoons baking soda
2 teaspoons cinnamon
1 teaspoon salt
1 ½ cups oil (your choice)
4 eggs
2 jars of carrot baby food 6 oz. size
1 can crushed pineapple 8 oz. size (drained)
Directions:
In a large bowl combine the dry ingredients. In a medium bowl, whisk the oil, eggs, pureed carrots and drained pineapple until thoroughly mixed. Add the wet ingredients to the dry ingredients and stir just until combined. Pour batter into an ungreased 9x12 baking dish (or similar size).
Bake at 350 F for approximately 35-40 minutes, or until a toothpick inserted into the middle comes out clean. Cool completely, then add frosting.
Frosting:
1 package cream cheese 8 oz. size – softened to room temperature
½ cups butter, softened
1 teaspoon vanilla
3 ¾ cups powdered sugar
In the bowl of an electric mixer, combine the cream cheese, butter and vanilla until smooth. Slowly add the powdered sugar and beat until combined. Now it’s ready to add to your cake!
Enjoy!
Amber

Just in case you ever wondered what happens to the sugary goodness around my house. There is usually a certain person with sticky fingers, hovering impatiently, waiting to do this....

and this.....

Pineapple Coffee Cake

Did you eat too much over Easter? I know I did, but it was sooo worth it. Our family gathering had a delicious collection of pot-luck dishes, including this Pineapple Coffee Cake I decided to try from Better than Burger’s blog.
I loved how tall and moist this coffee cake turned out, and the yummy crumble topping was perfect. I also added a pineapple glaze to drizzle on top. I find with most coffee cakes that they taste even better the next day, after they’ve had time to settle a bit. This cake was no exception and was even more moist and flavorful the next day. What was your favorite Easter dish?
Pineapple Coffee Cake

Serves: 8 Printable Recipe
4 c. flour
1 c. sugar
2 T. baking powder (yes, 2 TABLEspoons)
2 t. baking soda
1 t. salt
2 egg
2 c. vanilla yogurt
1 c. oil
2 t. vanilla
1 1/2 c. crushed pineapple (well drained) (reserve the juice)
Topping:
3/4 c. flour
1/2 c. sugar
1/2. c. butter
1/2 c. chopped walnuts
Pineapple Glaze:
2 cups powdered sugar
reserved pineapple juice from crushed pineapple
In a large bowl combine flour, sugar, baking powder, baking soda and salt. In a separate bowl beat the eggs, yogurt, vanilla and oil. Add the wet ingredient to the dry ingredient and mix until blended. Fold in the WELL DRAINED pineapple. Don’t throw out that pineapple juice! Save it for the yummy glaze. Pour cake batter into a greased 9x13 pan.
Topping:
Combine flour, sugar and butter. Cut in butter with a pastry blender until mixture is crumbly. Add chopped nuts and mix well. Sprinkle evenly over cake batter.
Bake cake at 350 F for 40-45 minutes OR until middle is set and cake is lightly browned. Allow cake to cool for 10 minutes before serving.
For the Glaze: Combine the powdered sugar and enough of the pineapple juice to reach your desired consistency. Drizzle the glaze over the top of the cake. Serve and enjoy!
Amber

Ozark Apple Pudding– Tasty Kitchen Blog Post

I’m so excited to be able to contribute another recipe post to the Tasty Kitchen Blog. I’m sure most of you are already familiar with Tasty Kitchen, a great place to find delicious recipes within a wonderful community.
You can browse and submit recipes on their main website, and on their blog they feature different recipes each week.
When I came across a recipe for Ozark Apple Pudding, it immediately caught my eye – since I live in the Ozarks! I’ve never heard of this dessert (shame on me), but it is so good I will be making this again. It is a rustic, hearty cake that is similar to an apple bread pudding – but better!
You can find the recipe and my complete Tasty Kitchen guest post here.
Enjoy!
Amber

Cherry Limeade Streusel Cake

I love cherries, especially fresh ones. Last year I bought some beautiful rainier cherries because they were so pretty with their pale yellow skin with a hint of blush. The dessert I use them for was a brainstorm that turned out so well, I decided to make it again this year. Since it’s the season for these yummy cherries, I picked some up at the store to remake the treat I used them for last time. Cherry Limeade Streusel Cake.
I love making this cake in a skillet, with lime soaked cherries and topped with a buttery streusel and zesty lime glaze…it’s sooo good. I had a few kinks to work out from the last time I made it. The cherries sunk to the bottom, so this time I coated them with a little flour and that seemed to do the trick. The cake is cooling as I’m writing this, and I’m pretty sure it’s time to glaze it….so I’m off to indulge in some deliciousness!

Cherry-Limeade Streusel Cake

Cake:
4 Tbsp butter, unsalted and room temperature, plus more for skillet
1 cup all-purpose flour, plus more for skillet
1/2 tsp baking powder
1/4 tsp baking soda
1/4 tsp salt
3/4 cup sugar
1 large egg
1/2 cup buttermilk
1 pound fresh cherries, halved and pitted
2 limes, zested and juiced
Streusel Topping:
1/2 cup all-purpose flour
1/4 cup butter, chilled and cut into pieces
1/4 cup sugar
1/4 tsp salt
Lime Glaze:
6-7 Tbsp powdered sugar
reserved lime juice from cake + 1 tsp lime zest
3 drops of almond extract
For the streusel topping: Place the flour in a small bowl and add the butter. Using a fork, cut the butter into the flour until the mixture resembles coarse crumbs. Add the sugar and salt, mixing it in with a fork. Set aside.
For the cake: Preheat oven to 375F. Cut the cherries in half and remove the pits, then quarter the halves. Place the cherries in a small bowl, and pour the juice of two limes over them, tossing lightly to coat. Set aside. Butter an 8-inch ovenproof skillet (or an 8-inch cake pan), and dust with flour, tapping out the excess. In a medium bowl, combine the flour, baking powder, baking soda, and salt. Using a mixer on medium speed, beat the butter and sugar until pale and fluffy. Beat in the egg. Gradually add the flour mixture, alternating with the buttermilk. Remove the cherries from the lime juice, and pour about 2 tablespoons of lime juice into the batter (save the rest for the glaze). Add the zest from the limes you juiced for the cherries. Stir just until combined. Sprinkle 1-2 tablespoons of flour over the cherries, and lightly toss. It’s o.k if the cherries get a little gummy, they will sill have some residual lime juice on them.
Pour the batter into the prepared skillet, and smooth the top with a spatula. Scatter the cherry halves on top of the batter, the sprinkle the streusel topping over the cherries. Bake for 35 minutes, or until cake is golden brown and a toothpick inserted into the center comes out clean. Remove pan from the oven and let cool for at least 30 minutes, up to an hour. In the meantime, combine the powdered sugar, lime juice, zest, and about 3 drops of almond extract. Set aside.
Once the cake has cooled, place a plate upside down, over the top of the skillet. Holding the bottom of the plate, quickly turn the skillet over so that the cake is streusel side down on the plate. Place your serving platter upside down over the cake, and flip again, so the cake is now streusel side up. Drizzle the lime glaze over the top of the cake. If desired, garnish with fresh cherries and a lime slice.

Enjoy!
Amber
7 Layer Chocolate Fudge Cake

Here’s another recipe that I tried out for the Clickin Moms scavenger hunt I participated in. The hunt is now over, and while I had a ton of fun with it…I’m exhausted! I loved how it made me push myself and step outside of my comfort zone.
During this scavenger hunt I:
Found a Delorean, met with a magician, visited a cave, took my son to his first fair, talked a complete stranger into letting me take her picture during her pedicure, cajoled an unknown tattooed man into sitting on a pink bike for me, and walked into a gym and asked a random man to bench press 200lbs for me! This is just naming a few of the bizarre things I’ve done this month
 If you haven’t guessed already, another list item was a seven layer cake, and rather than go out and buy a slice – I decided to make of own. Of course.
This cake was not as difficult as I thought it would be, and was quite good. I think I would bake the cake layers for a little less time next time though, and double the icing recipe. More icing = more deliciousness…right?
Seven Layer Chocolate Fudge Cake

(adapted from 100 Café Street)
Cake Layers:
3 eggs, beaten
1 tsp. Baking soda
¼ c. apple sauce
2 c. self-rising flour
1 ½ c. granulated sugar
1 tsp. Pure vanilla extract
1 c. buttermilk
Directions:
1. Combine flour and baking soda.
2 Add eggs, apple sauce, sugar, vanilla and buttermilk.
3. Mix until well blended, but do not over mix.
4. Pour ¾ c. batter into 6 or 7, 9” round cake pans (depending on how much batter you have and how well you scrape the bowl) and use anodized aluminum, so as not to burn the edges.
5. Bake at 350 degrees for 15-18 minutes.
6. Cool on wire racks while making fudge frosting.
Fudge Frosting:
2 cups granulated sugar
1/3 c. cocoa
1 tsp. Pure vanilla extract
½ c. margarine
7 oz. Evaporated milk
Directions:
1. Melt butter in sauce pan over medium heat without boiling.
2. Add sugar, cocoa, vanilla and evaporated milk.
3. Stir well and bring to a boil.
4. As soon as it comes to a boil, time for five minutes (ONLY five minutes) and then immediately remove from heat.
5. Ice your cake layers immediately or the frosting will harden into fudge, rendering it impossible to spread. 6. Serve warm, if possible, and you have the most decadent, Southern tradition that will melt in your mouth and be remembered for generations to come!
Note: The recipe shows the original amounts, I would suggest double the icing to be able to have enough to frost the layers and the outside. I used disposable cake pans, which made removing the cake from the pans easier. I very gently turned the pans inside out, and slide a knife under the cake to lift the cake off of the pan. I tried greasing and flouring one pan, but that method still let the cake stick.
Enjoy!
Amber
Peanut Butter Sheet Cake–Celebrate 30

There are some things that just scream “American”. Mac and cheese, apple pie…and peanut butter are a few of these. When I was a child growing up in Wales, my mom would always make my lunch for me to take to school. What did any normal American mom make for lunch in the 80’s?
The quintessential PB&J.
Now this was a perfectly acceptable lunch in the eyes of American kids, but to British kids – this was akin to eating bug guts and monkey brains. Let’s just say that peanut butter had not gone mainstream in Wales at that time. While I may have been mercilessly poked fun at, and secretly wished to be eating the marmite sandwiches that everyone else was eating (gross by the way), I never lost my secret love for peanut butter.
Flash forward 20-some years, and this cake fulfills all my peanut-buttery dreams. The month of June is a big month for me. I will be turning 30 (gasp!), and it is my 1 year Bloggiversary on the 30th. So in a Sesame Street-esque way, I will be celebrating the number 30 the whole month. I will be picking 30 of my most popular recipes during the last year to showcase, along with a few new ones. Let’s start with this Peanut Butter Sheet cake that I made last July 4th!
You can grab the recipe in my original post for this Peanut Butter Sheet Cake.
Enjoy!
Amber
How To Smooth Buttercream Icing

I learned a really great tip this week. I learned how to get my buttercream frosting smooth - so smooth that it gives fondant a run for its money. Almost.

What is the trick you say?
Viva.
Yes, you heard me right. Viva – as in the paper towel. It has to be a smooth, pattern-free paper towel like Viva.
Here’s the plan:
1. Give your cake a crumb coat, then a final coat. Smooth the icing as best you can with a knife or spatula.
2. Now leave it alone for 15 minutes. This will give your frosting time to crust. You want crust.
You should be able to touch the icing without any coming off on your finger.3. Take a clean Viva paper towel and place it over the top of your cake. Now either use a fondant smoother, or the palm of your hand to GENTLY glide over the paper towel – smoothing the surface of the cake. This is the same concept as placing a towel over a delicate garment to iron it. You are basically ironing the wrinkles out of your frosting
Move the paper towel to the sides of the cake, and use the same method to glide over the paper towel and smooth the icing out. You may need to slightly angle your fondant smoother at times, to properly get all the creases out. Remember to be gentle, you don’t want to move the icing around, just barely smooth the surface. Work on one small area at a time, smoothing until your surface is perfect – or almost perfect. I used the method on this birthday cake that I made for a friend this week. I didn’t worry about getting the icing on my cake super perfect, but it’s almost there.
I really like this technique, and I love how I can achieve a smooth, fondant-like surface, while keeping the taste of buttercream. The best of both worlds!
Here is a great video tutorial to show you the method.
Enjoy, and have a great holiday weekend!
Amber

New York Style Coffee Cake
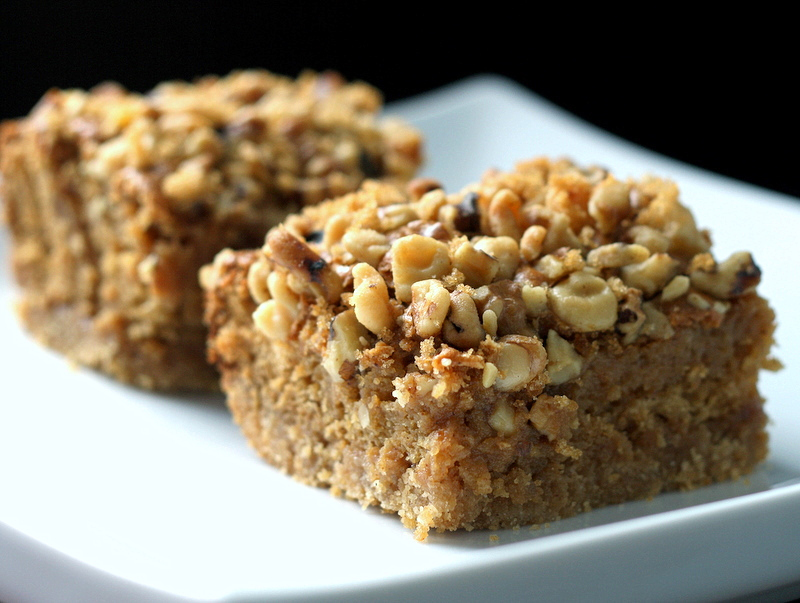
Well, the snow continues to fall here in the Ozarks, and like a bear I have been hibernating inside my cave (read: house). Unlike a bear, however, I have not been packing on my winter layer of fat:) I have endured my healthy week, which included daily trudges to the gym and countless moments of questioning my sanity. But at the end I was happy to be able to indulge in this yummy treat over the weekend. A moist coffee cake with a slightly gooey center, sitting on a shortbread like crust. It was well worth the wait!

Prep: 15 min; Cook: 45 min Servings: 9
2 cups all-purpose flour
2 tsp instant coffee granules
2 cups firmly packed light brown sugar
1 tsp ground cinnamon
1/2 tsp salt
1/2 cup (1 stick) unsalted butter, cut into pieces
1 (8-oz) container sour cream
1 tsp baking soda
1 egg, lightly beaten
1 cup chopped pecans or walnuts
Combine the flour and coffee granules in a large bowl. Add brown sugar, cinnamon, and salt. Stir well. Cut in the butter with a fork or pastry cutter until mixture resembles coarse crumbs. Press half of the mixture into a lightly greased 9" square baking dish. Set aside.

Bake at 350F for 45 minutes. Cool and cut into squares. **Note: When the cake is removed from the oven after 45 minutes, the center will still be slightly jiggly to the touch. This is okay. After cooling, the center will set up and the texture will be moist. If you bake longer, your cake will dry out.

(adapted from Southern Living Ultimate Christmas Cookbook)
Superhero Birthday Party

I have a superhero obsessed son - this is his latest phase. Before that it was race car mania, which had an impressive run of at least two years, before the superpowers of certain caped crusaders caught the attention of his sponge-like mind. Don't get me wrong, he still loves his cars, and has more hot wheels than any kid you will ever meet. Seriously, he has over 1000 (a lucky hand me down, not bought by us!)
Realizing that another birthday was fast approaching, I used my own mommy super powers (mothers intuition, eyes in the back of my head, and go-go-gadget arms, ) to plan a superhero themed birthday party for him. We had already been informed from our super hero in training, that he wanted his party at Chuck E. Cheese, so I worked with that and planned around what that kid-crazy-party infested place didn't provide. That left invitations, the cake, and goody bags. I scoured the internet for inspiration and put together a frankenstein hodge podge of party ideas. Several free printables later, along with some scrapbook paper, a little glue, and some imagination, I had the beginnings of a really cute theme.
The Superhero Invitations
These were made by cutting out the images I wanted, then typing up an invitation and gluing the images where I wanted them. This gave me my "prototype". I took this copy to Kinko's and made high quality color copies for the finished product. Fold the invitations up letter style, put them in an envelope marked TOP SECRET, and you have yourself a cute superhero party invitation.

The Superhero Cupcake Stand
I ordered a superhero themed scrapbook set that was on clearance at Oriental Trading, along with the clearanced superhero ribbon. I then covered my homemade cupcake stand with the superhero paper and ribbon.

The Cupcake Wrappers
I bought some scrapbook paper from Hobby Lobby that would work with the theme, and made these superhero cupcake wrappers. I used this printable cupcake wrapper template from Skip To My Lou.

The Superhero Cupcakes
I made these Blue Velvet cupcakes from Sprinkle Bakes, which are just red velvet cupcakes colored blue instead of red, and iced with yummy cream cheese frosting. Then I made superhero themed sugar paste cake toppers to place on top. Find the Blue Velvet recipe below.

Blue Velvet Cupcakes
Printable Recipe
2 cups sugar
2 sticks butter, softened
2 eggs
1 Tbs. cocoa powder
1 Tbs. Wilton food coloring gel in Royal Blue
Wilton food coloring gel in Violet – stick a toothpick in the bottle and use that amount
a teaspoon or two of water
2 1/2 cups cake flour
1 tsp. salt
1 cup buttermilk
1 tsp. vanilla
1/2 tsp. baking soda
1 Tbs. vinegar
Heat the oven to 350 degrees. Put cupcake liners in the cupcake pans.
In a mixer bowl, cream the butter and sugar. Add the eggs, one at a time, mixing well. In a small bowl, mix the cocoa, food coloring gel and water together to form a paste. Add to the ingredients in the mixer bowl and blend well. Stir the flour and salt together and add to the wet ingredients, alternating with the buttermilk. Mix well. Blend in the vanilla. In a small bowl, combine the baking soda and vinegar and then add that to the other ingredients in the mixer.
Fill the cupcake liners with batter, about 2/3 of the way full. The batter will be thick. Bake for 25-30 minutes or until a toothpick comes out clean. Cool completely before frosting. Makes 24 cupcakes.
Cream Cheese Frosting
1 pound cream cheese, softened
4 cups sifted confectioners’ sugar
1 cup unsalted butter softened
1 teaspoon vanilla extract
1 teaspoon lemon extract (optional)
Mix cream cheese with butter until smooth. Add extracts. Slowly add sugar and blend until light and fluffy! Use a piping bag with a round #8 tip to create fluffy cupcake tops!
The Birthday Boy's Cake
I used the same Blue Velvet recipe as the cupcakes, and iced with cream cheese frosting and royal icing. The cake topper is made from sugar paste.

The Superhero Masks
These masks are so simple to make, with some felt and an elastic string. I used this printable as a template and embellished the masks with felt stars. Sorry I forgot to take a picture of my own, but you can see what they look like here.
The Superhero Goody Bags
These masks are so simple to make, with some felt and an elastic string. I used this printable as a template and embellished the masks with felt stars. Sorry I forgot to take a picture of my own, but you can see what they look like here.
The Superhero Goody Bags
A quick trip to the dollar store gave me most of what I needed to customize these bags. I got some Marvel Superhero matching cards for a dollar a piece, and a container of small play dough pots for a dollar. I used the same printable superhero images that I used for the invitations, some scrapbook paper, and superhero ribbon to make these themed favors.

I had a lot of fun with this birthday theme, but am glad all of the work is over! The party was a success, and my little super hero loved his cake. Now I only have about 350 days of rest before the next one:) Thanks for stopping by!
Amber
Mom's Apple Squares with Maple Glaze

Does it look like fall yet in your neck of the woods? It does here. The leaves have finally started to turn, some of them having tumbled to the ground already, just waiting to be raked into big piles of kid romping fun. The only thing that doesn't feel like fall is the temperature. My son is still running around in short sleeves and shorts, and I'm still waiting for the chance to pull out his fall clothes. Long sleeved thermal shirts, hooded sweatshirts, jeans and jackets, these are a few of my favorite things....la la la. Before I break into song and scare you away forever, I will get to the matter at hand. Food. Namely, apples.
I know everyone is pulling out their apple recipes, pushing up their sleeves and whipping up hoards of apple sauce, apple butter, apple cake, apple everything. Apple, apple, apple. Have you ever said a word enough times, that it begins to sound weird? Sorta like spoon. Spoon. Spoon. OK, I'll stop now:) I'm afraid I'll be joining the ranks of the apple-dish-making-fiends, and since I've already gotten a start with my Harvest Apple Cookies, I'll proceed to my next recipe. Mom's Apple Squares with Maple Glaze. These little apple squares are the perfect combination of apples and spice, and have the perfect texture. A little crunchy on the outside, yet soft and moist on the inside. I added a little pure maple syrup to the glaze to give it that little something extra. These were good enough to get my son's vote, and I will be making them again.
Mom's Apple Squares with Maple GlazePrintable Recipe
Cake
3 large eggs
1/4 tsp salt
1 3/4 cups sugar
1 cup vegetable oil (you can substitute any oil, like coconut)
2 cups sifted all-purpose flour (whole wheat pastry flour would substitute well)
1 tsp baking soda
1 tsp ground cinnamon
1/2 tsp nutmeg
3 cups chopped unpeeled apples (Braeburn, Gala, or similar)
1/2 cup chopped walnuts
1 tsp vanilla extract
Maple Glaze
1 cup sifted powdered sugar
1 tbsp butter, softened
2-3 tablespoons whole milk
1 tbsp pure maple syrup (can use maple extract also)
For the Cake:
Preheat oven to 350F. Coat a 15x10-inch jelly-roll pan with nonstick baking spray with flour; set aside. Leave the apples unpeeled, but remove core and chop the apples into small pieces.
In the bowl of an electric mixer, combine eggs and salt. Beat at medium speed until frothy, about 1 minute. Add the sugar and oil, and beat until blended. In a medium bowl combine the flour, baking soda, cinnamon and nutmeg. Add the flour mixture to the egg mixture, and beat just until combined.
In the bowl of an electric mixer, combine eggs and salt. Beat at medium speed until frothy, about 1 minute. Add the sugar and oil, and beat until blended. In a medium bowl combine the flour, baking soda, cinnamon and nutmeg. Add the flour mixture to the egg mixture, and beat just until combined.
Fold in the apples, nuts and vanilla. Pour into the prepared pan, spreading evenly. Bake for 30 minutes or until lightly browned and set. Set the pan on a wire rack, let cool.
For the Glaze:
In a medium bowl combine the powdered sugar, butter and enough milk to make a spreadable consitency. This was about 2 tablespoons for me. Mix until smooth. Add the tablespoon of maple syrup/maple extract, and stir. Spread over the mostly cooled cake. Let the frosting set, then cut into bars.

Tip: You can also bake this cake in ramekins, just fill with batter about 1/2 - 2/3 full. If you fill too high it will spill over the sides. Bake until cake is golden and set, about 30-35 minutes. I set a small amount of my batter aside to make one ramekin, and my son loved having his own individual sized cake.


(adapted from Phyllis Hoffman Celebrate Fall 2010)
Angel Food Cake with Pink Grapefruit Cream Cheese Icing
.jpg)
I passed a display of pink grapefruit at the grocery store the other day, and even though it wasn't on my list - I have to follow my list or else I buy everything in the store - I picked a few up and put them inconspicuously in the grocery cart. I tried to convince myself that my inner grocery Nazi wouldn't have noticed. I love pink grapefruit - The summery mix of pink and yellow, and the citrusy aroma that makes the back of your tongue start to water. Sprinkled with a little sugar this is one of my favorite citrus flavors.
While trying to decide what I wanted to do with them, I thought the flavor would go well with an angel food cake. So I made angel food cake, cut them into squares and spooned a Pink Grapefruit Cream Cheese Icing over them. Then I garnished them with sugared gumdrop petals. I could have added the pink grapefruit juice to the cake batter, but I knew my husband wouldn't eat it that way, so I kept my grapefruit obsession to the icing. He could eat his cake plain. I didn't stop with adding pink grapefruit juice to the icing, I stirred in the zest and a few spoonfuls of the grapefruit pulp also. It was perfection!
Angel Food Cake
2 1/2 cups sugar
1 1/2 cups all-purpose flour
1/2 tsp salt
2 1/2 cups egg whites (about 18 large eggs)
1 tsp cream of tartar
1 tsp vanilla extract
Pink Grapefruit Cream Cheese Icing
6 oz cream cheese, softened
1/8 cup butter, softenedjuice of one whole pink grapefruit
10 oz powdered sugar
zest of one whole pink grapefruit2 Tbsp pink grapefruit pulp/flesh
For the Cake:
Preheat the oven toe 375F. Line the bottom of a 9x13 pan with aluminum foil, leaving 3 inches to extend over the sides of the pan. Do not grease the pan or foil, this will prevent the cake from being able to climb the pan and rise.
In a medium bowl: Sift the flour, sugar and salt together. In an electric stand mixer, beat the egg whites and cream of tartar at high speed until stiff peaks form. Gently fold the sugar mixture into the egg whites, 1/3 cup at a time, folding just until blended. Fold in the vanilla, and spoon the batter into the pan. The pan will be very full, this is OK.
Place the pan on an oven rack placed in the bottom third of the oven, and bake for 30-40 minutes, or until a wooden pick inserted into the center of the cake comes out clean. Turn the cake upside down onto a lightly greased wire rack, allow to cool for 1 hour or until completely cool, with the pan over the cake. Once cake has cooled, remove the pan and peel the foil off the cake.
For the Icing:
Beat the cream cheese and butter at medium speed until creamy. Add the grapefruit juice, beating just until blended. Gradually add the powdered sugar, beating at low speed until mixed. Gently stir in the pink grapefruit zest and the pulp. If not using the icing now, you can cover and keep in the refrigerator. I like to serve the icing cold, it tastes more refreshing this way.
Cut the cake into squares and spoon the icing over the top of the cake, allowing icing to drizzle down the sides. Serve as is, or garnish with Gumdrop Rose Petals. Enjoy!
.jpg)
.jpg)
Gumdrop Rose Petals:
Gumdrops in desired colors
small bowl of sugardampened paper towel
Take a gum drop, kneading and pressing it with your fingers until it looks like a flower petal. Dredge lightly in sugar and let dry on a wire rack for at least a couple of hours, but best results are after 24 hours. When working with the gumdrop, use a dampened paper towel to moisten your fingers, this will help prevent the candy from sticking to your fingers. You can combine different colors of gumdrops, to make new colors; like red and white for pink petals. Another technique is to press a small amount of one color, to the side of a larger ball of a different color. This creates the look of a petal with different color strokes.
.jpg)
.jpg)
(Recipe inspired by Lemon Angel Food Cake, Classic Southern Desserts )
)
)
Subscribe to:
Posts (Atom)



 Posts
Posts