Blueberry Maple Pecan French Toast Casserole

Well, those who have been following our relocation to St. Louis know we only have 6 days left in our house. I’m not sure how I feel about it. On one hand I’m excited to move into our new home and start the next chapter in our lives. On the other hand, I’m sad to leave the house and town we’ve lived in for the past 8 years. This is the home we bought as newlyweds, the home we brought our newborn son to, and the home we’ve built memories in. It will definitely be a bittersweet day for me.
Since this next week I’ll be too busy for updating posts, I wanted to get this really tasty recipe up today. It’s been overcast and dreary here today (kind of like my mood), so I decided some comfort food was in order. What’s more comforting than Blueberry Maple Pecan French Toast Casserole? Let me tell ya, NOT MUCH!
This french toast casserole is filled with juicy blueberries, topped with crunchy, toasted pecans, and drizzled with cinnamon-brown-sugar-buttery goodness. Oh yeah, can’t forget the Blueberry Honey Maple Syrup…and if you’re feeling reeeeally bad…a good drizzle of fresh cream. Mmmmm. I normally make this in a 9x13 casserole dish, but I decided mini french toast casserole’s would be fun for me and my son today. I loved how these turned out!
Blueberry Maple Pecan French Toast Casserole
Serves 8 Printable Recipe

2 large loaves of french bread (day old an stale is good!)
6 large eggs
3 cups milk
1 cup brown sugar (divided)
1 tsp pure vanilla extract
1/2 tsp ground nutmeg
1/2 stick butter plus 1 tbsp
1/2 tsp ground cinnamon
3 cups blueberries (fresh or frozen)
1 cup pecans
salt, to taste
1/2 cup honey
1/2 cup maple syrup
1 tbsp lemon juice
Directions:
For the syrup: in a small saucepan combine 1/4 cup of honey, 1/4 cup of maple syrup and 1 cup blueberries. Cook for 2-3 minutes or until berries have burst. You can strain the syrup if you want to, but I like to leave the blueberries in. Add lemon juice.
For the nuts: Preheat oven to 350°F. Spread pecans on a baking sheet sheet and toast about 6-7 minutes until fragrant. Toss with 1 Tbsp butter and some salt (to taste) and set aside.

Cut French bread into 1" pieces. Butter a 9 x 13 baking dish and spread the bread cubes in the pan (You may not need to use all of them). Whisk together milk, eggs, 3/4 cup brown sugar, vanilla and nutmeg. Pour over the top of the bread, cover and let stand 1 hour or overnight in fridge. If you want to make these individual sized like I did, just spread the bread crumbs and milk mixture evenly between your ramekins. You will probably have more filling than you need, just gauge it by your eye. I halve the recipe when I make individual servings. Increase oven temperature to 400°F. Layer the 2 cups of blueberries over the bread, then sprinkle the toasted pecans over the blueberries.

Heat 1/2 stick butter, 1/4 cup brown sugar and 1/2 tsp cinnamon in a small sauce pan. When butter has melted drizzle over the bread. Bake for 1 hour or until puffed up and browned, and liquid from blueberries is bubbling. Casserole may need to cook longer if its taken directly from the refrigerator than if at room temp. When done, allow the casserole to sit for at least 10 minutes to set up.
Now drizzle some of that warm Honey Blueberry Maple Syrup over the top….and a little cream…if you’re bad – like me.

Enjoy!
Amber

Creamy Spinach Artichoke Dip

There are some dishes that truly are guilty pleasures. You know the ones. They lure you in with their addictive deliciousness, even though you know once that bite passes your lips it will likely sit on your hips forever.
Knowing this, you don’t even care.
This dish is one of my guilty pleasures. Filled with cream cheese, mayonnaise, cheeses galore…oh yeah, there’s a teensy bit of spinach and artichoke in there too. So that’s healthy….right?
Baked to warm, gooey perfection, this dip will win you friends. I made this for our Easter dinner along with the Pineapple Coffee Cake, and it was quickly gobbled up. It really is simple to throw together, and can be made up ahead and then just thrown in the oven when you’re ready to

Spinach Artichoke Dip

Serves 8-10 Printable Recipe
1 package (8 oz) cream cheese, softened
1 cup mayonnaise
1 package Knors home style vegetable soup & dip mix
1 package (10 oz) frozen chopped spinach, thawed and WELL drained
1 can (14 oz) artichoke hearts, drained and coarsely chopped
2 packages (12 oz each) Parmesan/Mozzarella cheese
pinch of minced garlic (optional)
Directions:
In a medium size bowl, combine cream cheese, mayo & Knors dip mix. Stir in the drained spinach, artichoke hearts and 1 1/2 packages (3 cups) of the cheese. Spread mixture in 9 x 12 baking dish, sprinkle with remainder of cheese. Bake at 350 for 30 minutes or until lightly browned at edges. Serve with tortilla chips or crackers.
Enjoy!
Amber

Pineapple Coffee Cake

Did you eat too much over Easter? I know I did, but it was sooo worth it. Our family gathering had a delicious collection of pot-luck dishes, including this Pineapple Coffee Cake I decided to try from Better than Burger’s blog.
I loved how tall and moist this coffee cake turned out, and the yummy crumble topping was perfect. I also added a pineapple glaze to drizzle on top. I find with most coffee cakes that they taste even better the next day, after they’ve had time to settle a bit. This cake was no exception and was even more moist and flavorful the next day. What was your favorite Easter dish?
Pineapple Coffee Cake

Serves: 8 Printable Recipe
4 c. flour
1 c. sugar
2 T. baking powder (yes, 2 TABLEspoons)
2 t. baking soda
1 t. salt
2 egg
2 c. vanilla yogurt
1 c. oil
2 t. vanilla
1 1/2 c. crushed pineapple (well drained) (reserve the juice)
Topping:
3/4 c. flour
1/2 c. sugar
1/2. c. butter
1/2 c. chopped walnuts
Pineapple Glaze:
2 cups powdered sugar
reserved pineapple juice from crushed pineapple
In a large bowl combine flour, sugar, baking powder, baking soda and salt. In a separate bowl beat the eggs, yogurt, vanilla and oil. Add the wet ingredient to the dry ingredient and mix until blended. Fold in the WELL DRAINED pineapple. Don’t throw out that pineapple juice! Save it for the yummy glaze. Pour cake batter into a greased 9x13 pan.
Topping:
Combine flour, sugar and butter. Cut in butter with a pastry blender until mixture is crumbly. Add chopped nuts and mix well. Sprinkle evenly over cake batter.
Bake cake at 350 F for 40-45 minutes OR until middle is set and cake is lightly browned. Allow cake to cool for 10 minutes before serving.
For the Glaze: Combine the powdered sugar and enough of the pineapple juice to reach your desired consistency. Drizzle the glaze over the top of the cake. Serve and enjoy!
Amber

Homemade Hotdog Buns–A Tasty Kitchen Recipe

I’ve got another great recipe for you here from Tasty Kitchen – Homemade Hotdog Buns! Now you may think, “Why would I make my own buns when I can get them for a buck at the store?” The answer is in the TASTE. These buns are so soft and chewy, melt-in-your-mouth delicious, yet sturdy at the same time. They will hold up to any kind of topping you want to use, or if you’re a purist, they’ll enhance and compliment the flavor of your hotdog so you’ll wonder why you ever used the store bought kind. I usually just pick away the excess bun to get to my hotdog, but not with these guys. They are a little work, but if you’re up for it they won’t disappoint you! You can even freeze the leftovers or use them for hoagie sandwiches.
You can see my full post and snag the recipe over at Tasty Kitchen.
Enjoy!
Amber

Cheesy Bacon Pull-Aparts

Every kid has a favorite food. Some kids go for the pizza, some for the mac and cheese, mine has a soft spot for biscuits – or “bikscuits” as he calls them. Can you blame him? There’s something so comforting and satisfying about a soft, warm biscuit fresh from the oven. Whether you slather yours in butter and honey, douse it with creamy sausage gravy, or eat them plain, you can’t go wrong with a biscuit.
These biscuits are a step above your average biscuit. Covered in Swiss cheese slices and crumbled bacon, then scattered with additional cheese for good measure…oh yeah, don’t forget the fresh herbs. These babies are goooood.
Easter is just two days away and I’ve got some thigh-scaring, tummy-terrifying dishes planned. Can’t wait to share!
Cheesy Bacon Pull-Aparts
(adapted from Tasty Kitchen)

serves: 6 Printable Recipe
1 can (16.3oz) refrigerated Grand's biscuits
4 slices Swiss cheese
1 package (2 oz size) pre-cooked bacon
1/2 cup grated triple cheddar blend
1 tsp chopped fresh herbs (thyme, oregano, basil, etc)
Directions:
Preheat oven to 325ºF. Grease a 9″ pan or skillet. Place biscuits in the pan and top each biscuit with half a slice of Swiss cheese. Coarsely chop the bacon and sprinkle over the Swiss cheese. Top bacon with shredded cheddar cheese. Sprinkle your choice of herbs over the shredded cheese.
Bake for 20-30 minutes or until cheese is melted and biscuits are cooked through. Depending on how much cheese you pile on top, this may take a little longer to bake through. Serve immediately.
Note: If you have more time, you can easily make these from scratch for added deliciousness!
Enjoy!
Amber
Baked Cheesy Cherry Tomatoes

I love versatile dishes. The ones where you can easily swap out ingredients to come up with any number of tasty concoctions are always my favorite.
Like these Baked Cheesy Cherry Tomatoes.
You may notice that it’s very similar to my Roasted Parmesan Asparagus, and it’s basically the same dish. You just change the asparagus for juicy, sweet cherry or grape tomatoes, and use your cheese of choice. I also threw in some fresh thyme, but you can use any herb that you like.
Easy dishes like this will be sustaining us for the next month. We just got back from our house hunting trip, and we were able to put a contract on a house we love. It only took looking at 23 houses in two days.

So, the next month I will be very busy cleaning out closets and getting rid of my junk – the stuff I don’t want to have to move - and all the hoopla that goes with moving. Hopefully I can convince my 5 year old that he doesn’t need to bring every headless and armless action figure with us.
Enjoy these tasty ‘maters!
(Serves 4) Printable Recipe
1 tbsp extra virgin olive oil
1 pint cherry or grape tomatoes
sea salt, to taste
fresh cracked black pepper, to taste
1/2 cup grated cheese (parmesan is great, and I also love a sharp cheddar blend)
2 tsp fresh herbs (thyme, oregano, basil, etc.)
Directions:
Preheat oven to 400 F. Place tomatoes on a baking sheet. I like to slice some of them in half and leave some of them whole. Drizzle with olive oil and toss gently to coat. Season with sea salt and fresh cracked black pepper to taste. Sprinkle your cheese evenly over the tomatoes.

Bake for 7-10 minutes until tomatoes and cheese begin to color.

Serve hot and enjoy!
Amber
Pinteresting Tuesday – Old vs. New
Yikes! I’m a day late again on my Pinteresting Monday, so we’ll just call it Pinteresting Tuesday this time. We’re still in St. Louis on our house hunting trip, and we just put an offer in on the house we want. Now we’re waiting on pins and needles waiting for “the call”. Fingers crossed! I’m sitting here in our hotel room with the little guy watching Sesame Street, while I try to get this post up. I didn’t have to think too long about the theme I wanted for this Pinteresting post. Since we’re moving to St. Louis, home of some very tasty local dishes, and moving from Springfield – also home of some very tasty local dishes. I thought Old vs. New would be perfect!
Anyone from Springfield will be able to guess the number one dish we’re known for…Springfield Cashew Chicken! Another yummy treat that’s lesser known is our Pineapple Whip. As soon as the weather warms up, I’m impatiently waiting to see the little yellow trailer stands that go up in a few select locations around the city. People, this stuff is heavenly nectar. If you come to Springfield for no other reason, come to try this delicious concoction. I’m not really sure how they make it, and I don’t care, my main concern is how fast I can shovel it into my mouth. It’s not really ice cream, not custard, not really yogurt, and not sherbert, but kind of a hard to explain mixture of all four. It’s dairy free, but really creamy, and when it starts to melt a delicious puddle of pineapple juice forms in the bottom of the cup. THIS is my favorite part. Enough said.
Now onto St. Louis! Of course you have your Ooey Gooey Butter Cake, this stuff is sinful and oh-so-worth it. I love all the different variations you can try. Another local St. Louis dish is Toasted Ravioli. Generally, some type of meat or cheese is wrapped in ravioli, then breaded and deep fried until the shell becomes slightly crispy and golden brown, this is the reason for the toasted name. Add a bowl of tangy marinara sauce for dipping and you have a finger licking good meal!
Note: I've just started having these annoying text enhance links show up in my posts, and I can't figure out how to remove them. Bear with me while I get it taken care of. :)
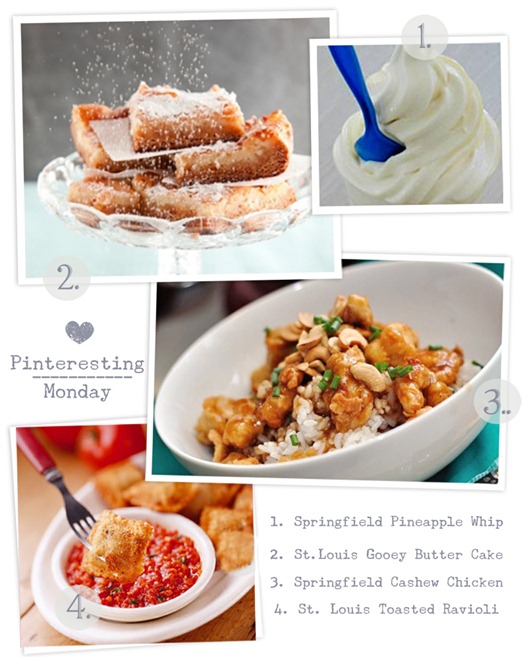
Photo Credits:
1. Springfield Pineapple Whip via Amber on Pinterest. Pineapplewhip.com
2. St. Louis Ooey Gooey Butter Cake via Amber on Pinterest. Source pauladeen.com
3. Springfield Style Cashew Chicken via Amber on Pinterest. Source Tasty Kitchen.
4. St. Louis Toasted Ravioli via Amber on Pinterest. Source Recipe.com
Anyone from Springfield will be able to guess the number one dish we’re known for…Springfield Cashew Chicken! Another yummy treat that’s lesser known is our Pineapple Whip. As soon as the weather warms up, I’m impatiently waiting to see the little yellow trailer stands that go up in a few select locations around the city. People, this stuff is heavenly nectar. If you come to Springfield for no other reason, come to try this delicious concoction. I’m not really sure how they make it, and I don’t care, my main concern is how fast I can shovel it into my mouth. It’s not really ice cream, not custard, not really yogurt, and not sherbert, but kind of a hard to explain mixture of all four. It’s dairy free, but really creamy, and when it starts to melt a delicious puddle of pineapple juice forms in the bottom of the cup. THIS is my favorite part. Enough said.
Now onto St. Louis! Of course you have your Ooey Gooey Butter Cake, this stuff is sinful and oh-so-worth it. I love all the different variations you can try. Another local St. Louis dish is Toasted Ravioli. Generally, some type of meat or cheese is wrapped in ravioli, then breaded and deep fried until the shell becomes slightly crispy and golden brown, this is the reason for the toasted name. Add a bowl of tangy marinara sauce for dipping and you have a finger licking good meal!
Note: I've just started having these annoying text enhance links show up in my posts, and I can't figure out how to remove them. Bear with me while I get it taken care of. :)
Enjoy!
Amber

Photo Credits:
1. Springfield Pineapple Whip via Amber on Pinterest. Pineapplewhip.com
2. St. Louis Ooey Gooey Butter Cake via Amber on Pinterest. Source pauladeen.com
3. Springfield Style Cashew Chicken via Amber on Pinterest. Source Tasty Kitchen.
4. St. Louis Toasted Ravioli via Amber on Pinterest. Source Recipe.com
Subscribe to:
Posts (Atom)



 Posts
Posts