
Browned Butter Pecan Shortbead: Before & After

I love makeovers don't you? I bet you never thought a photograph could get a makeover, but that's exactly what I'm going to show you today. Back when I first started this blog, it was purely as a way to chronicle recipes that I wanted to try, and to have something that showed my progress along the way.
I never imagined it would re-spark a love for photography that I'd always had but never did anything about. As I look back on my first few recipes, I cringe at those photos but I know that every journey had to start somewhere.
I just wish at the beginning of that journey I knew what the heck white balance was. Seriously, food is not supposed to be blue my friends...unless you happen to be eating a blueberry, or these Blue Velvet Cupcakes, or blue cotton candy...you get the idea.
I purposely kept those ugly images up because I wanted a reminder of where I started at. I've decided to go ahead and update my old photos with new ones, but instead of the old picture being dumped (rightly so) into the recycle bin, I'm going to turn it into a Before & After post. If you're just starting out in the food blogging world, and get discouraged looking at other bloggers food photos, maybe these posts will help you see that everyone started somewhere.
Even if somewhere was ugly blue food. :)
Here's the before shot of my Browned Butter Pecan Shortbread.

O.K. here's where I'm going to completely trash my own photo. Don't worry - I'm a pro - I've gotten enough rejection emails from Foodgawker over the years that I can handle it.
1. THIS COOKIE IS BLUE
Obviously. Food is not supposed to be blue. Unless it's the aforementioned blueberries...or cotton candy. If you don't already know about white balance, find your camera's user manual and learn how to set a proper white balance in camera. This does not mean Auto White Balance. To get the most accurate white balance, you should set a custom white balance using a grey card, or if your camera has the option you can set the Kelvin number to somewhere between 5500K and 6500K. This range should cover most daylight lighting situations. Here's a great Kelvin Chart to help you out. If you don't want to mess with setting your white balance in camera, you can also adjust it in your editing program. Most editing software has the option to adjust the WB to a more natural color.
Obviously. Food is not supposed to be blue. Unless it's the aforementioned blueberries...or cotton candy. If you don't already know about white balance, find your camera's user manual and learn how to set a proper white balance in camera. This does not mean Auto White Balance. To get the most accurate white balance, you should set a custom white balance using a grey card, or if your camera has the option you can set the Kelvin number to somewhere between 5500K and 6500K. This range should cover most daylight lighting situations. Here's a great Kelvin Chart to help you out. If you don't want to mess with setting your white balance in camera, you can also adjust it in your editing program. Most editing software has the option to adjust the WB to a more natural color.
2. CAN YOU SAY "BACK UP?"
Seriously, getting in close for a detail shot is alright but when you start to loose the ability to tell what's in the picture, you're too close. The same goes for cropping your pictures, leave a little room to breahe...trust me...your food will thank you. :)
Seriously, getting in close for a detail shot is alright but when you start to loose the ability to tell what's in the picture, you're too close. The same goes for cropping your pictures, leave a little room to breahe...trust me...your food will thank you. :)
3. TOO DARK
This image is underexposed AND overexposed, making the left side of the image too dark and the right side too bright. This easily happens when shooting a side lit image (when you're light source is coming from the side of your subject.) To fix this, you need use something to reflect some light back onto the shadowed side of the image. I like to use a white foam board or reflector to open up shadows. To prevent overexposed areas, you can either move the plate further away from the light - so it's less harsh, or use something to diffuse the light (make the light softer and not so harsh). I have sheer white curtains hanging from my kitchen patio door. These work great for diffusing the light when it's too harsh.
This image is underexposed AND overexposed, making the left side of the image too dark and the right side too bright. This easily happens when shooting a side lit image (when you're light source is coming from the side of your subject.) To fix this, you need use something to reflect some light back onto the shadowed side of the image. I like to use a white foam board or reflector to open up shadows. To prevent overexposed areas, you can either move the plate further away from the light - so it's less harsh, or use something to diffuse the light (make the light softer and not so harsh). I have sheer white curtains hanging from my kitchen patio door. These work great for diffusing the light when it's too harsh.
4. BAD COMPOSITION
The crop is part of the bad composition, but a little planning and food styling/arrangement does wonders. This subject is too broad to cover now, but when you're looking through your viewfinder really look at the image before you snap the shutter. Is your picture crooked? Is there enough room to crop if needed? I'm still guilty of not paying close enough attention to the composition before I snap the shot.
The crop is part of the bad composition, but a little planning and food styling/arrangement does wonders. This subject is too broad to cover now, but when you're looking through your viewfinder really look at the image before you snap the shutter. Is your picture crooked? Is there enough room to crop if needed? I'm still guilty of not paying close enough attention to the composition before I snap the shot.
Now for the AFTER shots:

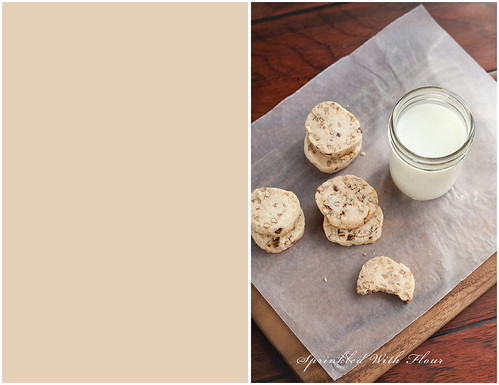 |
There you have it. How I went from glowing blue cookies to something a little more edible looking. If you'd like a more in depth explanation of anything I mentioned, let me know! If there is enough interest I'll do more food photography posts, diving into more detail on photography tips and tricks I've learned, and showing you how I like to get the shots for my posts. What do you think? Let me know in the comments below. :)
Note: I don't claim to be an expert, but I have learned a thing or two over the years and will gladly share those things with people. I'm also a family photographer in the St. Louis area, so if you're interested in seeing my work outside of food photography, visit Amber Potter Photography. Update: If you're just starting out in the photography world and need some help understanding all that photo jibber-jabber, my pal Karly at Buns In My Oven has started a great series called So You Want To Be A Better Photographer? Her tutorials are sure to help you "see the light". Hehe...bad pun? Anyway, her tips combined with my before and after critiques are a good way to see the photography principals put into practice, and learn to recognize what's wrong with an image. When you can tell what's wrong with a photo and why it doesn't work, then you can better improve your own skill!
You can find the recipe for these cookies in my original post for Browned Butter Pecan Shortbread.
|
Have a great day!
Amber
Chipotle Chicken Enchiladas


Remember that Slow Cooker Enchilada Sauce I posted about last week? Well, as promised here are the enchiladas I whipped up using it. They're so easy and yummy, and you can make the chicken filling in the slow cooker too. Just throw everything together in the morning, then by dinner time all you have to do is assemble your enchiladas, pop them in the oven for 25-30 minuets, and BOOM...delicious Cheesy Chipotle Chicken Enchiladas.
This recipe uses my homemade Slow Cooker Enchilada Sauce but you can use your own, or...I hate to say it...STORE BOUGHT sauce. :) The next time you need an easy week night meal, try these out!
Cheesy Chipotle Chicken Enchiladas
 Yield: 10 Printable Recipe
4 oz of cream cheese, softened
1/4 cup sour cream
1 1/2 cups Chipotle Enchilada Sauce
2 cups shredded cheddar jack cheese
2 cups shredded cooked chicken (about2-3 large breasts)
1 cup corn, undrained
4 oz rotel
1 onion, diced (omit if cooking chicken stovetop)
1/2 tsp ground cumin
1/4 tsp garlic powder
10 tortillas
Directions:
In a medium bowl combine the cream cheese, sour cream and 1/2 cup enchilada sauce. Add 1 cup of shredded cheese. Set aside.
In another bowl mix shredded chicken, corn, rotel, cumin and garlic powder. Add the cheese mixture to the chicken mixture.
Spread 1/2 cup enchilada sauce on the bottom of a baking dish. Place 1/3 cup of chicken filling on each tortilla, roll and place seam side down in baking dish.
Pour remaining 1/2 cup enchilada sauce over enchiladas. Sprinkle 1 cup shredded cheddar-jack cheese over the top. Bake uncovered at 3735 F for 30 minutes, or until hot and bubbly.
CROCKPOT DIRECTIONS: Place chicken breasts, corn, rotel, onion, cumin, and garlic powder in your crockpot. Cook on low 6-8 hours or high 3-4 hours. If desired, you can add a little bit of chicken broth to the mixture. When chicken is done, use a fork to shred it and then directions above for assembling and baking the enchiladas.
FREEZER DIRECTIONS: (uncooked enchiladas): Cook your filling, then assemble enchiladas, cover and freeze. Allow to thaw completely then bake at 375 F for 30 minutes or until hot. You can also freeze the chicken filling uncooked. Just place your chicken, corn, rotel, garlic powder and cumin in a freezer bag and freeze. When ready to cook, remove from freezer and allow to thaw completely. Place the thawed meat mixture in your crockpot and cook according to directions above.


Now I need a good white enchilada recipe, do you have one you'd like to recommend? If you do let me know in the comments, I'd love to try it out!
Amber
Browned Butter Pecan Shortbread:Recipe Recap

Yeah...that's what I'm going with.
This is a recipe recap of one of the first recipes I posted. Gotta love a good shortbread cookie, especially when it has browned butter and toasted pecans in it!
For the recipe, go to my original post Browned Butter Pecan Shortbread.
What recipes do you have up your sleeve for the this weekend? Let me know in the comments, I'd love to check them out! Have a great weekend.:)
Amber

If you want to stay up to date with my latest recipes and posts, come on over and join me on Facebook and Pinterest!
Slow Cooker Chipotle Enchilada Sauce

I have an obsession with making things from scratch, especially staples that you would normally just buy at the store. Homemade chicken broth, tortillas, baking mix, sauces and condiments, you get the idea.
Yesterday I decided to throw some things together and see how a homemade enchilada sauce would turn out. Let me tell you - I will never buy the canned sauce again! This is so easy to get started in the morning, and when it's done you have a delicious smoky and spicy enchilada sauce that will give you the best enchiladas ever. I love using it in my Cheesy Chipotle Chicken Enchildas. Yum!
This recipe makes quite a bit, so you can get two meals out of it or freeze the leftovers for dinner another night.

Homemade Chipotle Enchilada Sauce
Yield: 5 cups Printable Recipes
16-oz chicken broth
32-oz fire roasted tomatoes
2 onions, diced
5 cloves garlic
4 chipotle peppers in adobo sauce (seeds removed)
2 tbsp adobo sauce (from the the can of peppers)
1 1/2 tbs cumin
1 tsp chilli powder
1 tsp salt
pinch of sugar
Slice open the chipotle peppers and remove the seeds. Place the tomatoes, onion, garlic, chipotle peppers, adobo sauce, cumin, chilli powder, salt, sugar and chicken broth in your slow cooker. Cook on low for 6-8 hours, or high for 3-4 hours. Remove the chipotle peppers, then using an immersion blender, puree the sauce until smooth. You can also use your blender to puree the sauce. Now get ready for the best enchiladas ever! Store the sauce in glass mason jars in the fridge. Can be kept in the fridge up to 2 weeks, or will keep in the freezer for up to 4 months.
Recipe Note: This sauce is a little spicy, so if you want to tame it down for little mouths, reduce the amount of chipotle peppers and adobo sauce you use.
FREEZER DIRECTIONS: Cool the sauce completely. When it's completely cool, ladle into quart sized freezer bags which are placed standing up in a glass measuring cup. Gently squeeze the air out. Lay flat and freeze. Thaw for 24 hours and reheat on the stove top or by microwaving slowly. You can also reheat by placing the the frozen enchilada sauce in your slow cooker. Turn on low and cook until heated through.


Shared with Buns In My Oven on What's Cooking Wednesday
Turtle Rice Crispy Treats

Did you know there's a surefire way to make any treat better? It's called caramel...and chocolate...and pecans; otherwise known as turtles!
Any dessert that's layered with delicious homemade caramel, melty milk chocolate, and crunchy pecans is right up my alley. I decided to whip up some rice crispy treats this weekend - I'm all about the no-bake desserts lately - but I couldn't just stop there.
Nope, not content to let a good thing be...I decided to make it just a leeeeetle bit more special. I wanted Turtle Rice Crispy Treats, and the result was so good and so easy. Next time you want to fancy up your crispy treats, try 'em this way. You won't be sorry.


Treats
Yield: 12 bars Printable Recipe
4 tbsp salted butter
6 cups mini marshmallows
1 tsp vanilla
5 cups rice crispy treats
Caramel:
2/3 cup salted butter
1/2 cup brown sugar
1/8 cup milk
Topping:
1 cup milk chocolate chips
1/2 cup chopped pecans
In a large pot, melt the butter over medium heat. Add the marshmallows and stir until the marshmallows have melted. Add the vanilla extract. Stir in the crispy rice cereal, one cup at a time, until well combined. Press the mixture into a greased 9x9 baking pan.
Make the caramel: In a small saucepan add the butter, brown sugar, and milk. Bring to a boil and cook until caramel begins to thicken and pull away from the pan.
Pour the caramel sauce over the rice crispy treats. Sprinkle the chocolate chips over the caramel, followed by the chopped pecans. Place in the refrigerator until the chocolate sets back up. Serve and try not to drool. Enjoy!
Amber


What did you all do this weekend? Did you make any taste treats? Drop me a comment below, I'd love to hear what everyone was up to!
Berry Green Smoothie

Don't get me wrong, I love a good salad, but there comes a point (for me anyway) when you feel like one more forkful of lettuce will make you start mooing.
Enter the green smoothie. You can pack as much of your greens in as you want, add some fruit and a few other goodies and you're good to go. I love adding Kefir and Chia seeds into my smoothies. Kefir is amazing for getting probiotics, minerals, vitamins, and amino acids - all good for your immune system.
Chia seeds are full of omega-3 oil, anti-oxidants, and are great for dieting. The tiny seeds can be made to taste like whatever you want, and they keep you feeling full for hours. So what's stopping you? Grab some greens, some frozen berries and jump on the green smoothie bandwagon. You're waist and our lips will thank you.
Yield: 1 serving Printable Recipe
2 cups fresh spinach leaves (you can use any greens you like: kale, chard, collard, etc.)
1 cup frozen berries (blueberries are my favorite)
1/2 cup plain Kefir yogurt
1/2 banana
1/4 - 1/2 cup water, juice or almond milk
2 tbsp chia seeds
Directions:
Place the berries, yogurt, banana, and spinach in a blender. Add your preferred liquid and pulse until smooth. Use as much or as little as you need to reach your desired consistency. If you want your smoothie a little more "frozen", you can add some ice cubes to the blender and pulse until your smoothie is slushy. Add your chia seeds and pulse for a few seconds to combine. Serve immediately and enjoy!
Amber
Do you have a favorite smoothie recipe, or another great way to use Chia seeds? Let me know in the comments, I'd love to hear your ideas!
White Chocolate Sprinkle No-Bake Cookies

How about a cookie recipe today? I've got a cookie creation for you that comes courtesy of the imagination of a certain six year old little boy. My son loves no-bake cookies. He also loves helping me in the kitchen and experimenting with his own "ingredients".
These ingredients can range from flour and sugar, to say...dirt...or dog food.
Luckily his last idea involved something that's edible by humans - sprinkles and white chocolate; two more of his favorite things. We mixed the sprinkles into the cookies and had to put extra on top of course...just to make sure there was an adequate ratio of cookie to sprinkle.
These cookies turned out really good and disappeared in no time. The kid might be onto something here. Enjoy!
Amber

White Chocolate Sprinkle No-Bake Cookies
Yield: 12 cookies Printable Recipe
1/4 stick unsalted butter
3/4 cup granulated sugar
1/4 cup milk
1/2 cup white chocolate chips
1 tsp vanilla extract
1 1/3 cups quick cooking oats
1-2 tablespoons multi-colored sprinkles
Place the butter, sugar, and milk in a medium saucepan and bring to a boil over medium heat. Continue to cook for 1 minute longer. Remove from heat and stir in the vanilla extract and white chocolate chips. Stir until mixture is smooth and the chocolate has melted. Stir in the oats. Now mix in the sprinkles and gently stir to combine. If you stir too much the sprinkles will melt. Drop by tablespoons onto waxed paper, and top with additional sprinkles. Allow to cool before serving.
5 Healthy Soup Recipes

Today we're going to talk about soup folks. I love soup. There's just something about a bowl of warm, silky, soup that makes you feel like you just got a giant, cuddly, grandma hug.
(Because grandma hugs are the best. You know...they're squishy and smell like cookies...and stuff)
Soup makes you feel all warm and happy and reminds you to just stop, take a breath, and relax. That's my relationship with soup anyway. Now, if you're the open-a-can-and-dump-it-in-a-bowl kind of soup eater...you probably think I'm a few bricks short with all this talk of soup love.
I've got a secret...that's because you're not eating REAL soup! Ooh, yeah...I want a bowl of artificial flavors, preservatives, and fake squishy (not in the good grandma way) meat.
Said no person ever.:) Seriously, if you don't get my love of a good, homemade soup, then you need to dust off that pot, whip out that spoon, and try your hand at one of these soup recipes.
The added bonus? These soup recipes are full of healthy ingredients and low on calories. That's what we're looking to do this time of year, right? You can also make most of them in your slow-cooker, making them a super easy AND healthy dinner choice. Have I won you over yet? How about a few photos to get you going? Here's a collection of some of my favorite healthy soup recipes.


Happy soup eating!
Amber
Ham & Cheese Potato Skins: A Tasty Kitchen Recipe

I don't know about you but sometimes a girl needs a good, salty snack. If you make it crispy and throw in some gooey, melty cheese...then you've got my attention!
I'm talking about potato skins folks. Is there any vegetable more versatile than the trusty ol' spud?
French fries, hash browns, mashed potatoes, smashed potatoes, baked, roasted, fried, grilled...okay, I think you get the idea. Potatoes are amaaaaaazing. There's just something so comforting about a potato dish, any way you make it, that makes a not-so-good day seem a little bit better.
These potato skins are really easy to make and they taste so good. They'd make a great snack for your next football party, or throw in some scrambled eggs, add a side salad, and you've got yourself one delicious brunch! The best part? It's a super kid-friendly recipe! My six year old gobbled these right up...with his usual (small-lake-sized) side of ketchup. That kid loves his ketchup.
This potato skin recipe is another super yummy find from Tasty Kitchen, shared by TK member Dax Phillips. Now, head on over to the Tasty Kitchen Blog to check out my full step-by-step post, and you can grab the recipe while you're at it. Then after you make these, you can thank me when your taste buds do a happy dance. Enjoy!


Baked Cinnamon Apple Chips

Since we're 10 days into the new year and those New Year's resolutions are still underway, I thought I should share a tasty healthy snack alternative. Tired of carrot sticks and celery?
How about a bowlful (proportionately sized of course - sorry, no gallon sized containers), of sweet and crispy Baked Apple Chips? These tasty treats are tossed in a cinnamon-spice mixture, with just a hint of sweetness.
They're great on their own, but they get even better when dipped in a Honey Spice Cream Cheese Dip, like the one I made with these Grilled Peaches and these Patriotic Fruit Parfaits. Crunchy deliciousness + creamy goodness = the perfect afternoon snack. Yum.

Yield: 2 servings Printable Recipe
4 gala apples
1 1/2 tbsp ground cinnamon
1/2 tsp ground nutmeg
1/4 tsp ground allspice
1/8 tsp salt
2 tbsp granulated sugar
Preheat oven to 200 F. Line a baking tray with parchment paper. In a small bowl combine the cinnamon, nutmeg, allspice, salt, and sugar.
Cut the ends off of each apple. Using a mandolin or a sharp knife, slice the apple into very thin slices, about 1/8" inch to 1/16" inch. If you use a mandolin, make sure you use the protective holder that keeps you from slicing your fingers to shreds.

Arrange the slices on the baking sheet, place in the oven and bake for about 25-30 minutes. Flip the slices over and bake for another 30 minutes, or until the apples are a bit crispy. The apples will still be flexible when they come out, but will crisp up after a few minutes.
 |
Enjoy!
Amber
 |
Subscribe to:
Posts (Atom)


