
Soft & Chewy Oatmeal Bars

My family is a bit picky when it comes to granola bars. They tend to like the not-so-healthy store bought kind, the kind with weird sounding ingredients. I’ve tried make homemade ones in the past, and while they were perfectly tasty they never had the same consistency that my family seems to like in the store bought ones. I’ve experimented with different variations, trying to come up with something with no refined sugar or corn syrup.
My past attempts have been dismal at best.
THIS attempt however, I would say is a success! The secret is brown rice syrup, which adds the brown sugar flavor that I think I’ve been missing. If you’re wondering where the heck you find brown rice syrup, it’s really much easier to find than you’d think. You can get it at any health food store, but I actually picked mine up at Wal-Mart of all places. It was in the syrup aisle, and is actually a maple syrup substitute made from brown rice syrup. These bars are a bit of a kitchen sink experiment, with white and milk chocolate chips, raisins, and leftover crushed up dulce de leche cheerios. Straight from the oven they were more of a cookie consistency, but the next morning they settled and had a great soft and chewy consistency, which lasted for several days. They were so good that I’m already planning my next batch and all the variations I can try!
*UPDATE: After doing some research, it seems that brown rice syrup may be questionable in it's safety. If you'd like to find out more and do your own research, I suggest you start with this article. For those that decide not use brown rice syrup, I'm thinking agave syrup or maple syrup may be a good substitute that will yield a similar result.
Soft & Chewy Oatmeal Bars

(Serves: 8-10) Printable Recipe
3/4 + 1/4 cup old-fashioned oats (divided)
1/2 cup cereal divided (I used cheerios)
1/2 cup chocolate chips (I used half white and half milk chocolate chips)
1/4 cup raisins
1 tsp baking soda
1/8 tsp salt
2 tsp vanilla extract
3/4 cup all-purpose flour (can use wheat flour too)
1/4 cup neutral tasting oil
5 tbsp honey
1/4 cup brown rice syrup
1/4 cup cereal (like cheerios)
1/4 cup old-fashioned oats
Preheat oven to 325 degrees. Line a 9×9 pan with parchment paper and set aside.
Place 3/4 cup oats, 1/4 cup of cereal, chocolate chips and raisin in a food processor. Pulse a few times to break up the ingredients. Don’t go crazy or you’ll change the consistency of your bar. Transfer the mixture to the bowl of an electric mixer. Add the baking soda, salt, vanilla, flour, oil, honey, and brown rice syrup. Mix just until combined. The mixture will form a soft dough that resembles a cookie dough in texture.
Fold in the remaining 1/4 cup of oats and 1/4 cup of cereal until combined. Lightly press this mixture into the prepared 9×9 pan. Bake for 15-18 minutes or until the bars are lightly browned on top. Remove from heat and allow to cool. Cut into bars, serve and enjoy!
Amber

Vanilla Crumb Pie: Tasty Kitchen Recipe

What do you like to do when you’re trapped in the house on a snow day? I’d like to say I spent countless hours cleaning and scrubbing my house, all while performing amazing super-mommy tasks.
I would be fibbing just the teensiest bit though.
Snow days are for searching the internet for new and delicious recipes to try, and for whipping up a recipe that uses scandalous amounts of butter and sugar…and if there’s even more butter and sugar dumped on top?
Like this? Even better.

This is another wonderful Tasty Kitchen recipe, submitted by Tonya of 4 Little Fergusons. Head on over to Tasty Kitchen to find this great recipe. Thanks Tonya for sharing this deliciousness!
Enjoy!
Amber

Cinnamon Rum Raisin Swirl Pancakes

Since today is the start of National Pancake Week, I thought these pancakes would be a good start to kick it off. I’ve had this idea rambling around in my head for a while now, and what better time to try them out than a week dedicated to every kind of delicious pancake you can imagine? You’ve probably seen a ton of Cinnamon Swirl Pancakes making the internet rounds, but I had something different in mind. I love raisin bread, with the yummy cinnamon streaks and plump raisins filling every bite, and I just had to see if I could make a pancake version. Of course, if the raisins were rum-soaked and the pancakes were topped with a giant pat of Maple Butter, it couldn’t hurt right? These were so good, whether you drizzle them traditional syrup, or go with a powdered sugar glaze, they’re sure to please any crowd!
Cinnamon Rum Raisin Swirl Pancakes

(Yield: 6 pancakes) Printable Recipe
Pancakes:
3/4 cup milk
2 tbsp white vinegar
1 cup all-purpose flour
2 tbsp white sugar
1 tsp baking powder
1/2 tsp baking soda
1/2 tsp salt
1 egg
1 tsp vanilla extract
2 tbsp butter, melted
Cinnamon Swirl:
2 tablespoons melted butter
1/4 cup brown sugar
1 teaspoon cinnamon
1 tablespoon flour
Rum Soaked Raisins:
1/2 cup raisins
2 tsp rum extract
water to cover
Maple Butter:
1/2 cup butter, softened
1/4 cup maple syrup

For the Rum Raisins: Place raisins into a glass bowl. Add enough warm water to cover all the raisins, add 2 tsp rum extract and let sit for at least 30 minutes. (Alternatively, you can cover the raisins with 1/2 cup of rum.)
For the Maple Butter: Mix the butter and maple syrup with an electric mixer until blended. Set aside.
For the Cinnamon Swirl: In a small bowl combine ingredients for the cinnamon swirl, and pour into a plastic ziploc bag or a disposable pastry bag. Snip a tiny triangle off the end of the bag for piping. Set aside.
For the Pancakes:
- Combine milk with vinegar in a medium bowl and set aside for 5 minutes to "sour". Combine flour, sugar, baking powder, baking soda, and salt in a large mixing bowl. Whisk egg, melted butter and vanilla into the "soured" milk. Pour the flour mixture into the wet ingredients and whisk until lumps are gone. Drain the raisins and gently fold them into the batter.
- Heat a nonstick skillet over medium heat. Grease with butter, if desired, and pour on a 1/2 cup of batter. Use the pastry bag to make a swirl of the cinnamon sugar mixture on top of the batter. When the bubbles on the surface of the pancake begin to pop, and then no longer fill in with more batter, flip, and cook for 30 seconds more. Repeat with remaining batter.
- Top with the Maple Butter and drizzle with syrup or a powdered sugar glaze.

Enjoy! Happy pancake eating!
Amber

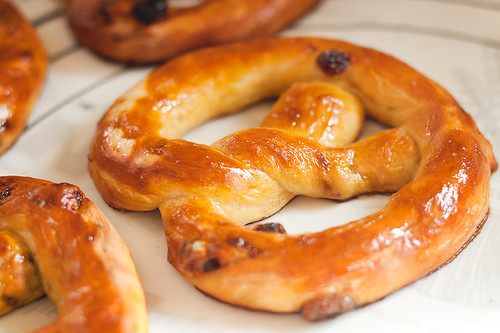
Buttery Soft Glazed Raisin Pretzels
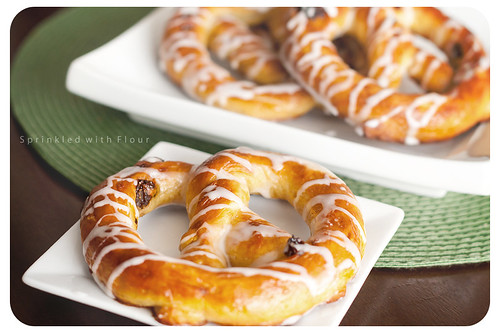 How do you like your pretzels? I like the soft and chewy variety, the kind that almost melts in your mouth as you close your eyes and pretend you're in pretzel heaven. I've always had a soft spot (no pun intended) for a certain soft pretzel from a certain store in the mall. You know the one I'm talking about. Until now, I never would have thought I could enjoy one just as delicious in my own home...and they would be EASY to make.
This recipe uses instant yeast which makes it super quick, and while it may seem labor intensive at first, it really isn't. I adapted this recipe from King Arthur Flour, and decided to add raisins to half of my dough, and add a glaze over the finished pretzel to make it as close as possible to my favorite kind from that certain store we mentioned earlier. The result? Pretty darn close if you ask me. Move over Auntie Anne, there's a new aunt in town...Auntie Amber. :)
 Buttery Soft Glazed Raisin Pretzels
(Yield: 8 large pretzels) Printable Recipes
2 1/2 cups all-purpose flour
1 teaspoon salt
1 teaspoon sugar
2 1/4 teaspoons instant yeast
7/8 to 1 cup warm water*
*Use the greater amount in the winter, the lesser amount in the summer, and somewhere in between in the spring and fall. Your goal is a soft dough.
1/4-1/2 cup raisins
Topping
1 cup boiling water
2 tablespoons baking soda
3 tablespoon unsalted butter, melted
Icing
1 cup powdered sugar
1/2 tsp vanilla
1-2 tablespoon milk or half & half
To make dough by hand, or with a mixer: Place all of the dough ingredients into a bowl, and beat until well-combined. Knead the dough, by hand or machine, for about 5 minutes, until it's soft, smooth, and quite slack. Since I wanted half plain and half raisin pretzels, I divided the dough in half at this point. Place the plain half in a floured bowl and turn to coat. Add 1/4 cup raisins to the other half of the the dough still in the mixer, and mix until combined. (If you want all raisin pretzels, use 1/2 cup raisins and there's no need to divide the dough in half). Place the raisin dough in the floured bowl and turn to coat also.

Take both halves of dough and place them each in a plastic bag, and allow it to rest for 30 minutes.
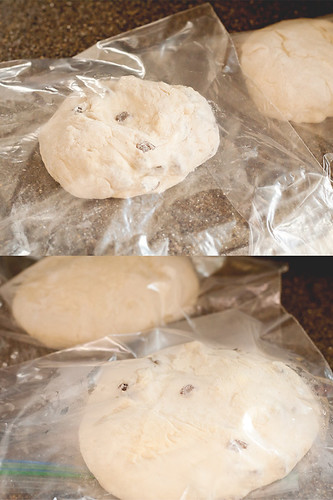
To make dough with a food processor: Place the flour, salt, sugar and yeast in the work bowl of a food processor equipped with the steel blade. Process for 5 seconds. Add the water, and process for 7 to 10 seconds, until the dough starts to clear the sides of the bowl. Process a further 45 seconds. Place a handful of flour in a bowl, scoop the slack dough into the bowl, and shape the dough into a ball, coating it with the flour. Transfer the dough to a plastic bag, close the bag loosely, leaving room for the dough to expand, and let it rest at room temperature for 30 minutes.
While the dough is resting, prepare the topping: Combine the boiling water and baking soda, stirring until the soda is totally (or almost totally) dissolved. Pour the mixture into a pan and set aside to cool to lukewarm (or cooler).
Preheat your oven to 475°F. Prepare a baking sheet by spraying it with vegetable oil spray, or lining it with parchment paper.
Transfer the dough to a lightly greased work surface, and divide it into eight equal pieces. (If you halved the dough for two different flavors, divide each half into 4 equal pieces.)
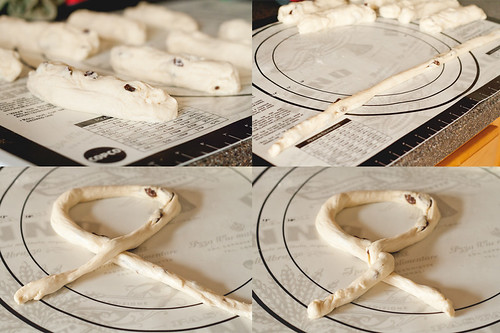
Allow the pieces to rest, uncovered, for 5 minutes.
Roll each piece of dough into a long, thin rope (about 28" to 3" long), and twist each rope into a pretzel. Working with 4 pretzels at a time, place them in the pan with the baking soda/water, spooning the water over their tops; leave them in the water for 2 minutes before placing them on the baking sheet. This baking soda "bath" will give the pretzels a nice, golden-brown color.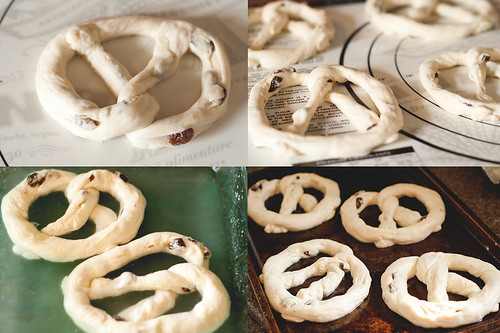
Transfer the pretzels to the prepared baking sheet. Allow them to rest, uncovered, for 10 minutes.
Bake the pretzels for 8 to 9 minutes, or until they're golden brown.
Remove the pretzels from the oven, and brush them thoroughly with the melted butter. Keep brushing the butter on until you've used it all up; it may seem like a lot, but that's what gives these pretzels their wonderful taste.
Mix together 1 cup of powdered sugar, 1/2 tsp vanilla, and enough milk to reach your desired pouring consistency. I used about 1-2 tablespoons of half & half. Drizzle the icing over the warm pretzels.

Eat the pretzels warm, or reheat them in an oven or microwave.

If you live at our house, and you happen to be a 5 year old little boy, the leftover baking soda bath can even be the ideal playground for your Lego men...after you've played with the dough and eaten way too many pretzels of course.


Cheesy Spinach & Bacon Quesadillas

Some nights a girl just wants to be lazy when it comes to dinner. Usually, this brings to mind the little blue box of mac & cheese that we all know so well. Or maybe slapping a slice of cheese between some bread, toasting it, and calling it a day. I wasn't in the mood for fixing dinner tonight, but I wanted something that was still just a little bit special, so I rummaged the fridge to see what I could come up. Somehow, I ended up with a counter full of cheese, bacon, cream cheese, tortillas, and some spinach. You can’t go wrong with those ingredients, right?
This is how I ended up with Cheesy Spinach & Bacon Quesadillas. I threw some cream cheese and grated cheddar cheese in a bowl, cooked up some bacon, steamed a little spinach, and threw it all in a tortilla. After grilling both sides, the cheese was the perfect blend of gooey and melty, oozing over the bacon and spinach. This is definitely an easy, quick dinner I’ll make again. I even got my 5 year old to eat it, after he felt reassured that the “green stuff” in his dinner wasn’t going to poison him.
The measurements are more of an approximation since I just eyed it, but you get the idea.
Cheesy Spinach & Bacon
Quesadilla

(makes 4 quesadilla’s) Printable Recipe
4 flour tortillas
2oz cream cheese
1/2 cup grated cheddar cheese
1 cup fresh spinach
4 slices bacon, cooked crisp
1. In a frying pan over medium heat, cook your bacon until crisp, drain on paper towel and set aside.
2. Mix together the cream cheese and cheddar cheese in a small bowl. Microwave on low in 10 second increments until the cheese mixture is smooth.
3. In a small pan, add about a couple teaspoons of water. Place the spinach in the pan and cook over medium heat just until the spinach starts to wilt. Remove spinach and set aside.
4. Take a tortilla and spread half of it with the cream cheese spread. Layer some spinach and a slice of bacon (broken into pieces) over the cheese spread. Sprinkle additional grated cheddar cheese on top, fold the tortilla in half and place in a hot frying pan or on a hot griddle. Cook each side about 10-15 seconds, or until it starts to get crispy and slightly blackened. Be careful, it will burn easily.
5. Serve with your favorite dipping sauce or salsa.
Enjoy!
Amber

Orange Creamsicle Cookies
Is there anything better than an ice-cold orange creamsicle on a hot, summer day? How about a warm, buttery, orange creamsicle COOKIE on a cold winter day? It truly is the best of both worlds. This cookie is not shy, with a full cup of butter in it, but that just makes it even better. Full of fresh orange zest and white chocolate chips, these beauties are definite comfort food…
…and that’s not extra padding on your rear, it’s extra comfort. That’s what I tell myself anyway. :)

(Yield: 2 dozen) Printable Recipe
2 1/4 cups all purpose flour
3/4 tsp baking soda
1/2 tsp salt
1 cup unsalted butter, slightly softened
1/2 cup sugar
1/2 cup brown sugar, firmly packed
1 egg
Zest of 2 oranges
1 cup white chocolate chips
Preheat oven to 350 degrees. Line cookie sheets with Silpats or parchment paper. In a large bowl, combine flour, soda, and salt. Stir together and set aside.
In a large bowl, cream together butter and sugars until light and fluffy, about 3 minutes. Add egg and beat until combined. Add flour mixture and beat on low speed until well incorporated. Add orange zest and beat to distribute. Stir in chips.
Use a cookie scoop or tablespoon to drop in rounded spoonfuls on cookie sheets, leaving plenty of room between cookies to allow for some spreading. Bake for about 10 minutes until light golden brown. Cool about 1 minute on cookie sheets and then transfer to wire racks to cool completely.

…and that’s not extra padding on your rear, it’s extra comfort. That’s what I tell myself anyway. :)
Orange Creamsicle Cookies
(Yield: 2 dozen) Printable Recipe
2 1/4 cups all purpose flour
3/4 tsp baking soda
1/2 tsp salt
1 cup unsalted butter, slightly softened
1/2 cup sugar
1/2 cup brown sugar, firmly packed
1 egg
Zest of 2 oranges
1 cup white chocolate chips
Preheat oven to 350 degrees. Line cookie sheets with Silpats or parchment paper. In a large bowl, combine flour, soda, and salt. Stir together and set aside.
In a large bowl, cream together butter and sugars until light and fluffy, about 3 minutes. Add egg and beat until combined. Add flour mixture and beat on low speed until well incorporated. Add orange zest and beat to distribute. Stir in chips.
Use a cookie scoop or tablespoon to drop in rounded spoonfuls on cookie sheets, leaving plenty of room between cookies to allow for some spreading. Bake for about 10 minutes until light golden brown. Cool about 1 minute on cookie sheets and then transfer to wire racks to cool completely.
Eat, enjoy, repeat as necessary!
Amber
(adapted from The Magnolia Bakery Cookbook)
Subscribe to:
Posts (Atom)


