
Chai Panna Cotta with Honey Jelly- DB Challenge

The February 2011 Daring Bakers’ challenge was hosted by Mallory from A Sofa in the Kitchen. She chose to challenge everyone to make Panna Cotta from a Giada De Laurentiis recipe and Nestle Florentine Cookies.
I am late posting my DB challenge this month. Truthfully, the date just crept up on me until I realized it was the 27th, and I didn't have many of the ingredients I needed.
A quick search of the cabinets showed me that I could make the Florentine cookies, but I'd have to run to the store to make the Panna Cotta. Luckily, I was able to con my husband into being my errand boy. He' s so sweet. Most days:)
Anyway, once I was elbow deep in the baking challenge, I almost threw in the towel with the cookies. I started out by halving the recipe, because I didn't need a ton of buttery cookies sitting around on a Monday. Things were going well...until I forgot to half the amount for the last couple of ingredients. So that led me to a mad dash of dumping in another half of the first few ingredients, trying to even everything out. Are you following me? Have I confused you yet?
Well, somewhere along the way I must have messed something up, because my Florentines turned out thicker than I believe they are supposed to be. I decided to go with it anyway, and just dipped and drizzled a few with chocolate, instead of sandwiching them. They turned out OK.
The panna cotta was an experiment that turned out a lot better though. I substituted liquid chai concentrate for the milk, and the result was a smooth, creamy, spicy concoction that was very yummy. Since I pretty much ruined the cookies, I tried to salvage my pride by layering the chai panna cotta with a honey jelly - the layered effect was inspired here. I have to say, I was pretty proud of myself for the visual effect, even if the cookies were blah:)
Honey Jelly
(adapted from Kitchen Wench)
1 2/3 cups cold water
1/3 cup strongly flavored honey
3 tsp powdered gelatin
Chai Panna Cotta
(adapted from Giada De Laurentis)
1/2 cup cold liquid Chai concentrate (I used Taco)
1 1/2 tsp unflavored powdered gelatin
1 1/2 cups cold heavy cream
2 Tbsp + 2 tsp honey
1 1/2 tsp granulated sugar
pinch of salt
For the Honey Jelly: Pour the water and honey into a pot, and sprinkle the gelatin evenly over the top. Set aside for 5 minutes, then cook over low heat, stirring constantly until it begins to come to a boil and the gelatin is dissolved. Set aside to cool slightly.
For the Chai Panna Cotta: Place the chai concentrate in a cold pan and sprinkle the gelatin evenly over the top. Set aside for 5 minutes. Now cook the chai mixture over low heat, stirring constantly until the gelatin is dissolved, about 5 minutes. Do no let the mixture boil. Combine the cream, honey, sugar and salt, then pour over the gelatin mixture. Cook over medium-low heat, stirring occasionally, until the honey and sugar is dissolved and the mixture is hot, but not boiling, about 5-7 minutes. Set aside to cool slightly.
~ Divide half of the honey jelly between 4 glasses. So you will pour about 1/8 of the mixture into each glass. Carefully place the glasses in the fridge and chill for 30 minutes - 1 hours.
~ When the first layer of honey jelly is set, carefully pour 1/8th of the panna cotta mixture into each glass, over the honey jelly. Carefully place back in the fridge for 30 minutes - 1 hours to set. Repeat with a layer of honey jelly, followed by the panna cotta. When completed, you should have 4 layers, alternating honey jelly and panna cotta. Place back in the fridge for the final layer to set.
When ready to serve, remove from fridge and let sit at room temperature for a few minutes. Enjoy!


The Best Homemade Flour Tortillas

There are a few recipes that each cook has in her arsenol, that turn out perfectly without fail. You know the ones, they are usually referred to as a "go to" recipe. Well, this is my "go to" recipe for flour tortillas that I've used for years. I've tried several, and while each one was good, it didn't leave me remembering how perfectly soft and delicious each one was. Like this one.
Some of you may think to yourself, "Why would I want to make my own tortillas?" Sure, you can hop in your car, drive to the store, and pick yourself up a bag of ready made ones. But where's the fun in that? Besides, the store bought tortillas are filled with preservatives and who knows what. These homemade ones are filled with simple ingredients and you know exactly what's in it.
Do I even need to bring up the most obvious point? Have you ever tasted a homemade tortilla? It tastes supremely better than anything old Wally World could serve you. Trust me on this. If for some reason you're one of those people, and you find making these is too much hassle, you can always make up a bunch and freeze them. Or give me a holler and I'll make some up for you. I only charge $100 per tortilla :
Joking aside, these really are simple to make and taste delicious. They keep very well and maintain their supptleness, without turning dry and stiff. Try them, you might never buy a bag at the store again:)
Homemade Flour Tortillas
(Prep: 30 min; Cook: 12 min; Servings: 12)
2 cups all-purpose flour
1 teaspoon salt1 teaspoon baking powder
1 tablespoon shortening
1/2 cup water
In a large bowl, combine flour, salt and baking powder. Add shortening and cut in with a fork, mix well. Add water and mix. If needed, add more water a tbsp at a time, until it comes together. I usually add about another 1-3 Tbsp.

Divide the dough and roll into 12 balls, let rest for 15 minutes.

Take a dough ball, and flatten with the palm of your hand. Roll the dough out on a lightly floured surface, or I like to use a silicone baking mat. Roll the dough out very thin, until it becomes transparent, turning the dough a quarter turn with each stroke. It will be about 6 inches in diameter when finished.

Heat your skillet over medium heat, then place the tortilla in the skillet and cook the first side for about 20-30 seconds, until it just begins to turn golden. Flip and cook the other side for 20 seconds. Place cooked tortilla in a ziplock bag to stay warm while cooking the other tortillas. The steam from the cooked tortillas in the bag will prevent them from drying out.

*Tip: The secret to getting soft tortillas, is not cooking them for too long on each side. I cook mine for exactly 20 seconds each side over medium heat. After I have several tortillas cooked, I turn the heat down a little since the pan continues to heat while cooking. I roll and cook each tortilla separately. I find if I roll all of my tortillas first, the dough is so elastic that the tortilla will shrink up and become thicker than I want. If you want to roll all of the tortillas out first, you may need to reroll each one a little before cooking. These keep very well for several days in a ziplock bag.

Slow Cooker Chicken Taco Chili

I have a soft spot for baked goods. I think this fact is a little obvious by the majority of what I bake and post about here. Give me some sugar and flour and I'm a happy camper. However, I can enjoy a good salad or a perfectly roast chicken too, and I'd like to bring a little balance to my recipe box. A quick look at my recipe box shows my main course selection as a tiny blip, compared to the ever increasing list of cakes, pies and cookies.
I must admit that I find my enthusiasm for making dinner dwindling, when I have to work around a husband who is just a tad picky. There's only so many times a girl can make tacos or spaghetti before getting bored. I refuse to give in though, and continually present my family with new dishes, hoping with fingers crossed that I have found an acceptable variable to throw into the weekly mix. Sometimes my efforts are met with a thumbs down, but sometimes I'm given an astonishing thumps up.
This was the case when I came across a recipe I wanted to try. I was looking for something healthy but flavorful, something that would fit in with our healthy eating attempts. This dish is a hodgepodge of flavors that happens to work very well. I adapted it a little to suit our tastes, and the result was a new favorite dish for my husband. I call that a success! This Slow Cooker Chicken Taco Chili can be served over rice, tortilla chips, or you could even use it as a filling for a burrito. I bet it would make killer nachos too!

(adapted from skinnytaste)
Prep: 5 min; Cook: 8 hr; Servings (1 cup): 8
1 onion, diced (optional)
1 8-oz can pinto beans
1 8-oz can kidney beans
1 8-oz can black beans
1 8-oz can tomato sauce
1 8-oz can corn
1 (14.5-oz) can diced tomatoes w/chilies
1 packet taco seasoning
1 tbsp cumin
1 tbsp chili powder (can reduce this amount for less spiciness)
2 garlic cloves, minced
3-4 boneless skinless chicken breasts
1 package shredded cheddar cheese
Combine beans, onion, corn, tomato sauce, cumin, chili powder, garlic, taco seasoning in crockpot. Place the chicken on top and cover. Cook on low for 8-10 hours or on high for 6-8 hours. Before serving, use a fork to shred the chicken, and stir to mix.
Serve over cooked rice and top with shredded cheddar cheese.
Tip: This is also great topped with fresh cilantro, sour cream, and jalapenos. It keeps very well in the refrigerator and tastes even better the next day. For additional flavor, squeeze a little fresh lime juice (to taste) into the meat and stir. Note: I buy chicken breasts that are naturally raised, so they tend to be on the small size. If your chicken breasts are large, you may only want to use 2-3 chicken breasts. Enjoy!
Amber

Fresh Cranberry Lime Scones

I've been wanting to make scones for a while now. They are a comfort food for me and remind me of home. Today was a good day for me to make this particular comfort food, as it is the anniversary of my brother's death. It has been 17 years, and although it seems like a lifetime ago, it can also be very fresh at times. As a twelve year old girl it was the hardest thing I had ever had to deal with, but now that I am a mother I can truly feel empathy for my what my parents went through. So this recipe today is for them, to let them know that I'm thinking of them:)
Back in Wales, a scone (pronounced "Scon") is a little round affair served with a slather of butter, or a dollop of clotted cream and fresh jam. They are not the dry, crumbly, triangle shaped mountains you see at certain coffee franchises and book stores. These are the Americanized scones - which are good - but they are not your classic British scone. I'll have to save "The Classic" for another day, because the scones I made today are very flashy and American:)
I've had a bag of fresh cranberries sitting in my fridge for a while, and I couldn't decide what to do with them. I also had a couple of limes, resting quietly on the cranberries, minding their own business. Little did they know that my brain was churning, and they were about to be zested and squeezed to within an inch of their life. Poor little fellows. This is how I decided to make Cranberry Lime Scones, filled with plump fresh cranberries and tart lime zest, then drizzled with a little lime glaze. They are NOT dry, and they ARE delicious.

Fresh Cranberry Lime Scones
Prep: 15 min; Cook: 15 min; Servings: 10
2 1/2 cups all-purpose flour
1/2 cup sugar (plus 3 tbsp additional for fresh cranberries)
1 tbsp baking powder
1/2 tsp salt
6 tbsp unsalted butter, cold and cut into pieces
2 tbsp freshly gated lime zest (about 2-3 limes)
1 1/4 cups fresh cranberries, coarsely chopped
1 large egg
1 large egg yolk
1 cup heavy cream
Lime Glaze:
2 limes, zested and juiced
1 cup powdered sugar
Preheat oven to 400F, and grease a large baking sheet. Zest the limes and set aside. Coarsely chop the cranberries and place in a small bowl with 3 tbsp of sugar. In a large bowl combine the flour, 1/2 cup sugar, baking powder and salt. Cut in the butter with a fork or pastry cutter until the mixture resembles coarse crumbs. Stir in the lime zest. Stir the cranberries into the flour mixture. Combine the egg, yolk and cream, then add to the flour mixture, stirring just until combined.

On a well-floured surface with floured hands, gently pat dough into a 1-inch-thick round (about 8 inches in diameter). With a sharp knife cut the round into thirds one way, then make perpendicular slices the other direction to make diamond shaped scones. Depending on how you slice them, you should get about 10-11 scones. Use your hands to gently shape any leftover scraps into scones. Do NOT roll dough out. Place scones onto a greased baking sheet. Bake for 15-20 minutes or until lightly golden. Remove from oven and let cool on a wire rack.
For Lime Glaze: In a small bowl combine the lime juice, lime zest and enough powdered sugar to reach your desired consistency. Drizzle glaze over warm scones and allow to cool.
Tips: When making scones, it is best to handle the dough as little as possible. Stir just until the wet ingredients are incorporated into the dry. Use your hands to pat the dough into a circle, don't roll the dough out.

(dough base adapted from Gourmet)
Valentine Fortune Cookies

I'm a sucker for most holidays. During December you will see me giggling with glee, as I make my husband trek up to the attic in search of my boxes of holiday wonder (aka, Christmas decorations). He faithfully does his duty, perched precariously on each attic board designated as "safe", to prevent
In November, I start scouring my cookbooks to plan the big turkey day meal, and browse the internet for fun table decorations that I always say I'll have time to make, but never do. July 4th is the epitome of Americana here; Red, white and blue, stars galore, strawberry pie and sparklers too:) This balmy summer night, we sit in our very classy walmart brand lawn chairs, to watch the fireworks overhead and set off our "city approved" fountains in the driveway. See what I mean? Holidays are fun.
Valentine's Day has never really been a big deal at our house though. Why? I don't know. Maybe because we get tired of being saturated with red hearts and pink polka dots the second that Christmas is over. Maybe we think it's ridiculous how much restaurants charge for a meal on this day. Maybe we're just crotchety Valentine's scrooges:) Don't get me wrong, we still celebrate it in our own way, we just don't shower ourselves in copious amounts of roses and giant boxes of chocolate. While way shy away from some of this holiday's festivities, there's no denying how much I love my family, and I love to show them in my own way- like these Valentine's Fortune Cookies:)
I thought it would be fun to create something with my son for a Valentine's post, and we turned out these super cute Valentine's Fortune Cookies. They are quick and fairly simple to make, are a great kid friendly activity, and chances are you already have most of the ingredients in your kitchen.

Valentine's Fortune Cookies
Prep: 5 min; Cook: 12 min; Servings: 24
1/2 cup all-purpose flour
1 tbsp cornstarch
1/4 cup sugar
1/4 tsp salt
1/4 tsp ground cinnamon
1/8 tsp ground nutmeg
1/4 cup vegetable oil
2 large egg whites
1 tbsp water
1 tsp vanilla extract
semi sweet chocolate chips for melting
red decorator sugar
heart shaped sprinkles
paper and pen to write your valentine notes
In a medium bowl whisk together the flour, cornstarch, sugar, salt, cinnamon, and nutmeg. Add the oil and egg whites, whisking until smooth. Whisk in the water and vanilla.
Drop a rounded teaspoon of batter onto a well-greased baking sheet. Using the back of a spoon or an offset spatula, spread the batter into a 3" circle. Repeat with another rounded teaspoon of batter. Bake at 300F for 8 to 12 minutes or until lightly golden. The cooking time will depend on your oven, mine were done at 8 minutes. If the cookies break when you are trying to shape them, try cooking them for less time.
Working quickly, immediately remove each cookie from the pan with a spatula (an offset spatula works well), and flip over into gloved hand. Place your prepared valentine message in the center of each cookie and fold each cookie in half. Grasp the end of each cookie, and place over the edge of a bowl, pulling the edges down to form a crease. Place cookies, ends down, in a muffin pan to maintain shape while cooling. Let cool completely. Repeat procedure with the remaining batter, baking only 2 cookies at a time.
To Decorate: Microwave the chocolate chips in a small bowl at medium power for 2 minutes, stirring every 30 seconds. Dip the outer edge of the cooled cookie into the melted chocolate, then into decorator sugar or sprinkles. Place on waxed paper to let the chocolate harden. You can place the cookies in the refrigerator for about 15 minutes to harden the chocolate faster.


Happy Valentine's!
New York Style Coffee Cake

Well, the snow continues to fall here in the Ozarks, and like a bear I have been hibernating inside my cave (read: house). Unlike a bear, however, I have not been packing on my winter layer of fat:) I have endured my healthy week, which included daily trudges to the gym and countless moments of questioning my sanity. But at the end I was happy to be able to indulge in this yummy treat over the weekend. A moist coffee cake with a slightly gooey center, sitting on a shortbread like crust. It was well worth the wait!

Prep: 15 min; Cook: 45 min Servings: 9
2 cups all-purpose flour
2 tsp instant coffee granules
2 cups firmly packed light brown sugar
1 tsp ground cinnamon
1/2 tsp salt
1/2 cup (1 stick) unsalted butter, cut into pieces
1 (8-oz) container sour cream
1 tsp baking soda
1 egg, lightly beaten
1 cup chopped pecans or walnuts
Combine the flour and coffee granules in a large bowl. Add brown sugar, cinnamon, and salt. Stir well. Cut in the butter with a fork or pastry cutter until mixture resembles coarse crumbs. Press half of the mixture into a lightly greased 9" square baking dish. Set aside.

Bake at 350F for 45 minutes. Cool and cut into squares. **Note: When the cake is removed from the oven after 45 minutes, the center will still be slightly jiggly to the touch. This is okay. After cooling, the center will set up and the texture will be moist. If you bake longer, your cake will dry out.

(adapted from Southern Living Ultimate Christmas Cookbook)
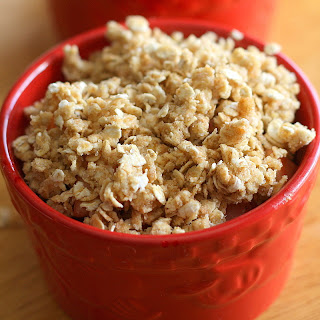
Strawberry Apple Crisp

I almost succumbed to temptation today. Almost. I have planned to make a particular calorie laden dessert for my weekend treat, but being snowed in with this midwest blizzard had me itching to make it today. Instead of giving in to temptation, I settled on a compromise instead. A dessert surely, but a lighter one with a substantially lower amount of calories and fat. I scavenged through my refrigerator and cabinets to see what I could make, and settled on a Strawberry Apple Crumble Crisp. I used sweetener in the fruit, and not much sugar and butter in the topping, so the final outcome was something that soothed my sugar craving nerves, but kept my scale happy:)

Strawberry Apple Crisp
(preparation time: 10 minutes; cook time: 20-25 minutes; servings: 2)
Filling:
1 1/2 cups sliced strawberries (fresh or frozen)
1 small apple, peeled, cored, and diced
lemon juice
1/2 tsp ground cinnamon
1/4 tsp ground nutmeg
1/8 tsp vanilla extract
1 tsp cornstarch
3 packets Truvia sweetener (or sweetener/sugar of your choice)
Topping:
1/4 cup oats
1 1/2 tbsp whole wheat pastry flour (all-purpose and whole wheat is fine too)
1 Tbsp brown sugar
pinch salt
1 Tbsp butter (or reduced fat spread if you prefer)
Preheat oven to 400F. In a small bowl combine the oats, flour, brown sugar, and salt. Mix in the butter until mixture forms coarse crumbs. Set aside.


In a medium bowl combine the diced apples and sliced strawberries. Squeeze a little fresh lemon juice over the fruit to keep the apples from turning brown. Add the cinnamon, nutmeg, cornstarch, sweetener, and a few drops of vanilla. Stir until combined.

Divide the fruit between two ramekins. Sprinkle the crumble topping over the fruit. Bake at 400F for 10 minutes, then lower the oven temperature to 350F and bake for another 10-15 minutes, until the topping is golden and the fruit is bubbly.

My little helper kept sneaking into my photos. He wanted some of this crisp very badly.

And was happy when he finally got some:)

(Nutrional Information per serving: Calories: 170; Fat: 3g; Carbs: 34g; Fiber: 5g; Protein: 3g)
Subscribe to:
Posts (Atom)


